OpenText - TX-1 Hardware Disk Imager
by Jon Munsey - February 2021
Welcome to this CFRO review, if you are new here this review is probably not what you are used to reading, they are very long, littered with tangents and full of rants when a serious bug is found.
If that sounds like your cup of tea, put the kettle on and sit down for a long read, if not, here is a link to SC Magazine where it's all smiles, sunshine and vendors pay for the review :)
As you know, CFRO prides itself in being totally independent, no money changes hands.
1. Introduction:
Today on the CFRO chopping block we have the current hardware based disk imager from Guidance Software/Tableau/Opentext or whatever they are called these days.
I've been handed a shiny new TX1 by Steve Gregory the EMEA Sales Manager at OpenText, who is a true veteran of the digital forensics industry over here in the UK and an old acquaintance of mine from days of old. He may not be speaking to me at the end of this review, as I have no idea if the TX1 is any good at this point and no one gets special treatement here - as this is the warts and all review website!
Long Term Test:
The TX1 has gone back to OpenText, but I have had it on test for around six months, so I have well and truly poked, prodded and fiddled with it in true CFRO long term style.
To be honest "her indoors" has had enough of this on the kitchen table for hours on end, so perhaps it is a good thing its gone back - as the fans are very loud.
Its been an interesting journey with the TX1.....
Anyway, enough waffle, you know how this works by now (well, if you don't go here and read how the review system works) - so lets get on with the show.
2. Product Overview & Pricing:
The TX1 is what your humble reviewer would call a "hardware imager", meaning it is an all-in-one unit that you connect hard drives, SSD's, network shares and other things to (such as USB devices), in order to make a forensic copy of the data.
You can even hook up Apple devices to the TX1 using the Target Disk Mode found on such machines, if you really wanted to.
This is as opposed to a software imager product (Like Encase Imager (yuck), FTK Imager (yummy) or something like Guymager (also yummy) found on a forensic linux distro which a) puts hair on your chest and b) boots the suspect machine in a read only mode from a USB stick - such as CAINE, DEFT or if you are a Windows junky WINFE.
You can go here and read all about the TX1 on the OpenText website, but thats boring and is full of corporate schpeel - I'm not a fan of vendors blowing trumpets, I like the real deal, so do yourself a favour and read this review first !
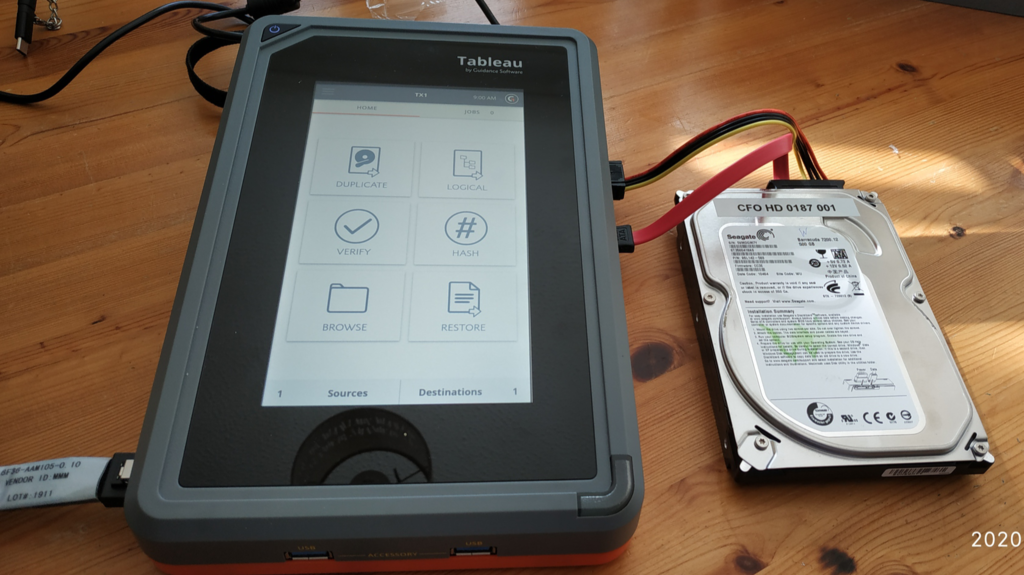
Anyway...behold....the TX1, as designed by Fisher Price (only kidding, but the colours do remind me of childhood toys!!);
 TX1 on OpenText Website
Pricing:
The TX1 in base form comes in at £3,065 + VAT in the UK (around $4200 or €3,480) we will explore what the base kit contains shortly. The UK reseller is Avatu and you can see their product page (and online shop) here. I've dealt with them for years - back in the day when they were Data Duplication.
If you want some extra value, you can also purchase the "Investigator Kit" - which contains the TX1 base kit, plus a myriad of drive adapters for the TX1 (which we will also cover later) from Avatu for £4,289 + VAT €4880/$5,909.
US customers may be able to shave a few hundred bucks from these prices, by visiting the Digital Intelligence website here for native US prices. The DI website is beautiful - whoever designed that well done.
You don't have to buy everything in kit form, so we will be exploring individual pricing of items later in the review.
That's quite a sizeable amount of coin, but when factored into the charges you are making to image drives for customers - the unit will soon pay for itself over and over again!
Warranty:
The TX1 comes with a really nice 3 year parts and labour warranty - which is reassuring at this price point. Be warned though - the drive adapters only come with a 1 year warranty, which is odd, as they are nuclear holocaust proof.
Technical Support:
The TX1 is backed up by initial support from the reseller and the subsequently direct dialogue with OpenText for issues that the reseller can't resolve. The people that were dealing with my queries during the review knew what they were talking about - so you should get stellar support in the face of issues that you encounter during your TX1 ownership.
3. Feature Overview:
The TX1 is a bit of a swiss army knife, in true cut and paste style see below the entire, exhaustive, seriously long feature list as lifted from the TX1's user manual.
I've had to cherry pick the features I have tested as there are so many, testing them all would be impractical.
The TX1 has a whopping user manual, some 200+ pages! Before you use this unit in the wild, read the whole thing - because this is not a simple device and there are gotcha's and limitations that will bite you firmly on the ars€ if you are not aware of them.
No one wants to look like a numpty when on-site and something happens that you don't understand!
The manual is a thing of beauty, I am a real stickler for accurate documentation - that is up to date and has enough depth to explain all features at a basic level, to help you in a pinch.
OpenText deliver here and this manual is right up there with the stuff that Sumuri and other passionate vendors pump out with their products (Paraben also springs to mind).
You can download the manual from the sprawling god-awful OpenText website here.
The OpenText Website Rant:
Out of all the vendors websites I have visited - theirs is the worst site in the world for finding anything.
If you remember what happened when HP merged with Compaq all those years ago, this is exactly what has happened here. Broken links everywhere, possibly the worst search feature I have ever seen - which takes you to even more broken links - its just a gigantic, painful sprawling mess.
Thank god most forensic vendors are still small to medium sized businesses, with sensibly sized websites and I don't need to call Doris Stokes when I need to find something or register to download a product or licence. I only visit their site when I absolutely have to - its that bad.
To give you an example of how badly mismanaged the OpenText website is, I tried to download the latest manual for the TX1;
 Your guess is as good as mine as to which version this is.
I ended up on a page which says the 200+ page manual is 19 pages in length and took me to the outdated version 20.2 of the manual.
At the time of writing the latest version of the documentation is actually 20.4. Digital Intelligence (a reseller) has their act together and you can download that latest 20.4 manual here.
I would have an extreme sense of humour failure if I was in the field and urgently needed the latest manual from OpenText - so whoevers responsibility this is, please fix this for your customers who could be in a real urgent need when they try to download it.
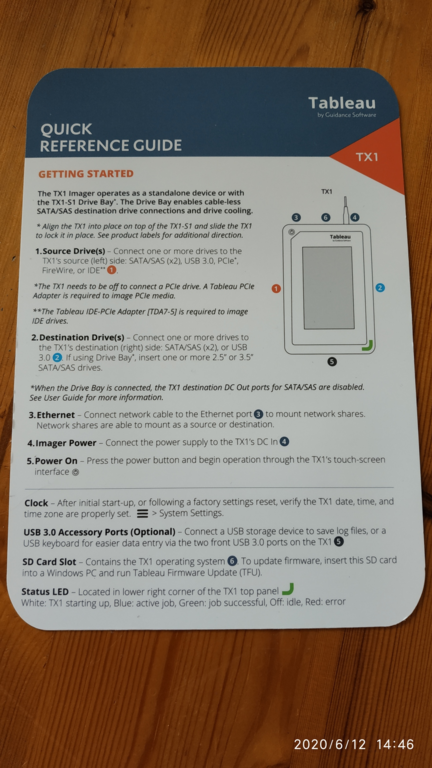
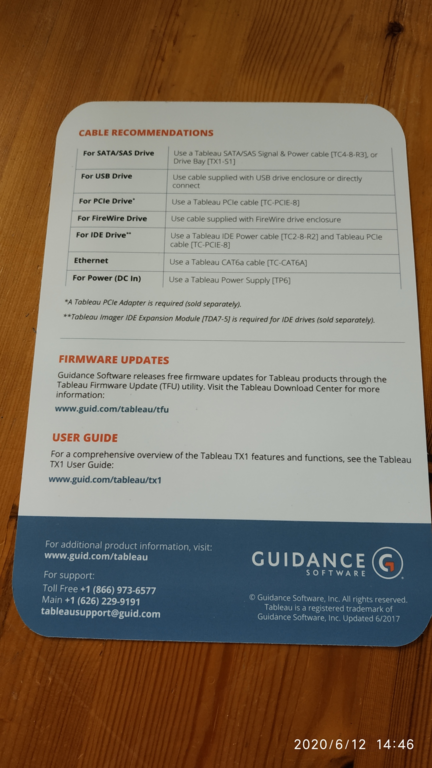
Quick Start Guide:
In addition to the manual (which is download only) is a handy printed quick start guide (shown below), which is ideal if you have used a hardware imaging device before - as it covers the basics and you will soon be up and running. Yes you read that correctly, actual printed words and numbers on a piece of paper in 2021, I am impressed.
Whoever wrote the quick start guide has an eye for detail - it also tells you the exact drive adapter or method to use for various evidence types (more on that later). So OpenText are off to a good start, scoring well in the documentation section.
5. Unboxing & First Impressions:
The TX1 is shipped in an optional rugged Pelican case, the type you could throw off a sky-scraper if you could not be bothered to carry it down the stairs with you - its water proof, shock proof, b0m_b proof and is guaranteed to get you stopped at the airport for a quick cavity search.
It's nice to see that they are using genuine Peli cases, the cheaper Chinese knock-off cases can leak and cause condensation in aeroplane holds or hot climates (they have inferior breathing valves, poor rubber seals and flex under heat/cold) so bonus points to the engineer who decided this was the best way to package the TX1.
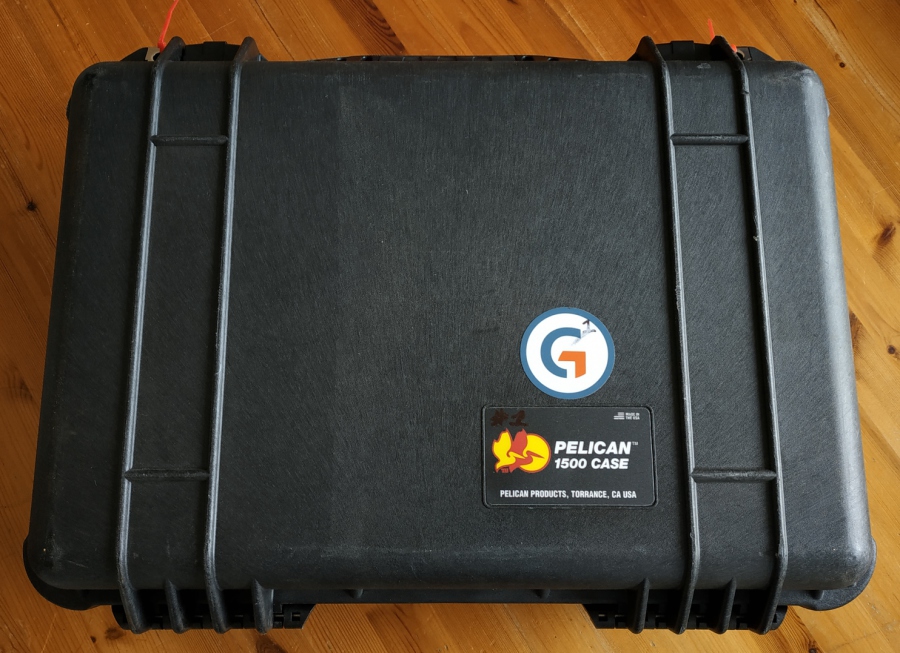 Peli case hiding the TX1
 Inside view of the case
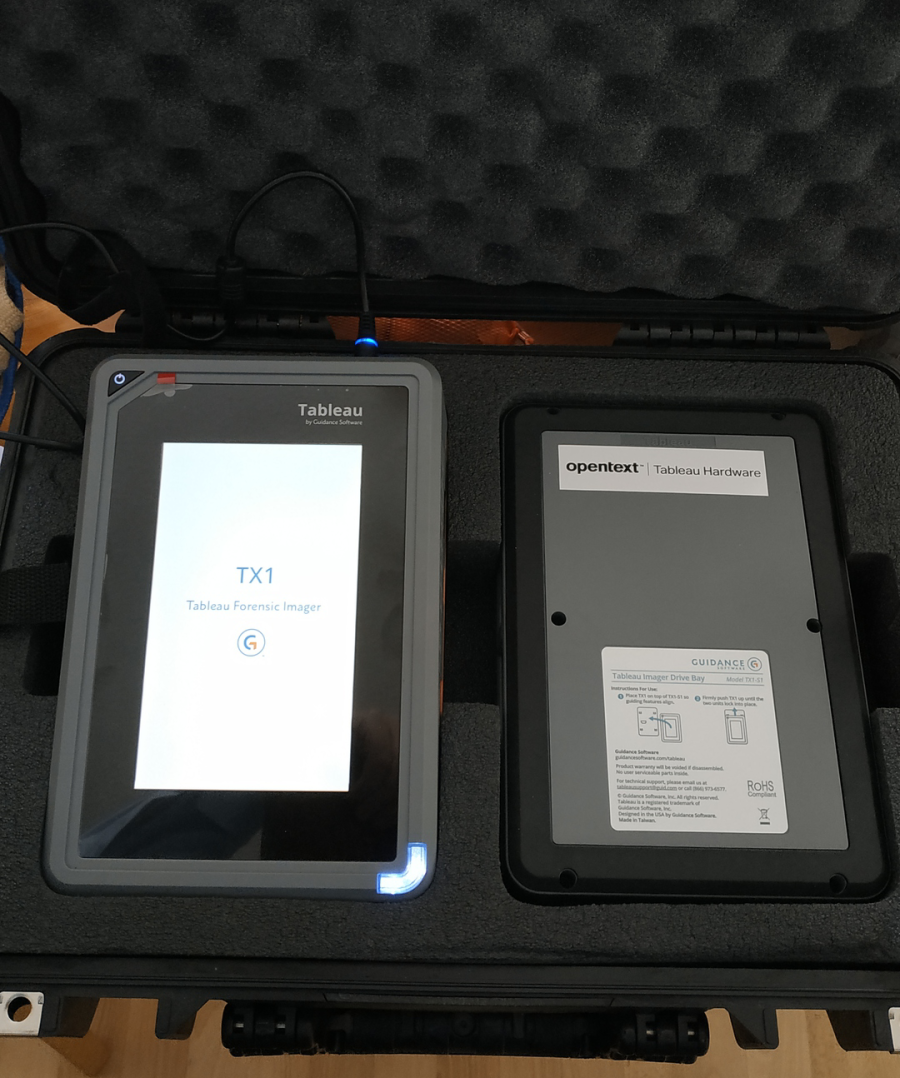
Honey I Shrunk the Screen:
So, first impressions count - and I can honestly say that I have not seen screen bezels this thick since I bought my parents an "Ebay special" digital photo frame about ten-years ago.
Its an odd choice for a premium unit to feature such a small screen (when there is a lot of real-estate available in those crazy bezels) - but as the TX1 is not new by any means, perhaps quality LCD screens were expensive back when the unit was originally designed (around 2015/16).
OpenText state the panels resolution is 600 x 1024 which is sensible as that is not going to make text appear teeny tiny on that small screen (as a higher resolution high-definition such as 1080p 1920 x 1080 would).
Confusing Branding:
Check out the branding on the unit shown in the photo above, "Tableau" on the TX1's screen bezel, "Guidance Software" logo on the boot screen and "OpenText" on the drive addon bay to the right of the main unit. I'd expect this from a tin-pot company building and selling these from their garage, but from a large corporation such as OpenText, I expect brand uniformity - this is just not professional - especially when the product costs thousands of pounds/dollars/crinkly bottom groats.
Just in case you didn't know Tableau is a brand owned by Guidance Software and OpenText purchased Guidance Software. So I assume thats why we have all these different names all over the unit.
I also suspect that they had a lot of inventory acquiried during the various takeovers and mergers and thought no one would notice if they cheaped out and just sold them as is - opposed to relabelling everything.
What Else is in the Case?:
Lifting up the top tray holding the TX1 reveals the neatly arranged laser cut foam tray (see below) which holds the rest of the gubbins that comes in a standard TX1 kit (which is not a lot - its all optional extras, covered elsewhere in the review).
I don't think we could could ask for better storage/packaging of the TX1, so make sure you pay the extra and get the Peli case! You won't regret it (well maybe on the second airport cavity search).
The TX1 comes with the following in its "bare" kit form (see below);
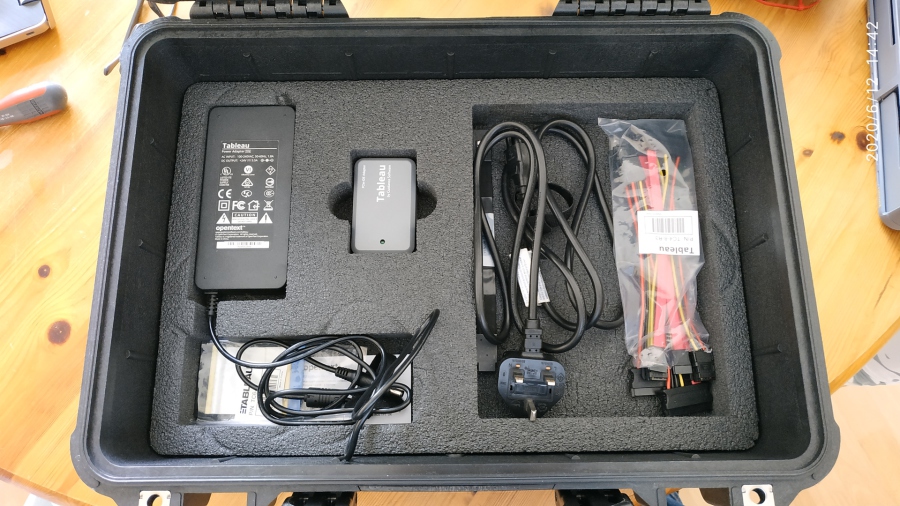
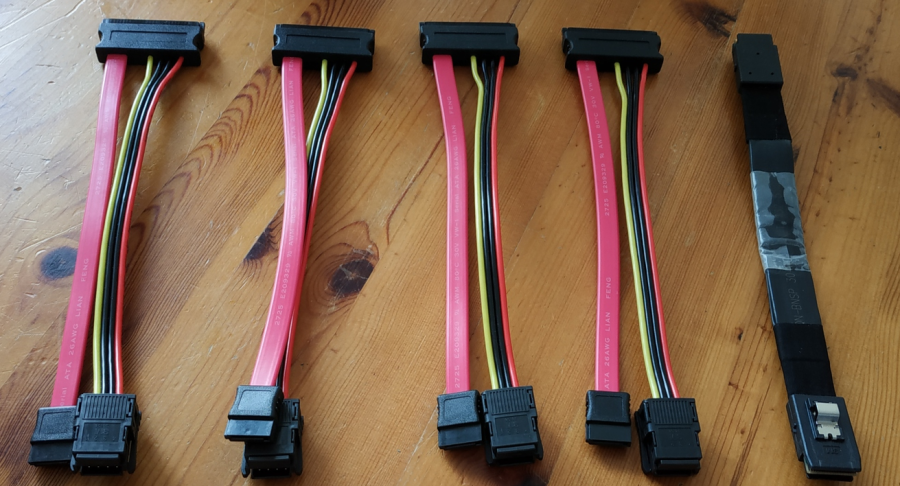
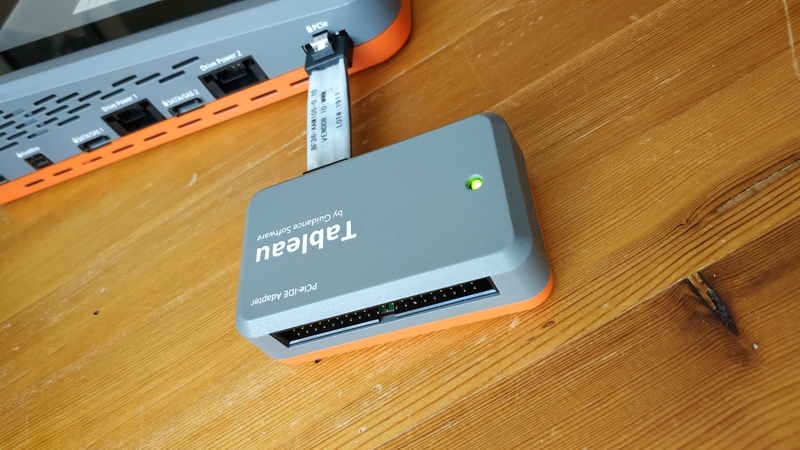
Enough here (above) to hook up 4 SATA or SAS drives via cable. The PCIe cable is used for expansion devices, but none come with the TX1 in the basic kit (the small grey box marked Tableau (top photo, middle of the box) pictured is an optional PATA adapter).
The black PCie cable shown (lower screenshot above) is not the one in the base kit, the supplied one is a lot shorter - so forgive me for showing the wrong cable in this photo. We will have some fun with that later....
The hard drive SATA/SAS cables are well designed and appear to have been made from plastics that would stand up to the duty cycle of them being connected and disconnected hundreds or thousands of times during the TX1's service life.
Its rather threadbare, the base kit - but personally I prefer it that way - as at least this way you are not paying for a bunch of adapters that you are not going to use - especially if you are a penny pincher like me.
Safety Features Baked In:
I powered the unit up in the case just to take a quick picture, don't do this with yours if you buy one - its not designed to be used in the case (the cooling vents would be blocked) and thats going to lead to a potential failure (due to overheating) during an image operation, or so I thought.....
After a bit of manual reading (make sure you read it here), its nice to see that an OpenText engineer has thought about this overheating issue and the unit has a temperature sensor built in, which warns you on-screen if the temperature of the unit is increasing. There is also a second "extreme" temperature warning which shuts the unit down [after a short countdown] to prevent any permanent damage from occuring.
This is a nice feature for the likes of you and I in day-to-day use, but not so good if you are Frodo Baggins imaging the Balrog's Panasonic tough-book laptop in mount-doom (its a wee bit hot in there!).
Great attention to detail OpenText, I like this!
Digging Deeper - On The Bench:
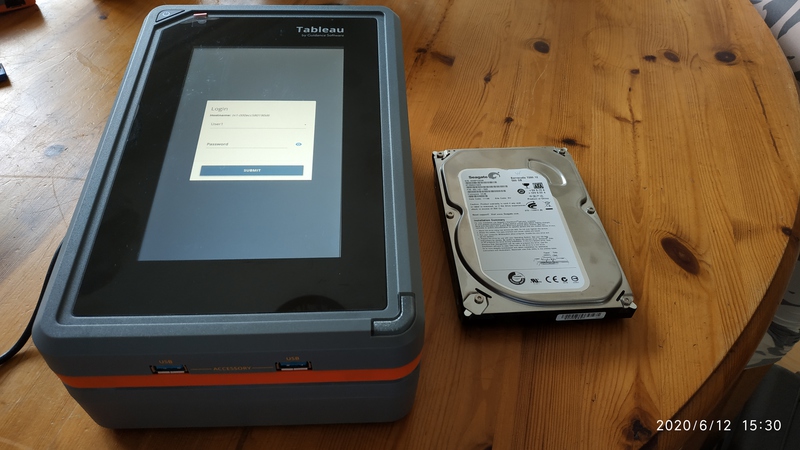
Lets take this out of the case and see what it looks like on the desk, as you can see from the 3.5" hard drive on the table in one of the pictures - this unit is not massive - you could easliy put this into an empty laptop bag and carry it on as hand luggage if you don't have space for the Peli case.
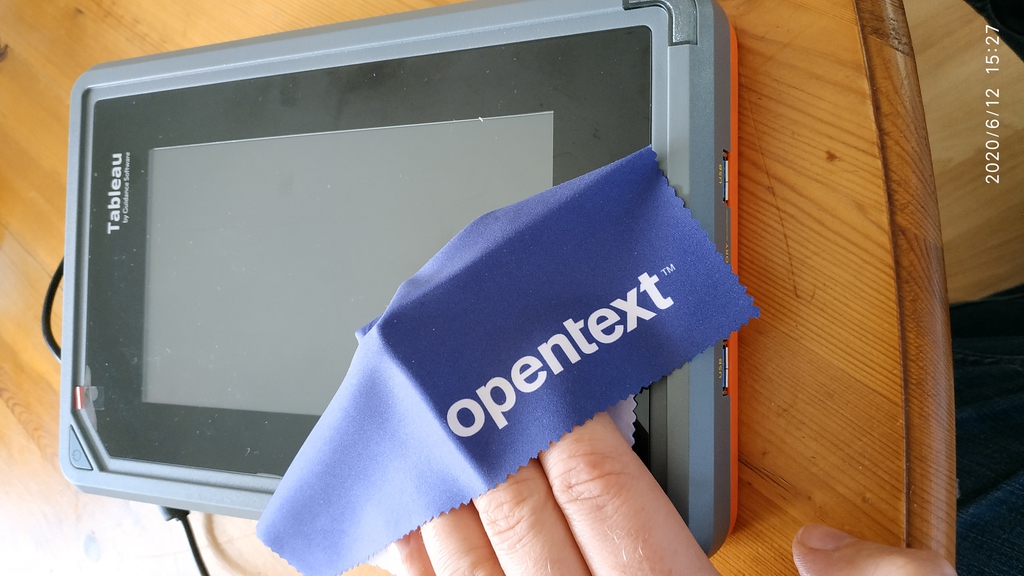
You will also see the screen cleaning cloth that comes with the unit, thats a nice touch!

Look and Feel:
The TX1 looks like it means business, it has a good amount of "heft" to it and has a very unique design aethstetic, its no ZX Spectrum as designed by the late Rick Dickinson, but it is certainly unique and stands out from the other units I have seen like this. I like it.
The plastic casing looks as if it has been injection molded (it looks far to complicated to be vacuum formed) and that would explain the distinct styling and general sturdiness of the unit.
The screen is multi touch capacitive (meaning its the same as the one on your phone and will be a pleasure to touch) and jokes aside about the diminuitive screen size, it does support pinch and zoom in the GUI, which allows the elderly and blind among us to read the ridiculously tiny fonts. Thats not quite the problem solver you would think - I'll come back to that later.
I need the pinch and zoom - I'm one of these crusty old dinosaurs that actually checks that the embedded serial number of a hard drive matches the label (experience has taught me that some don't) which I then hand write in my contemporaneous notes or case managment system (such as Monolith from Monolith Forensics, review in the pipeline..).
Destination Drive Expansion Bay Unit:
In traditional Tableau style, there is an expansion add-on unit that clips to the bottom of the main TX1 unit, just like the old TD3 below which was the TX1's predecessor.
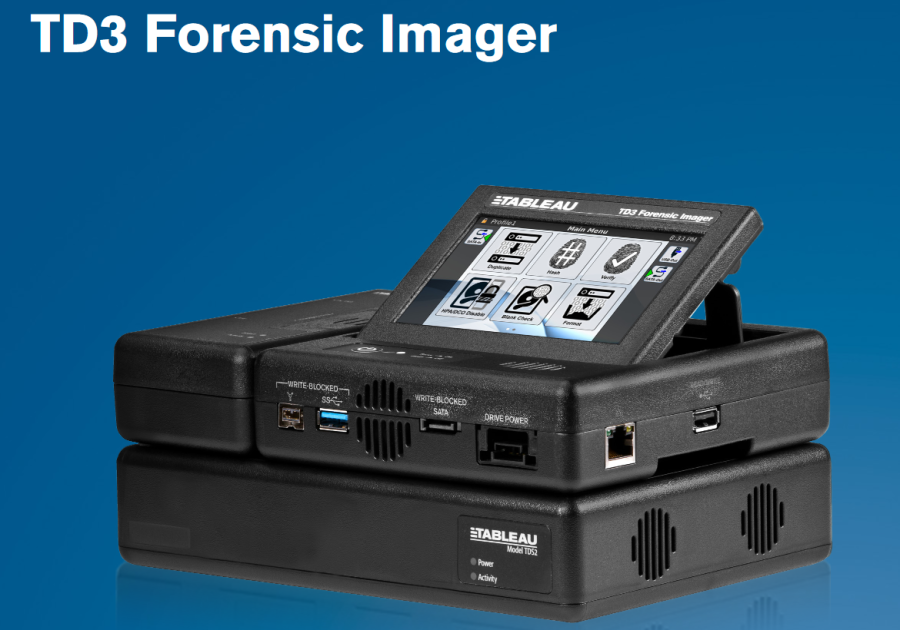 Previous Gen - Tableau T3 Imager
Lets look at that included expansion bay close up.
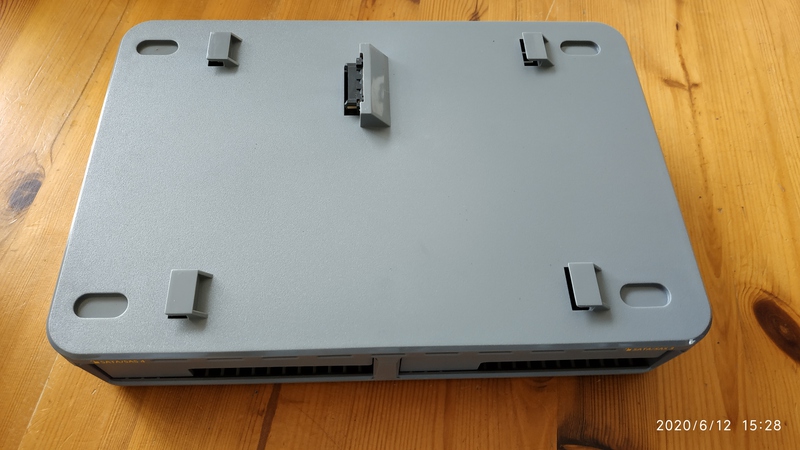
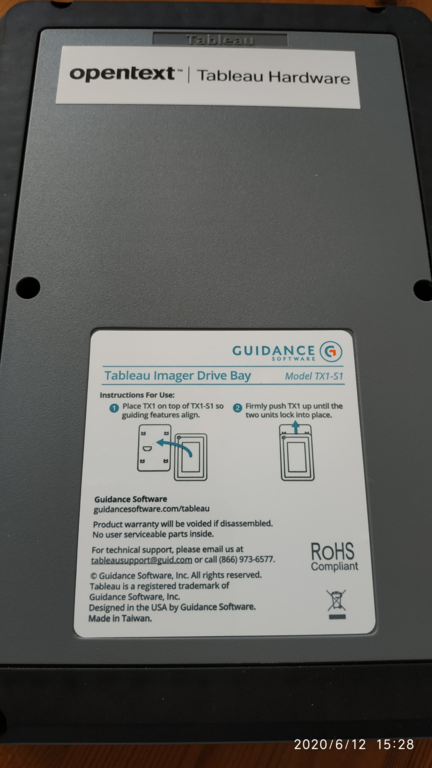
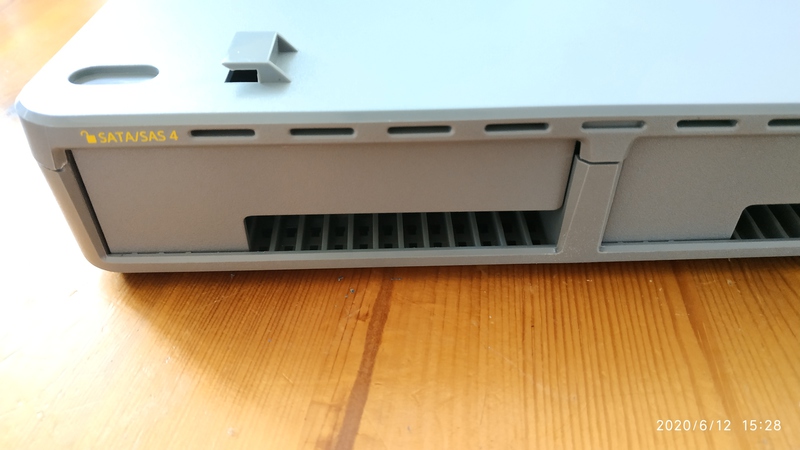
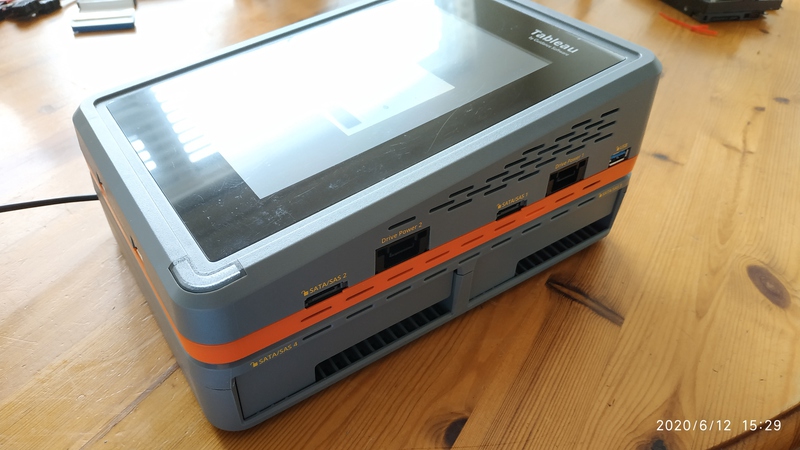
The expansion unit connects via a well designed connector and four securely interlocking lugs. This unit gives you the ability to plug in additional 3.5" or 2.5" SATA/SAS drives to store your disk images or other captured data on.
Its nice to have SAS functionality out of the box, so you can plug in drives from a clients server if you feel the need. In days gone by, add on units were required by hardware imaging devices to support SAS.
ProTip: Enterprise SAS drives use a different command set to a consumer SATA drive, if you want to learn about the differences read this article here. In short you can't connect a SAS drive to a SATA contoller, but you can connect (with some caveats) a SATA drive to a SAS controller.
This base expansion unit is included in the TX1 base kit, which definetely increases the value (and usability) of the unit.
The base expansion unit sucks power from the main TX1 unit, so now we can see why the beefy high quality PSU is needed that we saw in earlier photos. I'll come back to the PSU later.
Automated Drive Detection:
This brings me on to the TX1's auto detection function, if you plug anything into it - that device will be powered on and be detected as a source, destination or accessory.
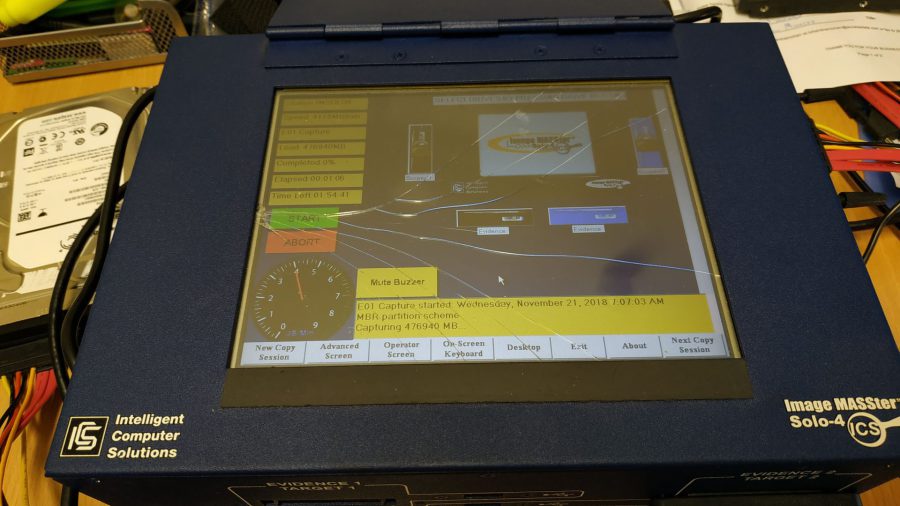
Im a control freak and I don't like this immediate auto detection of drives when they are plugged in, the best (and safest in my opinion) method of detecting drives plugged into a hardware imager was discovered around 10 years ago - check out that "Turning on Drives" line when starting an image on an old Image Master 3 below;
In other words, nothing gets powered up until you attempt to access it.
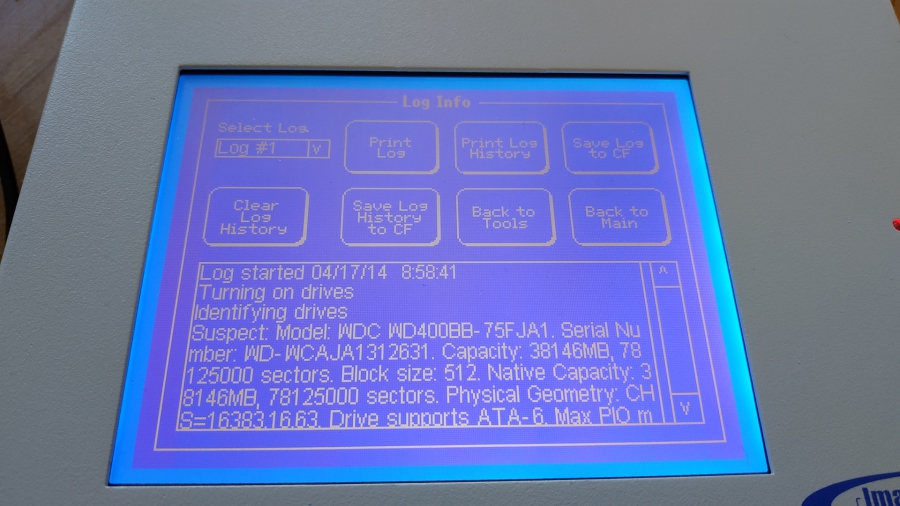 Image Masster 3 Solo - Proper Drive Control
Automation is for Generation Z:
I guess we live in a convenience world, where everything is done for the user so I can see why this was thought to be a good idea, however for me, this is one of the TX1's worst features.
I would like to see an option in the settings where auto drive detection (powering up) can be switched off - requiring you to press some kind of "refresh" button when in the source or destination menu - which would then spin up drives you have connected. This would solve the issue I have in a snap.
Maybe its me being pedantic and over cautious, but I'm set in my ways, it was burnt into me by my mentor many years ago to respect that small piece of metal inside a hard drive spinning away at several thousand RPM.
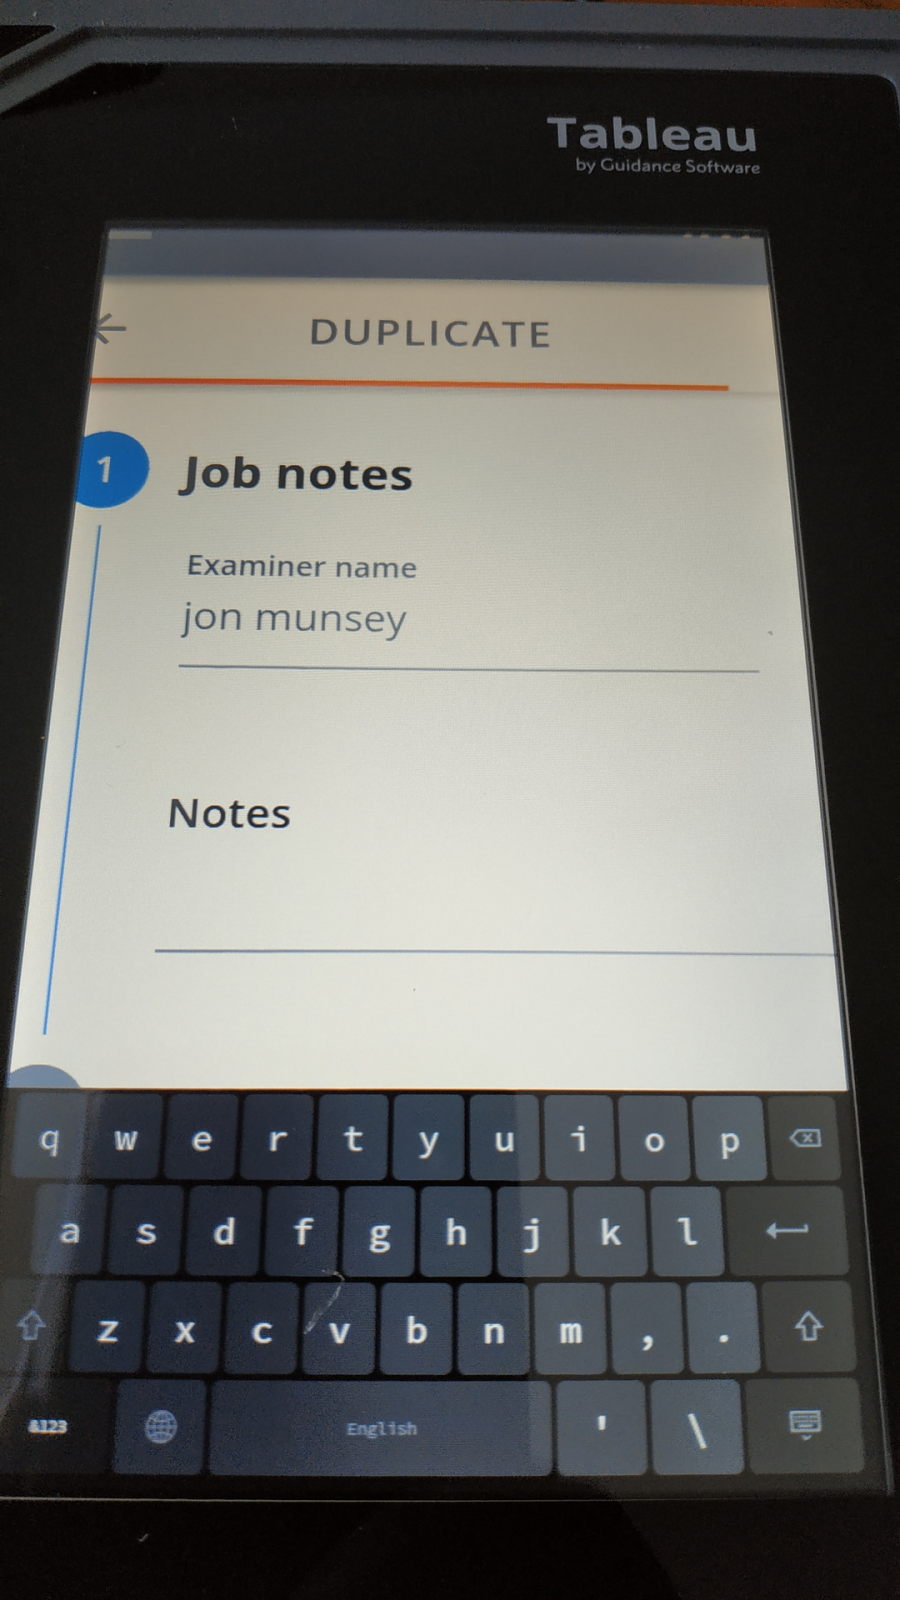
Return of the On-Screen Keyboard:
Hmmmm, I knew this bloody keyboard would come back to haunt me, so lets return to it now.
Here is where that first-gen Kindle Fire 7" screen starts to cause problems, my sausage like fingers continuously made me mistype when entering case details and reminded me of how frustrating a poorly designed onscreen keyboard can be.
 TX1 Onscreen Keyboard - Android 3.12 :)
I also discovered that when I was trying to see the details of a drive (an option in the menus) I constantly accidentally clicked the neighbouring "Eject" option instead - as there is no space between the two buttons in the menu. Nill points for the berk that designed this part of the GUI.
Another minor annoyance I found was that there is no automatic toggle of capital letters when typing, once you switch caps lock its on, its on until you switch it off - a real pain if you like to keep proper capitilisation of custodian names as one example.
I could not see any way to customise the keyboard - to make the letters larger - so I was shackled with this and spent most of my time swearing out loud - correcting typos for the duration of the review.
I would not want to use this onscreen keyboard onsite day-in-day out I can tell you!
We all use quality on-screen keyboards every day, be that on Android or Apple devices, so how OpenText stuffed this up is a mystery to me. There is however a work around if you are fat like me....
External Keyboard and Mouse:
OpenText do allow you to plug in a USB keyboard and mouse to the TX1, so there is some reprieve available if you are a member of the fat finger club.
I've also heavily pinch zoomed the screen so that I can see what I am typing in [see below].
 Pinch and zoom (when the OS allows it!)
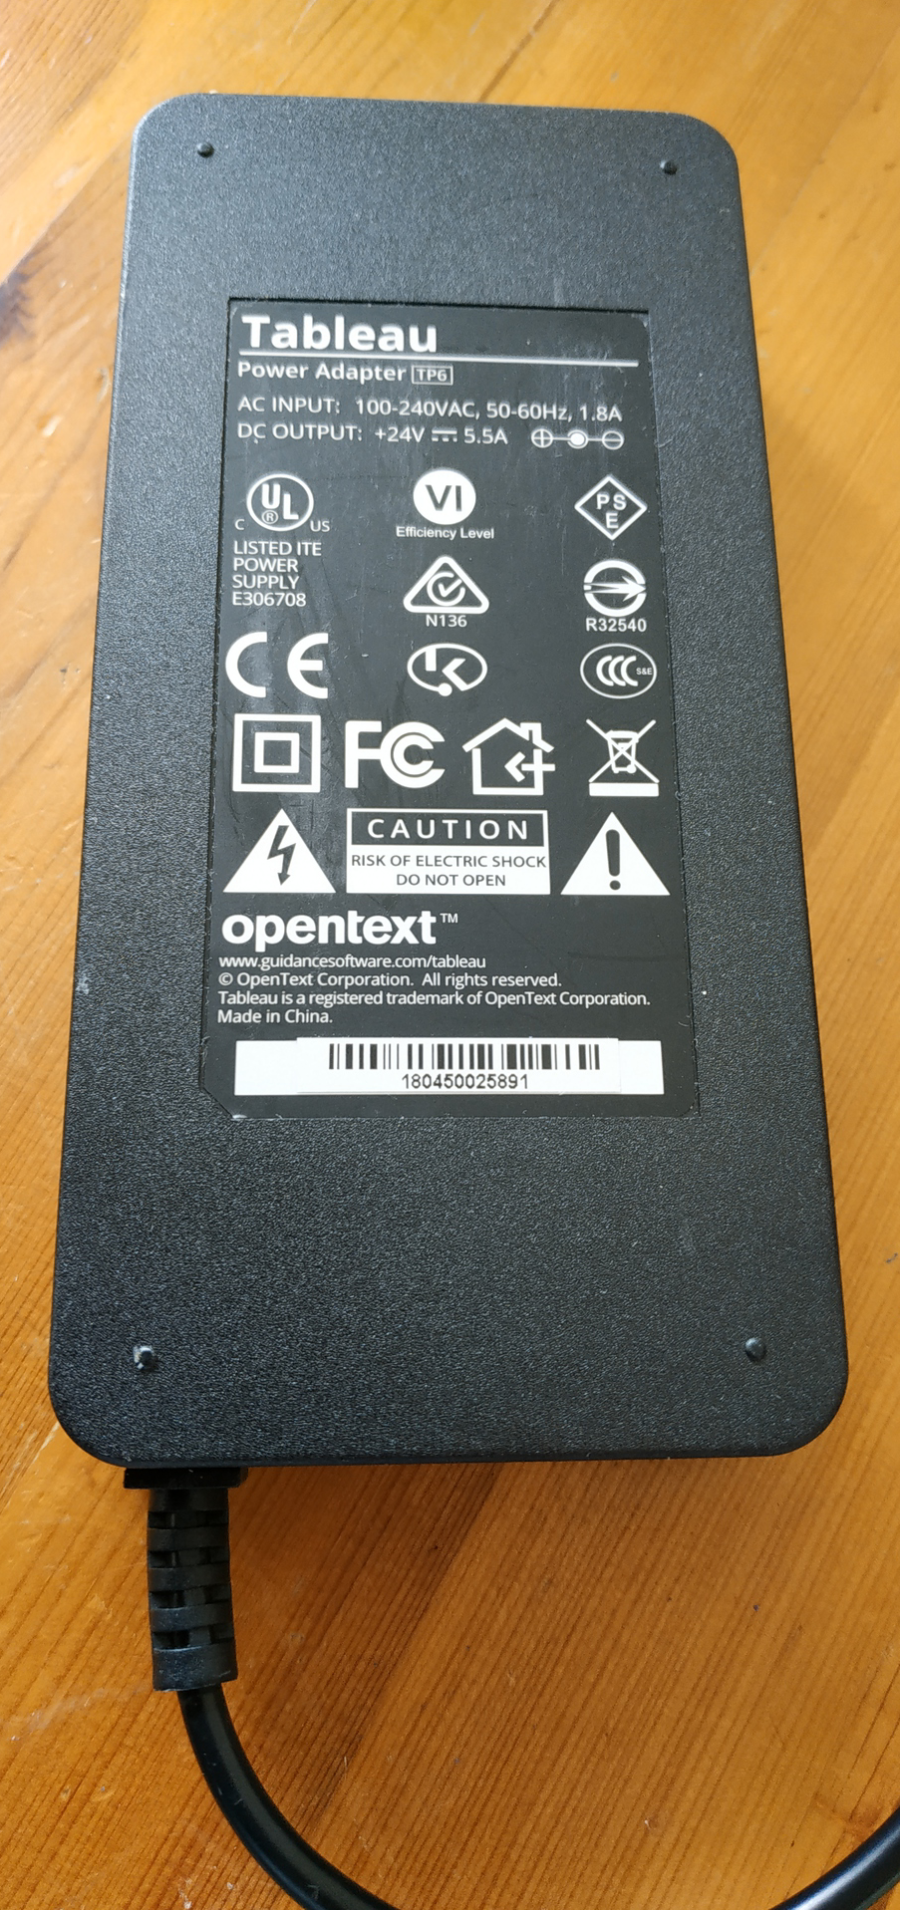
Power Supply Unit (PSU):
Checking out the TP-6 PSU of the TX1 reveals that corners do not appear to have been cut - we essentially have the usual high quality unit that has been a hallmark of the Tableau brand of old for many years.
For the electronically minded folk, the unit pumps out 24 volts at a maximum of 5.5 amps which is enough to support all of the combinations of hard drives and other devices you may attached to the TX1.
I would recommend purchasing a spare for redundancy if you are taking this onsite as your only imaging device, this is a proprietary unit and not something you can readily purchase at Radio Shack, Rumbelows or your local electronics store.
 TX1 - Quality Power Supply Unit - TP-6
The TX1 has an auto-switching voltage regulator built into its psu, so this works fine on 110v and 240v systems around the globe.
From a design perspective, on the bottom I would liked to have seen raised rubber feet (instead of the functionless dimples it has at present) on the psu, so that airflow is maintained under the supply when it is placed on a flat surface (such as an office carpet) - anything drawing potentially 5.5 amps is going to get mighty toasty under load (in theory).
So all in all, minor whinging aside, I'm happy - this is a great quality power supply unit and on paper will give you years of trouble free operation.
ProTip: Powersupplies can usually be judged upon their weight, a heavy power supply uses the old fashioned way to step down the power from the mains socket, to the DC voltage that consumer devices use (12V, 19.5v etc). These power supplies usually last a long time, as they have been engineered in a way that balances heat output, which stresses components. A lightweight powersupply, that you bought from E-Bay (which seemed like a good deal at the time) is usually a barebones switching power supply, that uses a micro controller to rapidly switch the incoming mains electricity on and off, very quickly, to reduce the voltage and convert the incoming AC to DC. These are the ones that get red hot when you use them - and are most likely to fail due to the breakdown of the components inside after prolonged exposure to the extreme heat. So rule of thumb heavy = good, lightweight = bad. Thats perhaps oversimplying it a bit, but its a good rule of thumb.
A Race Car in the Red:
As Vincent in Pulp Fiction once said "Its not good to have a race-car in the red" - so lets see what this power supply can do when we thrash it into the redline. I decided to give the unit a bit of a torture test, as we like it when things break here at CFRO!
So, deep breath... I hooked up;
2 x SAS 15000rpm drives in the underbelly expansion bay.
2 x 500GB SATA 7200rpm drives to the writeblock side of the main unit
2 x 500GB SATA 5400rpm drives to the non-write blocked side of the main unit
1 x 2TB USB3 5400rpm drive to the USB non-write blocked side of the main unit
1 x 2TB USB3 5400 rpm drive to the USB writeblock side of the main unit
plus a Keyboard and a Mouse in the accessory USB sockets, all at the SAME TIME.
This little lot may seem like an excessive amount, but when they are running, the power draw is not that high (relatively speaking). What does take a heap of power (amps) for a second or so is the initial spin up of these drives, especially the 15k SAS server drives.
I've seen competitor units actually power off or reboot when exposed to extreme loads like this (My old ICS ImageMaster 4 comes to mind - it has some worn out capacitors), that was an amazing unit.....but that thats another story.
 My old Image Master Solo 4 - a truly awesome machine.
Back to the Torture Test:
The TX1 power supply became very warm, but at no point was it so hot that you could not hold it (which is what happens to cheap switching power supplies under persistant high loads) - there was no danger of it melting the carpet either.
Being the unforgiving type, I left this configuration running multiple images for a 12 hour period, ambient temperature was around 22 degrees centigrade - and when I checked in on the unit, it was still running without incident.
So credit where credit is due, whoever specified this power supply knows what they are talking about and I have no doubt at all that this supply will last for years without a problem! If we had an individual score for power supplies, this would get a 10/10 !!!!!!text box >>
Using The TX1 - Drive Connections:
As I touched upon earlier, the TX1 comes with a few data cables in the poverty spec "base" kit, these cables allow you to image SAS and SATA drives only.
Remember that some units out there require an add-on adapter to do SAS drives (as the instruction set used by a SAS drive is more SCSI like as opposed to the SATA command set used by desktop/laptop hard drives) - so this is a nice feature to have out of the box.
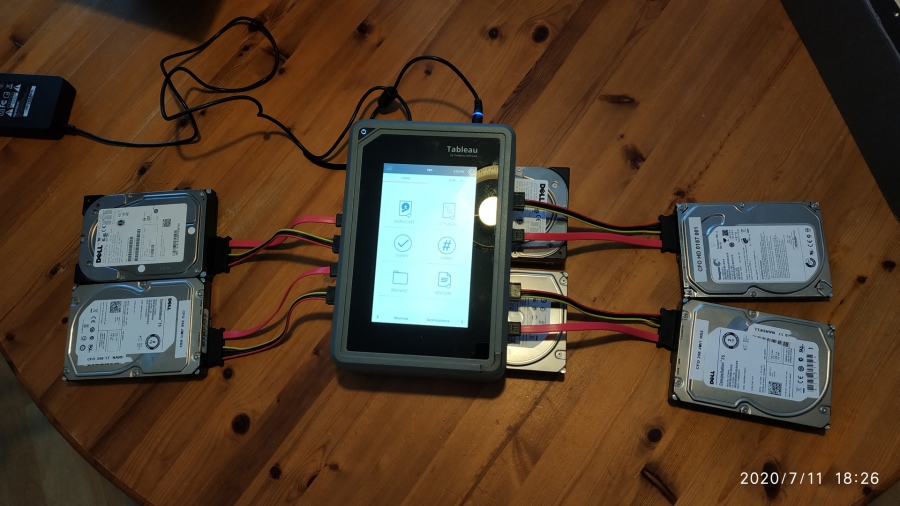
Using all of the cables supplied and the under-belly base unit, we can hook up a total of 6 drives;
Optional Drive Adapters - Up Close:
The TX1 has a number of optional connectivy, most of which uses the PCIE port on the unit and a series of proprietary adapters which are not included in the base price of the kit.
ProTip: Be prepared, the last thing you want to do is get on site with the TX1 and realise that you don't have adapter X and cable Y to copy executive Z's hard drive. The TX1 is going to be with you for years to come if you purchase one, so my advice is purchase the whole kit so you are never caught with your pants down. Remember these cables are mostly proprietary, so you can't be a cheap-skate and pop out to CompUSA or Ebay (Shudder..) and buy one locally to get the job done.
So lets look what additional optional adapters OpenText have;
3.5" PATA (aka IDE) Drive Adapter:
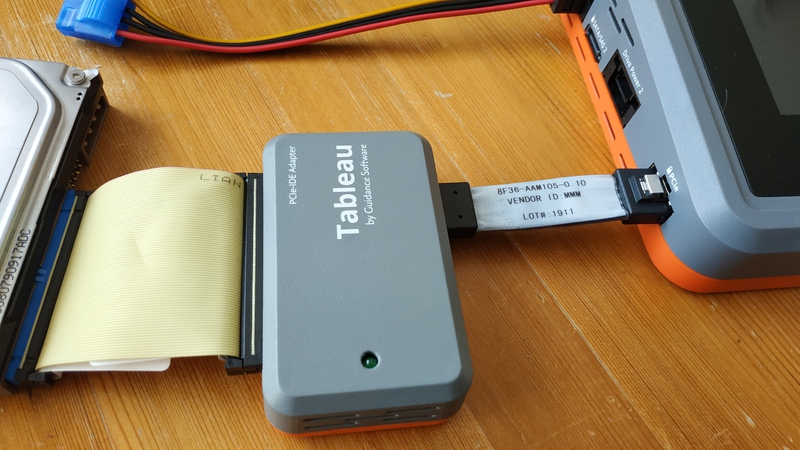
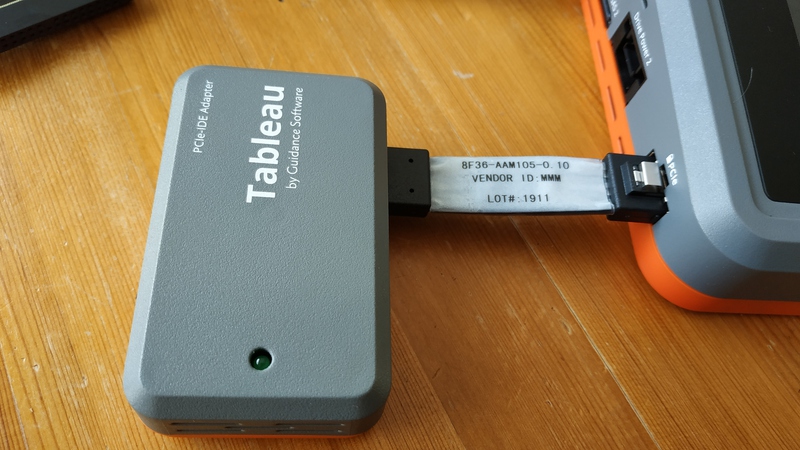
First up is the TKDA705 PCIe-IDE adapter which when translated in english allows you to connect up old-school 3.5" PATA drives to the unit, this retails at £71 excluding VAT.
This adapter connects to the TX1's PCIe expansion bus via a short stubby white cable which you can see in the photo gallery below.

Other Drive Adapters:
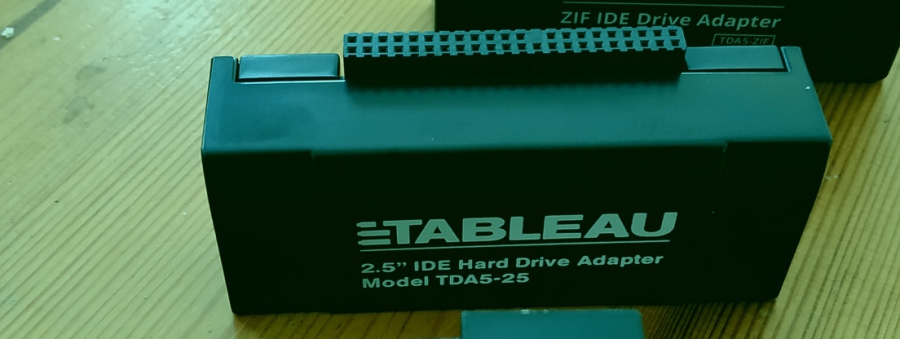
If you want to connect a 2.5" PATA drive, you will need to purchase an additional TDA5-25 adapter, which retails for £17 ex VAT. Don't get caught out you will also need a TC2-8-R2 cable to get power from the TX1 to the 2.5" drive (as that does not come with the TDA5-25) unit which costs another £9 ex VAT.
There is an easier way than fighting through the myriad of adapters listed on the resellers product page and that is to buy "kits" which contain virtually (but not all) of the items you would need for belt-and-braces connectivity with the TX1, the kit shown below contains;
1.8"
2.5"
ZIFF
LIFF
M2 SATA (For SAS SSD's - Not NVME)
MSATA (For SSD's)
Micro SATA
Look at how nice and neat this little pouch is that contains the adapters - now that is someone who has attention to detail and OCD almost as bad as mine. I like this - great packaging OpenText.


I found no problem with any of these adapters, they all worked flawlessly and are of a very high quality. It looks to me like these are the adapters that Tableau of old sold for many years, so there is no need to re-invent the wheel here.
That covers the basic adapters, however, the TX1 is a very versatile beast and has some rather cool additional adapters (optional extras) that you may not be aware of - After asking nicely, Steve at OpenText sent me these to play with.
Additional Optional Drive Adapters:
Apple SSD Adapter
NVME PCIe SSD Adapter
Micro Sata to PCIe Adapter
PCIE Slot (for PCIe card based SSD's)


All of these adapters are also of a very high quality, and are made from quality plastics.
Whoever designed these knew what they were doing and they will last a very long time, even if you used them every day.
I can't stress again the importance of buying all of the adapters and power cables at the time of purchase (thats three times now!), so that when you do come across that unusual drive, you have that £25 adapter that will allow you to connect it to the TX1.
To see all of the adapters and pricing, go here to visit the website of the UK distributor of the TX1, or here to see a list of re-sellers worldwide if you are not based in the UK.
Adapters are not Dead yet!
I think there is still a real need for these adapters - I have been finding lately that I have been removing "unusual" drives from their host laptop, and imaging them using an adapter - instead of booting the suspect device from a USB stick with some form of forensic operating system on it (my preferred method).
Gotcha: With the advent of Windows 10, Bitlocker, Trusted Platform Module and Safeboot - it has become harder to boot a suspect machine from these sticks (they don't boot with it enabled in some cases). In short, the last thing you want to do on these machines is trip bitlocker so that it asks for the recovery code when you reboot it after imaging and hand it back to the subject - that could be very messy for you - as they may not have that recovery key - and nor might their IT team.
Yes I know I could log in as an administrator and make a logical image of each partition using something like FTK Imager, but thats not my preference and its also not forensically sound.
So using the TX1 in situations like this makes sense if you want a hassle free experience when Bitlocker and Safeboot are in play.
So thats the outside of the unit and the adapters covered, lets power it on and take a look at the gui.
Exploring the Gui:
The TX1 when first booted up will prompt for a user to logon. This is mandatory and allows a full audit log of any given users activity to be produced, but also protects the unit from unauthorised access.
This is especially useful if the device is left connected to your clients network for remote imaging operations, or you just want to see what the unit has been used for.
The TX1 also has a web interface that can be accessed remotely by authorised users. Most if not all features are available to remote users - but obviously someone local would have to connect and disconnect drives from the unit if those were your targets.
The remote functionality is going to be really useful when collecting network data from endpoints or servers at the clients premises.
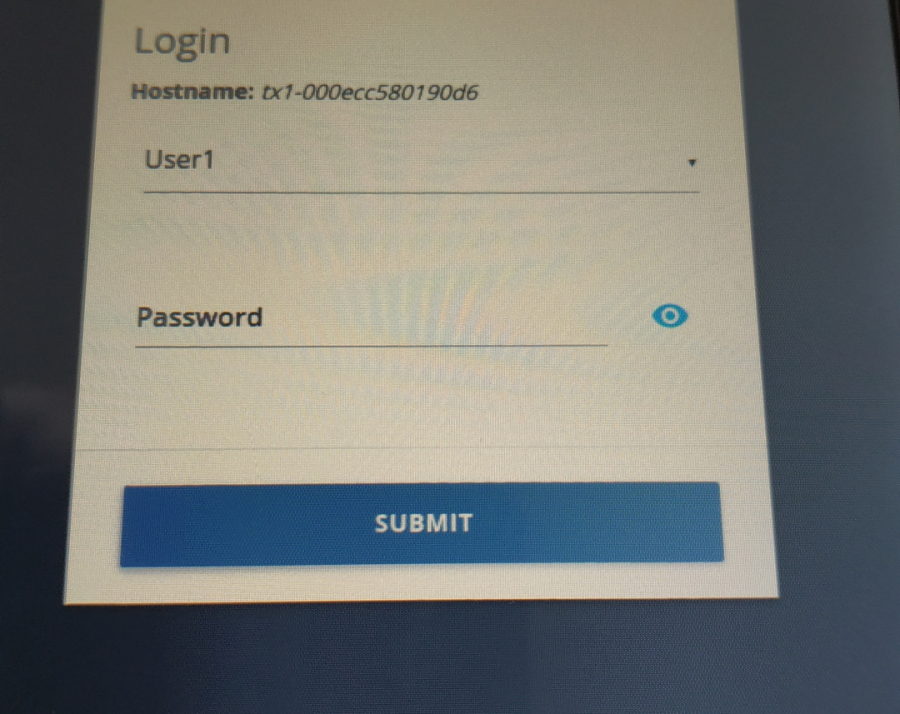 TX1 Logon Prompt
Once logged on, the user is presented with a nice simple and self explanatory set of icons;
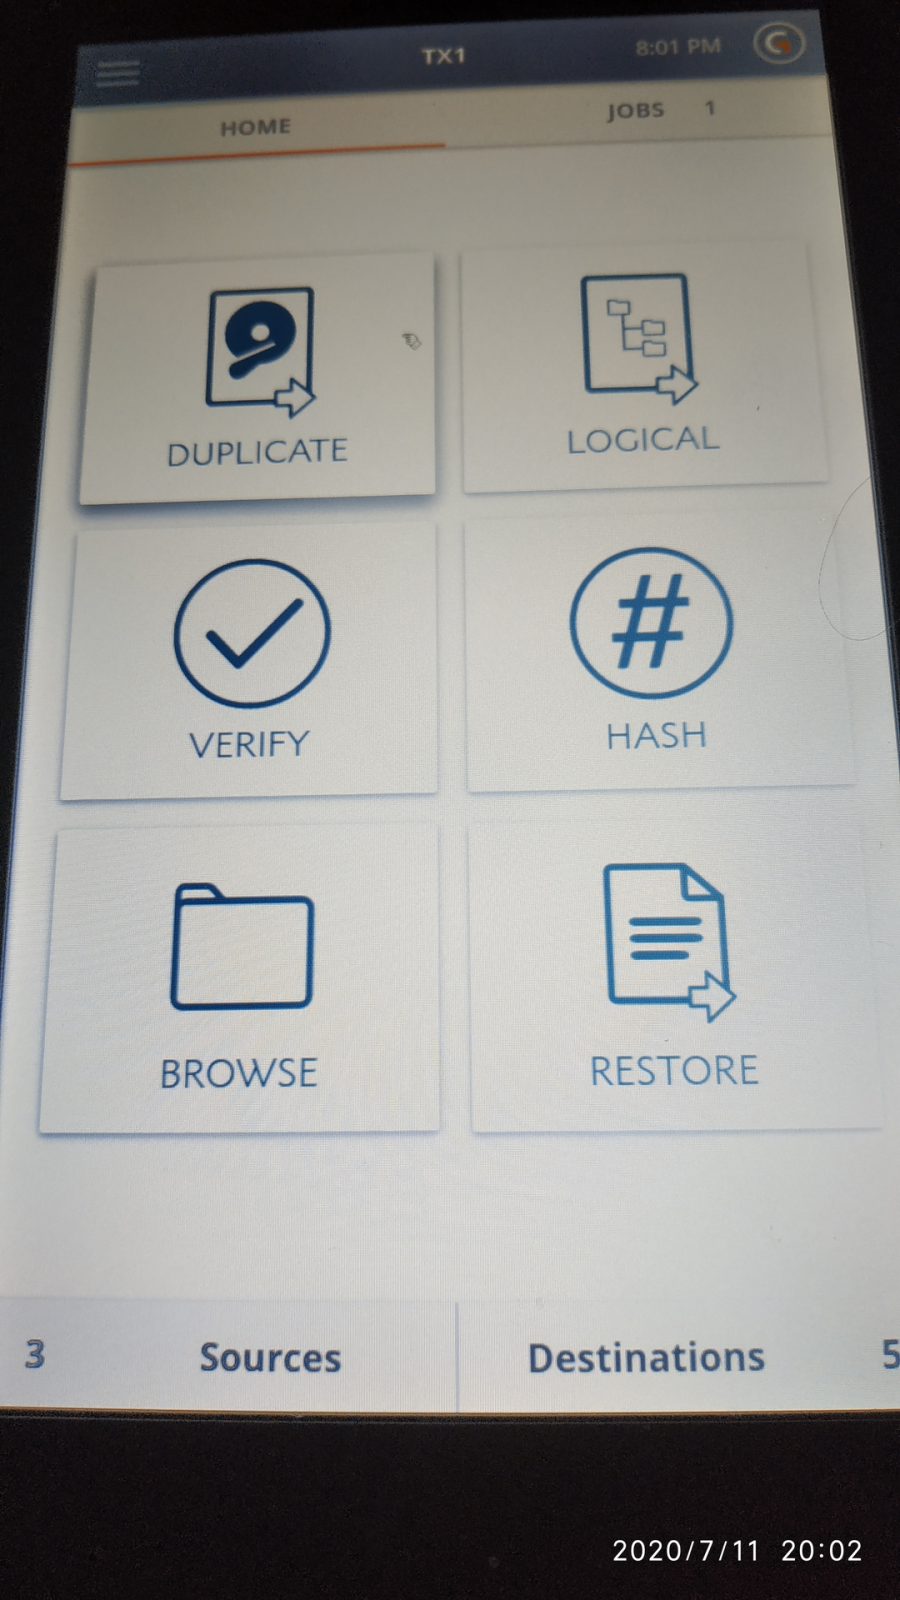 Main Menu
We can see (above) that we have six icons for tasks and a divided pane right at the bottom of the screen showing Source and Destination drives attached to the TX1.
Duplicate - Lets you create physical disk images (and disk to disk clones) of anything attached.
Logical - Lets you create logical images of files on a suspect disk/network.
Verify - Lets you verify a disk image that you created earlier.
Hash - Lets you hash an entire drive or set of files.
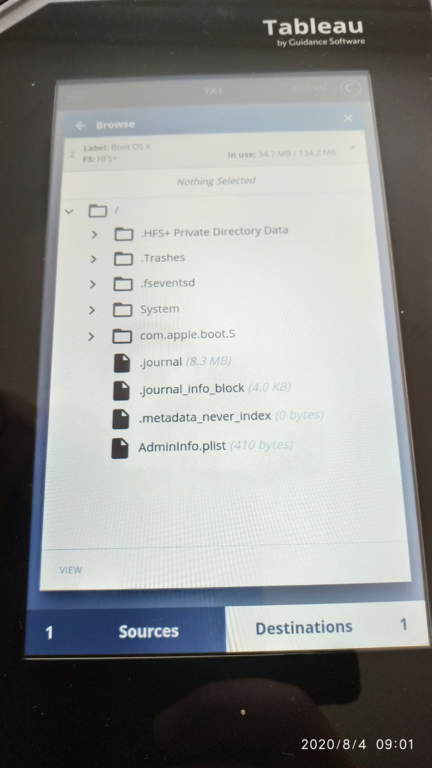
Browse - Lets you explore the file system of both suspect and destination drives attached to the TX1.
Restore - Lets you restore an image file to a physical disk.
There is also a slide out side menu, which allows you to change certain parameters, including setting up the Network Adapter, managing users and log maintenance to name a few (see below);
 Slide Out Menu
Its all neatly laid out and apart from constantly pressing the wrong thing due to the screen size and small font, I didn't see any GUI related issues during the review process, so its thumbs up from me here!
6. Test Disk / Data Set:
As you know, I don't mess around with testing, so lets have a look at my collection of test hard drives, memory sticks, and SSD's that were used during the review;
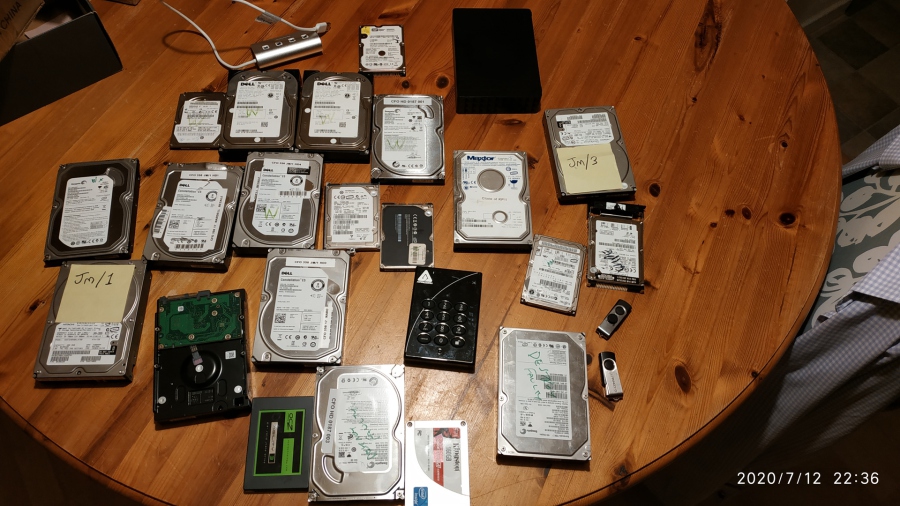 Test Disk/Data Set
We are going to have some fun here as a few (not all) of these have really dodgy file systems, others have weak sectors and some overheat and fall off the data bus due to controllers hanging and other issues that fall into the "b*ggered" category.
All a good recipe for seeing how well the engineers that coded the firmware for the TX1 have implemented error handling. Some may say that this is unfair, but in reality you are going to come across drives like this in the wild - so to its important to know whats going to happen when these errors occur.
There is a mixture here of consumer SATA, EIDE (ok...PATA), USB 2/3 and enterprise SAS drives for us to play with. We also have some USB memory sticks and some SSDs. I was thinking of putting them on Ebay as an "untested" job lot, but that would be just cruel.
7. Using the TX1 - Imaging - Physical Disk (Mechanical):
Right, lets start of with something simple, lets image a bog standard 3.5" PATA mechanical disk drive, my one-armed nan could do that, so it should be easy peasey.
So, lets go to the relative dawn of time and attach a ye-olde-PATA 160GB drive to the TX1;
 160GB PATA Hard drive from the neolithic period.
These things used to be tricky, what with jumpers to set, to choose between Master, Slave, Cable Select and various sector clips to make the drive work with the various BIOS limitations back in the day. 2GB, 4GB and up, its all a bit like the great barrier in Star Trek V that they tried to break through. [Oh no, not bl00dy Star Trek references...]
Things reached a high point in Generations, where Kirk and Picard were in the same movie - attempting to foil a plot by the nefarious.... sorry, I digres....
When hard drive manufacturers passed the 8GB barrier and we saw the introduction of Logical Block Addressing (great article here). Great article on BIOS limitations here if you fancy a read, as you are probably sitting at home in your underpants waiting for your next Zoom meeting with the MD.
So we have to hook this drive up with the PATA to PCIe adapter (detailed previously), so lets plug it in;
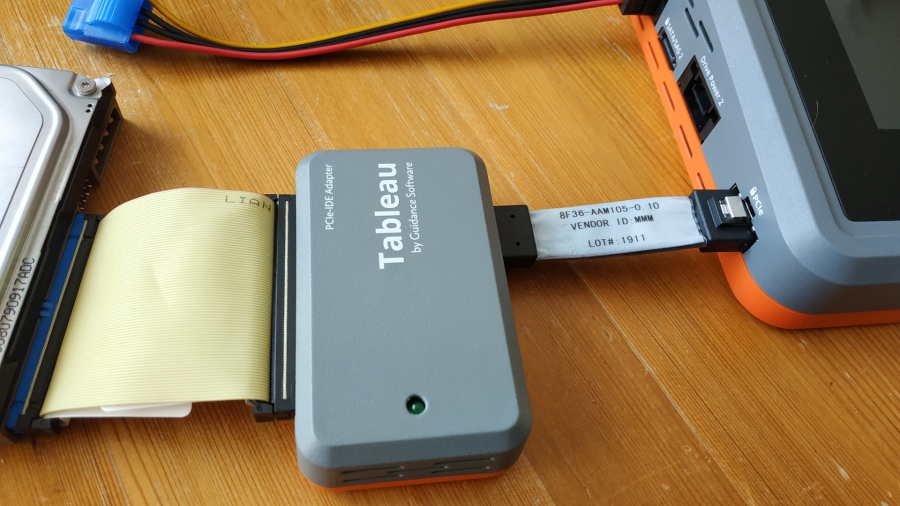 PATA drive connected via PCie
The TX1 requires a cold start to recognise any drives you connect via PCIe port adapters, you won't know if your drive has been recognised until you boot the TX1 up and see the number of sources counter increment by one. This is not a limitation of the TX1, but more of the architecture of system buses.
ProTip: If you know your hardware history, you will recall that certain buses which connect directly to the CPU such as ISA, AGP, PCI and PCIe are usually only polled for devices at boot time by the systems BIOS. Try plugging in an additional GPU to your machines second PCIe slot and see what happens (well don't, as thats possibly not going to end well) - it won't be recognised until a reboot if it survives the process. [Correct me if i'm wrong!]
I don't think that many of us will be doing many PATA drives - so unless you get a fussy drive, I don't think you will have any problems - if you set the jumpers to Master and remove any jumpers that are enforcing a sector limit clip.
This drive (see below) was recognised first time so no problems here (yet);
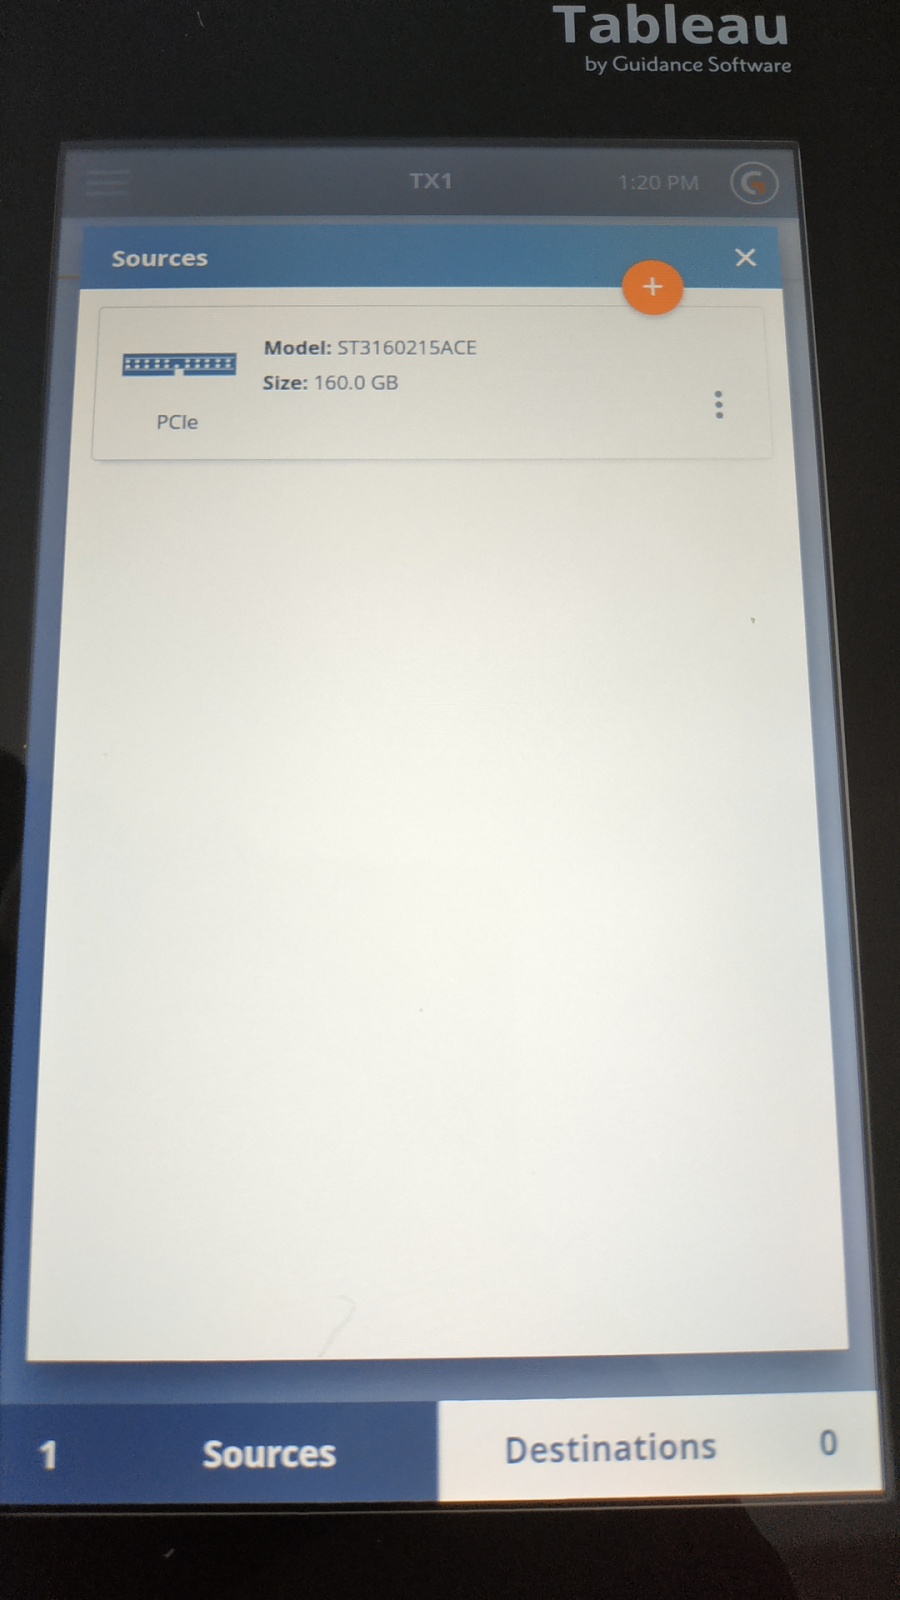 PATA Suspect disk recognised.
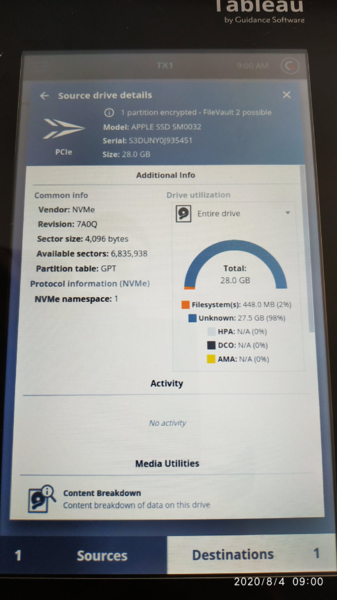
Clicking on the drive shows a lot of information about the source drive , you can quickly tell if something is not right from this dashboard. You can also explore the drives file system, view a graphical partition table and view SMART disk health information.

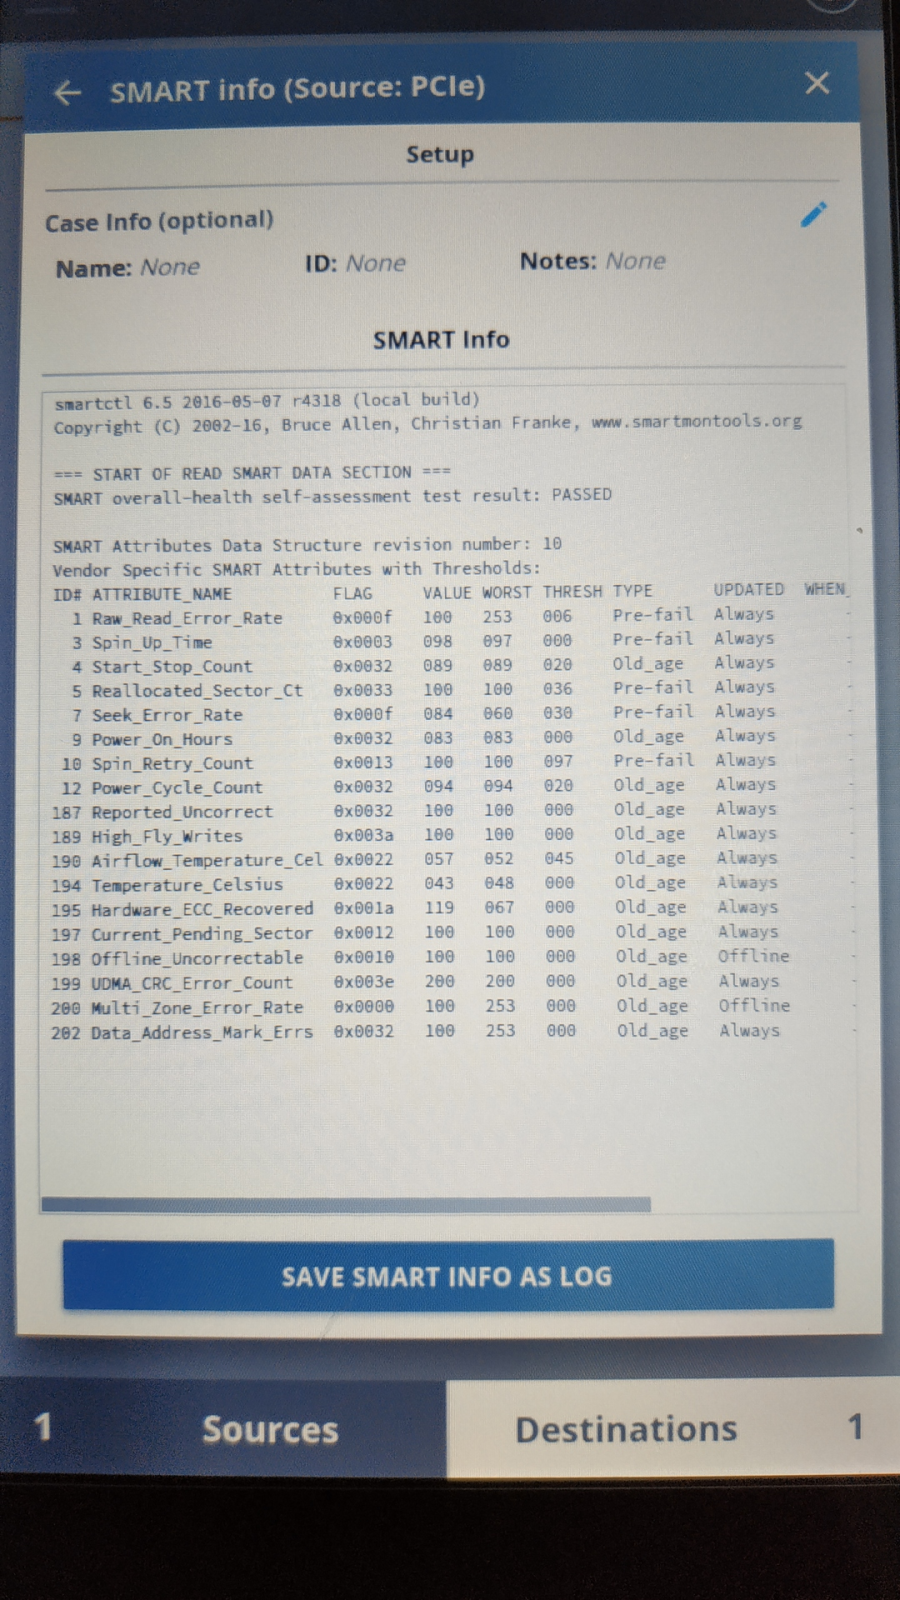 Meaningless without explanation!
Selecting this drive as a source is easy (its also write blocked) a green tick lets you know that the drive has been selected (see below).
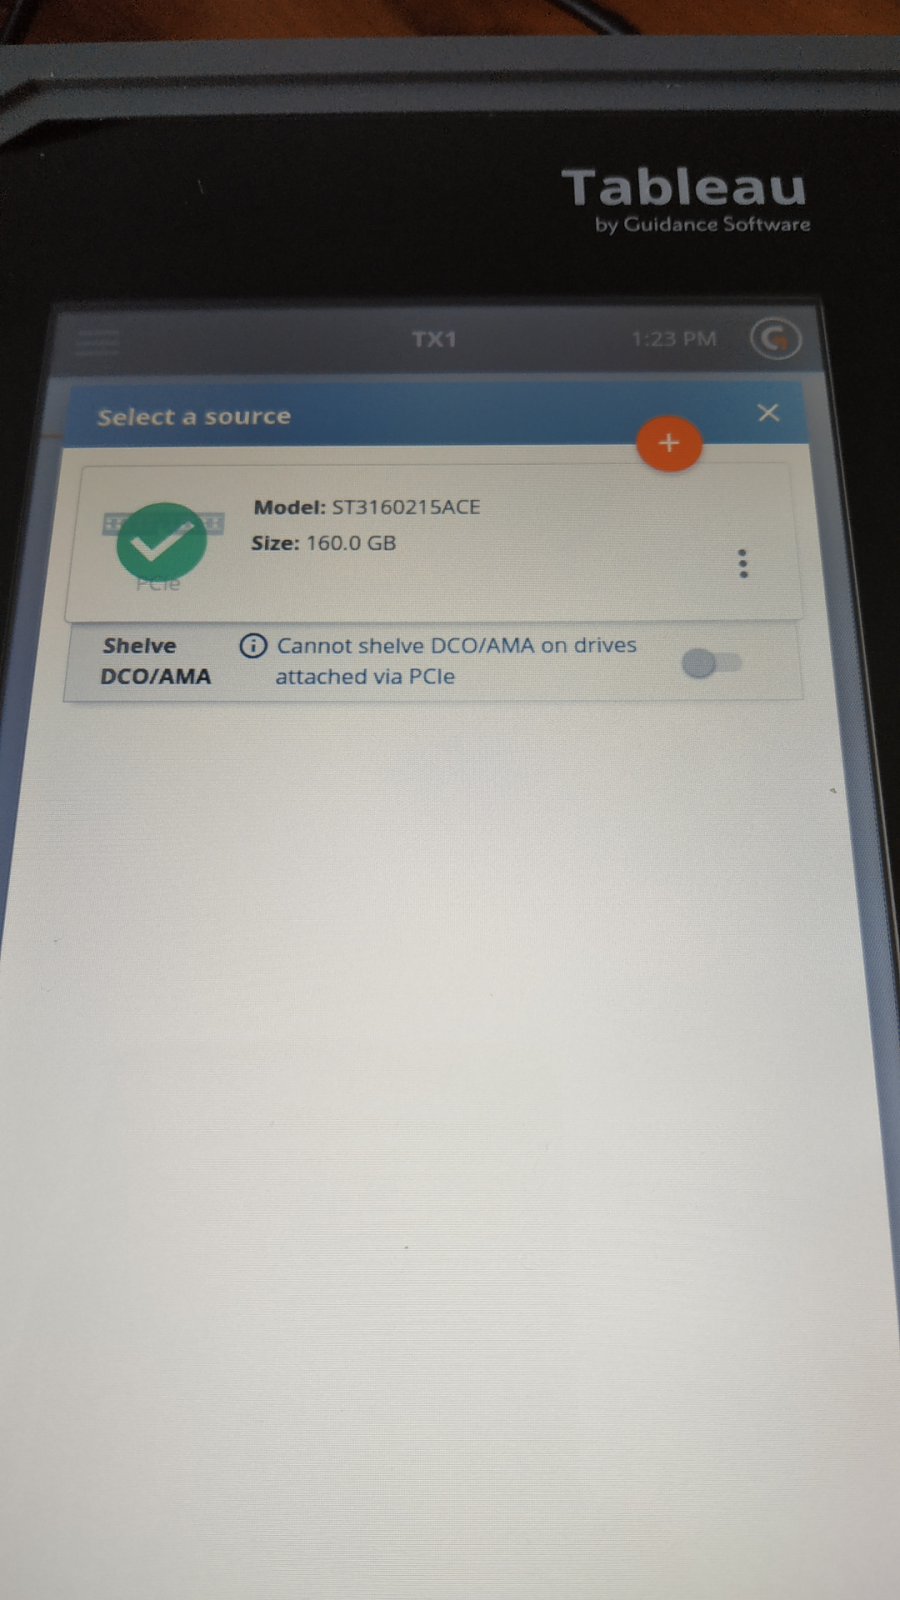
We now need to give the TX1 a destination drive to write to and set the imaging parameters (as seen below in this incredibly high quality screenshot);
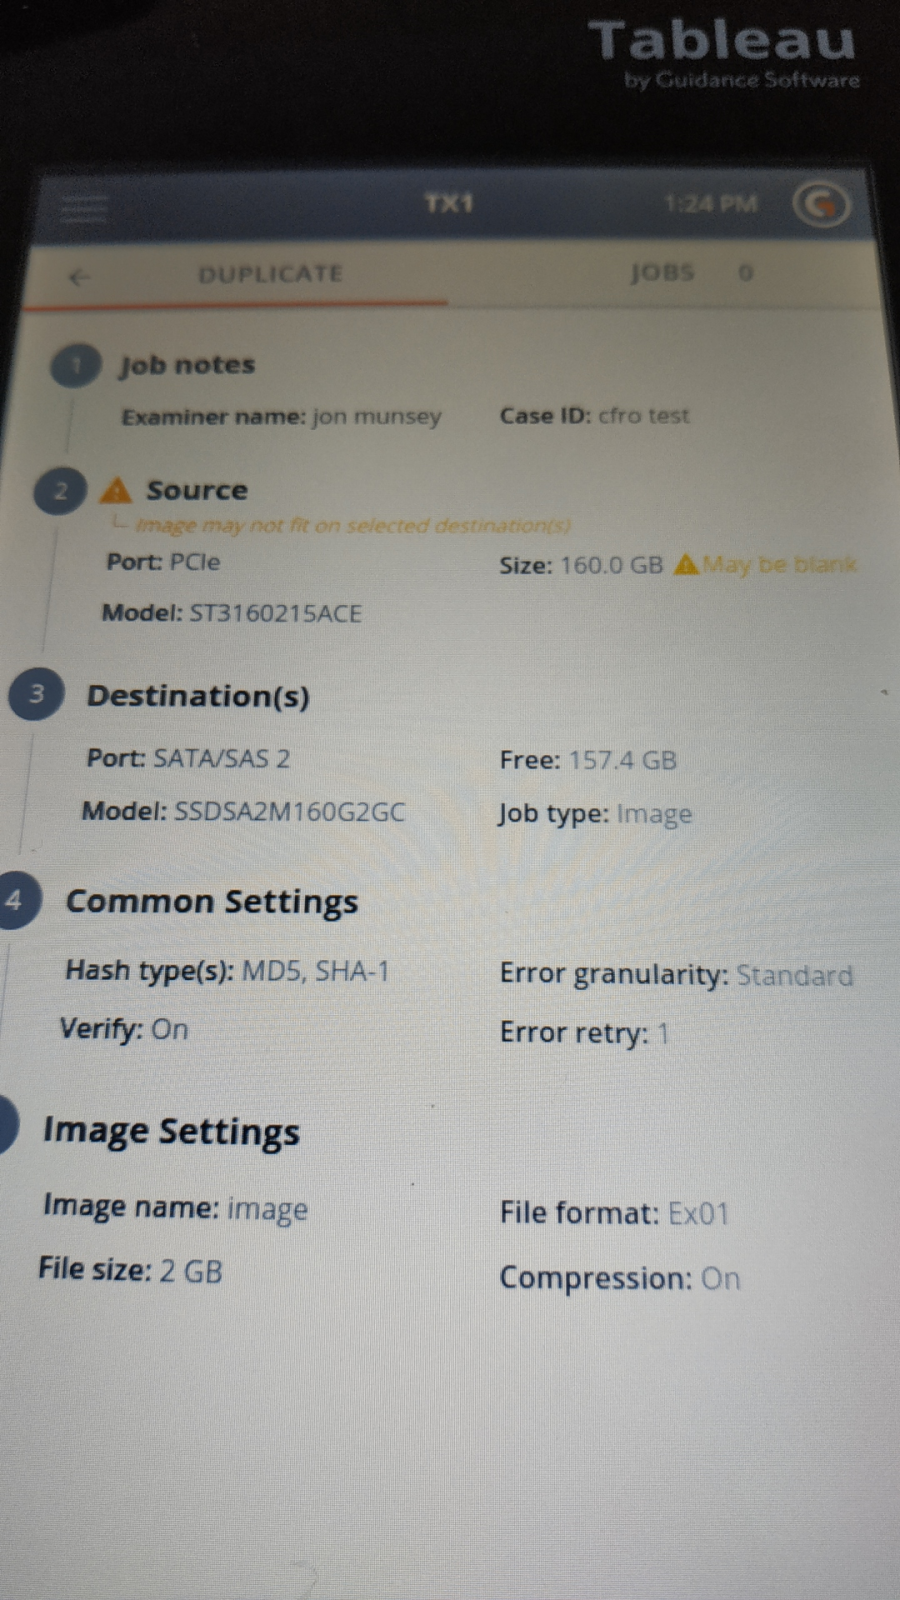
Note that the TX1 has rather helpfully labelled the Source drive (see above) with a yellow warning, telling us that it may not fit onto the destination drive. Both the source (a PATA hard drive connected via the PCIe adapter) and the destination disk (a SATA SSD) have labels marked 160GB, but as we know different drives have varying sizes to what is printed on them - especially SSDs.
As this is the test bench, I will be taking a punt and with compression - I think that the suspect disk will easily fit onto the destination drive.
Gotcha: The fact that the suspect disk is flagged as potentially empty by the TX1 is no indication that the finished image will fit.
ProTip: Don't gamble when you are on site that compression will make the suspect disk fit onto a same size destination disk. Whilst in most cases, you will be fine and it will work, that one time when you choose to do it - when you are in a hurry, have one shot at the image or don't have much free space on your destination disk - it won't fit.
For example, if the unallocated space of the drive contains large swathes of uncompressible data (such as stacks of MP3 audio, or heaps of deleted MP4 movie files, or the unallocated space has been encrypted during the bitlocker encryption process) it is highly likely that your image (due to the principal that compressing data that is already compressed makes it slightly larger) will be larger than your same size destination drive can hold. Eeeek.
Full Image Control:
There is quite a lot of adjustment pre imaging that can be done by the user, the good old "Error Granularity" setting is present, along with the ever useful "Error Retry" count, plus all the usual verification options associated with creating an Encase Image file.
Being the control freak I am - thats great I like all these settings, great for getting the image that you want - not what the machine wants to do!
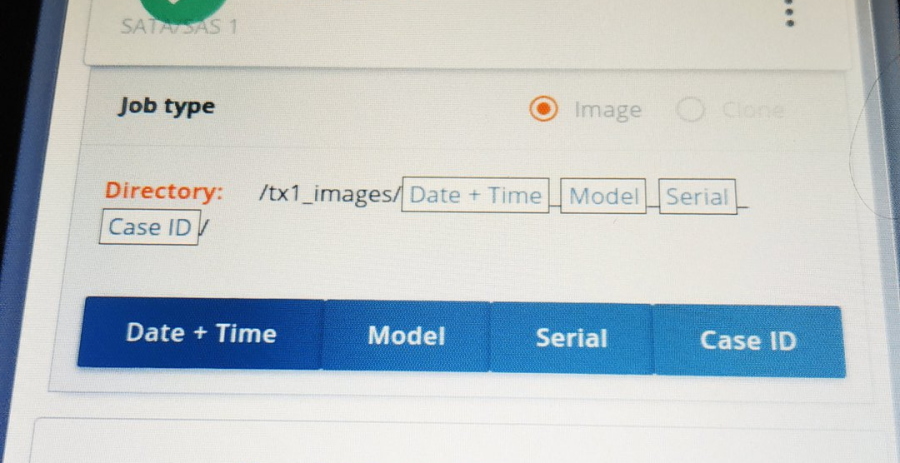
As you can see below, the TX1 lets you decide what information you want to include in the folder that the TX1 stores its images in (more on that later).... Clicking the blue boxes toggles that information to be added - thats a nice feature.
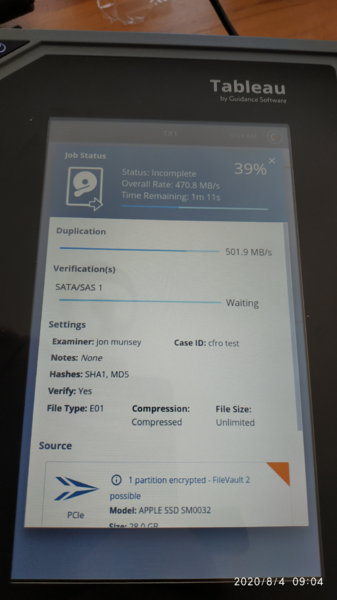
Kicking the imaging job off, we can see that the TX1 is very verbose and gives us an estimated completion time, along with the imaging speed (79.9 MB at this point), which for an ancient PATA disk from circa 1995 is about the maximum speed I would expect.

It appears the TX1 uses either CPU grunt or hardware to assist with compression, I am only doing an MD5 hash of the image for the purposes of verification, the TX1 can do two hashes simultaneously (MD5 and SHA1 as an example) - but this is a good sign that the hardware in the TX1 is up to the task without any signficant loss of speed.
So no real drama here, the TX1 imaged the drive as expected, with the verification completing successfully within expected timescales.
Image Folder Structure on the Destination Drive:
I touched on this earlier - The TX1 allows you to use its own built in folder structure for storing any disk images you create, by default that is a folder on the destination disk named "tx1_images".
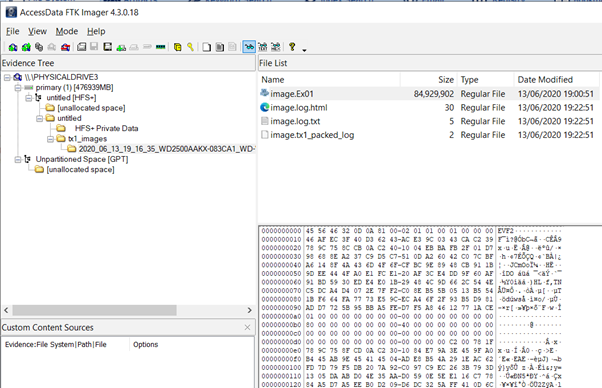
Each image that you place on that disk is placed into a uniquely named subfolder, as you can see below. I've been imaging to a filthy Macvellian HFS+ formatted disk [spits on the floor in disgust], so ignore the metadata folders and look at anything below the "tx1_images" folder (see pixellated image below);
 Examining disk images created via TX1
You can of course type in your own image path and file name (a must if you have a workflow).
For the purpose of my testing I just used the built in variables for the naming which worked a treat.
Image to Multiple File Systems Simultaneously:
One really cool feature of the TX1 is that you can image to different file systems at the same time, so for example you have a lab that works using Apple analysis machines and another part of the lab that works with Windows analysis machines - you can image a suspect disk to an NTFS formatted disk and a HFS+ disk at the same time.
Its a small feature, but I think that will really save some labs a lot of time (yes you can use software to access both of those filesystems from your analysis machine - but this makes that pretty redundant!).
I had no issues doing this and the log file is nice and clear and shows the file system for each destination disk which is nice (but more on log files in a deep dive later on). There was also no tangible slow down from the TX1 when imaging to two destination disks with differing file systems.
Pausing and Resuming Images:
Another great quality of life feature of the TX1 is the ability to pause jobs and resume them later. This is especially good if you need to perhaps stop creating a logical evidence file during a network collection and quickly sneak in a copy of a custodians hard drive.
Operations can be paused indefinetely (whilst the device is powered on) and there is further support for resuming in the event of the TX1 losing power for any reason.
Both of these features are something that has been long overdue in disk imaging and I am glad to see it implemented here, if only this was implemented into Encase Imager (and other software tools!).
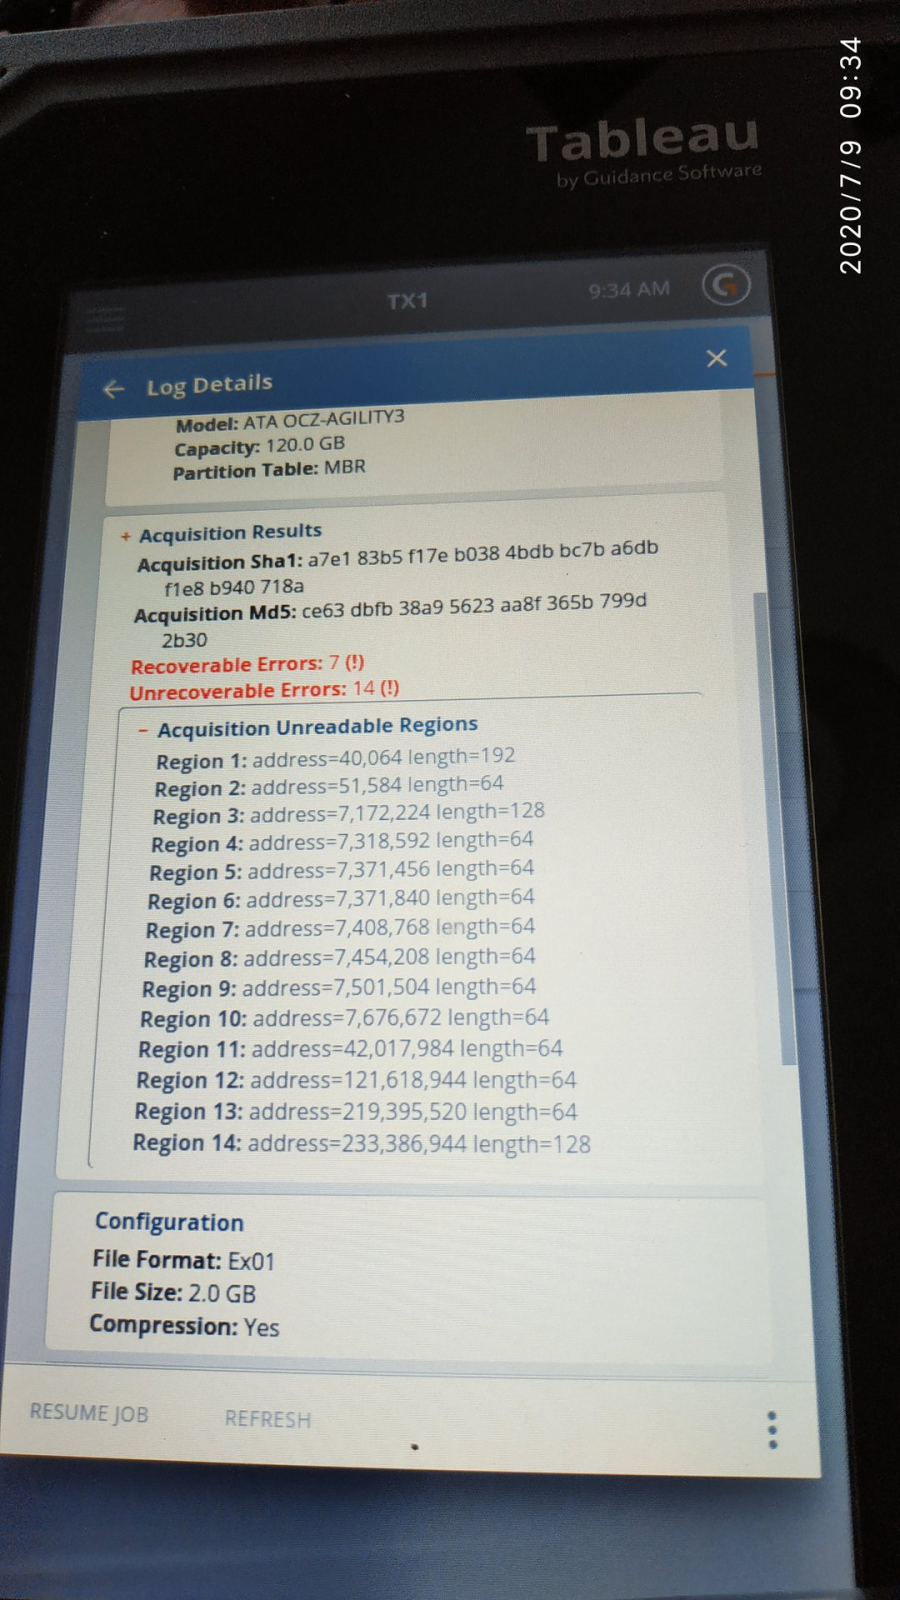
How did the TX1 get on with Tricky/Faulty Drives ?
An important part of firmware is how it handles unexpected results, or in English, how it handles drives that are not very healthy.
ProTip: Its not big and its not clever to even attempt to image drives that have either mechanical (head related) or physical damage (platter). Those drives should be immediately sent to proper data recovery companies (such as my good friends over at R3 Data Recovery in Sheffield, England). Attempting to image a drive that is clicking, making odd noises, keeps powering down or has reported bad sectors is negligent in my opinion and is very likely to cause further damage and data loss if you do.
Sure you can take a punt when nobody is looking and it might image ok or run long enough to logically copy off some files, but if the drive fails during the image, thats going to take some explaining!
Anyway, for those of you that want to know anyway how the TX1 treats poorly drives, I am not one to disappoint, so lets get some real world drive problems and see how the TX1 copes.
Mechanical Drive - Weak Sectors:
Its possible to have weak sectors on a hard drive, often they are found at sectors 0-63 as those are at the beginning of the disk and are accessed every time the machine boots, they can also be in other areas, nice article on that here.
A weak sector is one that has a weakened magnetic field and when read, often trips a CRC error because the disks controller receives data that does not match the checksum for that area of the disk (it sees a 1 when it should see a 0). This then triggers the drive to re-read the sector in an attempt to get a read where the maths all checks out. Most controllers will try this a certain number of times, stop and then report an error - others (especially really old drives) get into an endless loop and read the sector until the sun burns out.
The TX1 did well on this test and allowed the drives controller enough time to repeatedly read the problematic sectors, resulting in a perfect disk image.
You may see some clues that weak sectors are present on a disk from the SMART data on the drive, but thats another article entirely. If you want to know more about Self Monitoring and Reporting Technlogy, there is a good article here.
ProTip: SMART data is usually only read from your hard drive on a Windows PC at boot time, during the POST checks, very basic polls are carried out by the BIOS on your machine and if your drive is not up to snuff, the boot process will halt. To monitor your drives in the OS itself, you will need a third party app, such as SMART Mon (for real time alerts) or Crystal Disk Mark for an on demand health report. I did read somewhere that Windows 10 now has a new drive health feature, whether that polls SMART data at any given point, I don't know.
SSD - Overheating Controller
Next up was an elderly 120GB OCZ Vertex SSD, which had an issue with the controller chip overheating when connected to a desktop PC an used to run an operating system.
The Vertex uses an early Sandforce controller chip, which whilst a step up from the terrible micron controllers available at the time, still had issues with firmware and performance.
When hooked up to a bog standard write blocker, the SSD drive (and write blocker) would freeze and the image was toast (and incomplete/inaccessible). Fitting a desktop CPU heatsink to the controller chip would improve things and allow the image to get to around 85% completion, so there is definetely some damage inside the SSD's controller chip which is causing heat buildup.
Hooking this on up to the TX1 saw a complete image (see below);
I assume that the TX1 has some how throttled the reads - perhaps it detected latency between SATA commands being issued and responses being received from the drives controller (which is what happens when that controller gets hot) - but even if there is no smart programming here and this was dumb luck - this was impressive and to date the only way I have been able to get a complete image of this drive (less the unreadable blocks).
Mechanical Drive - Bad/Damaged Sectors:
Next up for the TX1 was a drive that had been purposely dropped a few times whilst powered on, ouch - makes me cringe just thinking about that.
This disk has large swathes of bad sectors and most imaging tools that I have used on it during testing have marked huge contiguous blocks of the disk as unreadble (unecessarily).
The TX1 has the ability to adust the granualarity of reads when it encounters a bad sector, setting this to the finest level, the TX1 read the most sectors from this disk than any other tool/imaging device I have thrown at it over the years.
So a win here from the TX1, I am suitably impressed.
8. Using the TX1 - Built in Utilities:
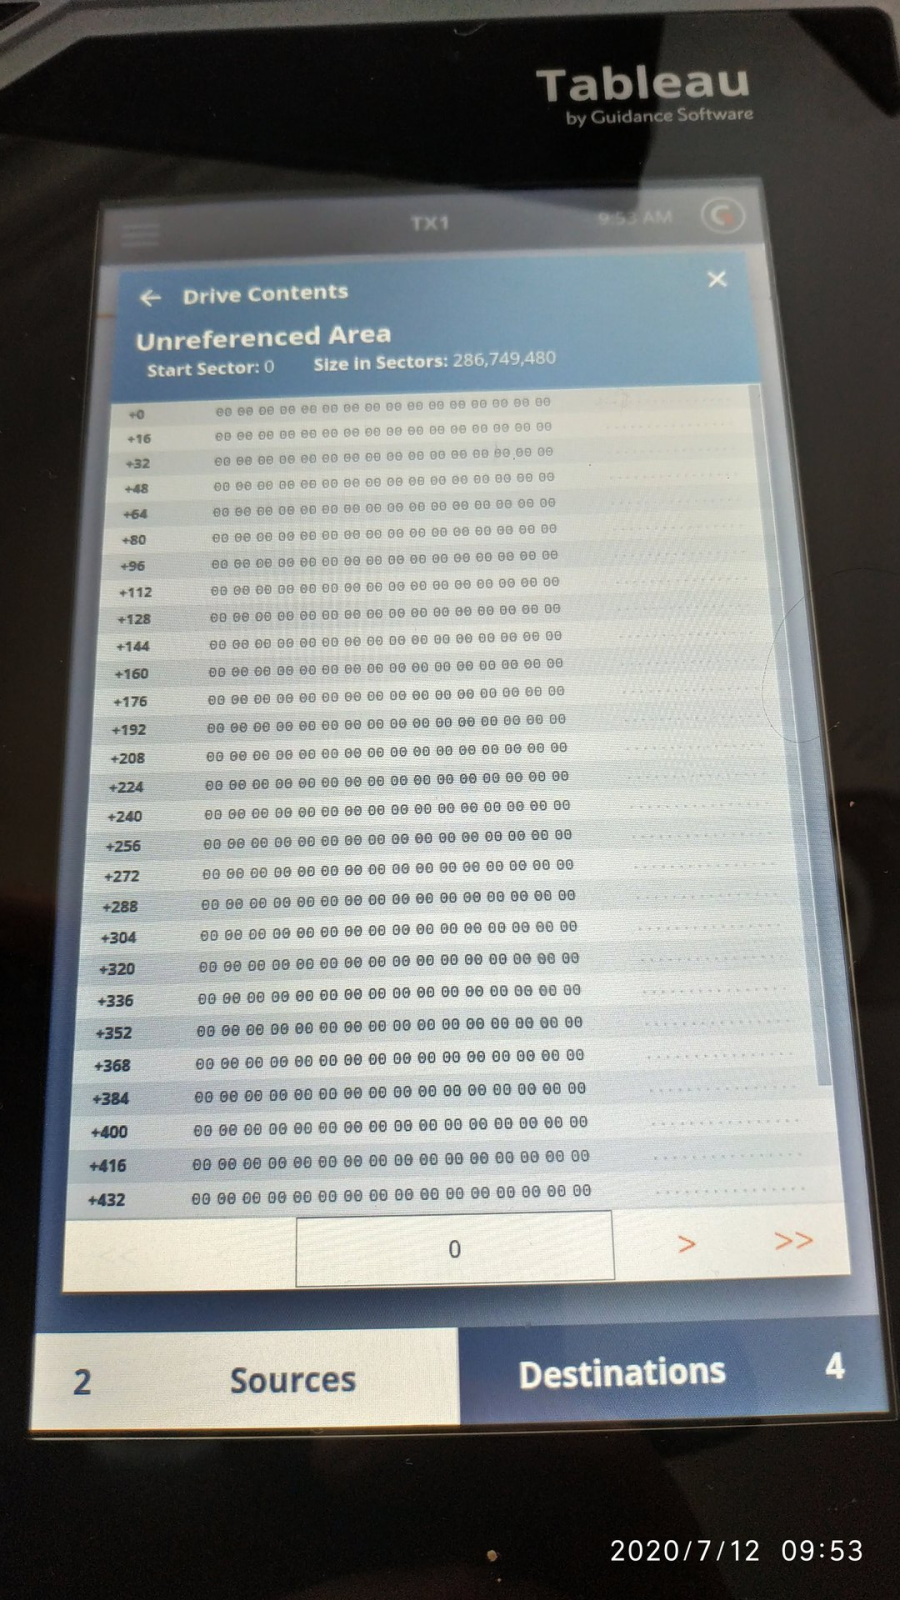
Built In Hex Viewer:
The TX1 has a built in hex viewer, which is a great little tool to see what is going on with a drive if the GUI is telling you something that you suspect may be
incorrect.
I found this very useful to check to see that disks were full of zeros after I had wiped a destination drive for reuse.
9. Using the TX1 - Imaging USB Devices:
The TX1 can handle USB drives that you attach to it, via its USB ports that are on both the suspect disk side of the unit and the destination disk side.
I imaged a number of drives this way and experienced no issues, speed was only limited by the USB3 bus when dealing with SSD drives, but that is a limitation of USB3, not the TX1.
I don't use bare SATA drives anymore for imaging, I've been using small USB3 portable drives for a long time now and find them so much easier to hook up to an analysis machine, so to have that option on the TX1 is another nice selling point (to me at least!).
I had no issue connecting up really large drives (8TB and greater) to the TX1, they all were detected properly and worked fine.
I did encounter issues with the TX1's inability to detect the serial number of certain USB memory sticks that I plugged in. Whilst it is normal for generic memory sticks to either have no serial number, a number like 0000000 or 123456789 - these were genuine Kingston and other quality branded sticks. They were all detected correctly when using software tools in Windows, so I think this needs a little bit of a tweak from OpenText.
Other than the serial number issue, a solid performance here and no issues in detecting odd drives (such as the Aegis Padlock) which requires a pin code before it presents a valid volume to the host controller (the TX1) that it is connected to.
10. Using the TX1 - Job Queuing:
The TX1 has the ability to run certain job types simultaneously, such as disk imaging and logical collections. Now that is certainly going to come in useful.
Here we have the Home screen which lists the TX1's current Status;
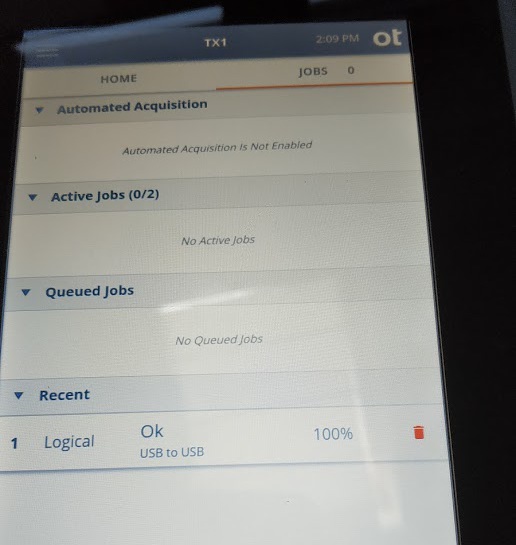 TX1 Job status screen
As the screenshot above shows, we have;
Automated Acquisitions
Yep, you read that correctly, you can hook up a large destination disk and configure the TX1 to automatically image whatever you attach the to write protected suspect disk ports.
You can pre-configure the settings for this, which gives you granular control over how devices are imaged - this is a good feature if you have people operating the TX1 that are inexperienced - they would just connect the disks to be imaged up one after the other with little or no other interraction.
Its not something I would use - too much of a control freak - but for some this will be a god-send.
Active Jobs - Self explanatory.
Recent Jobs - Self explanatory.
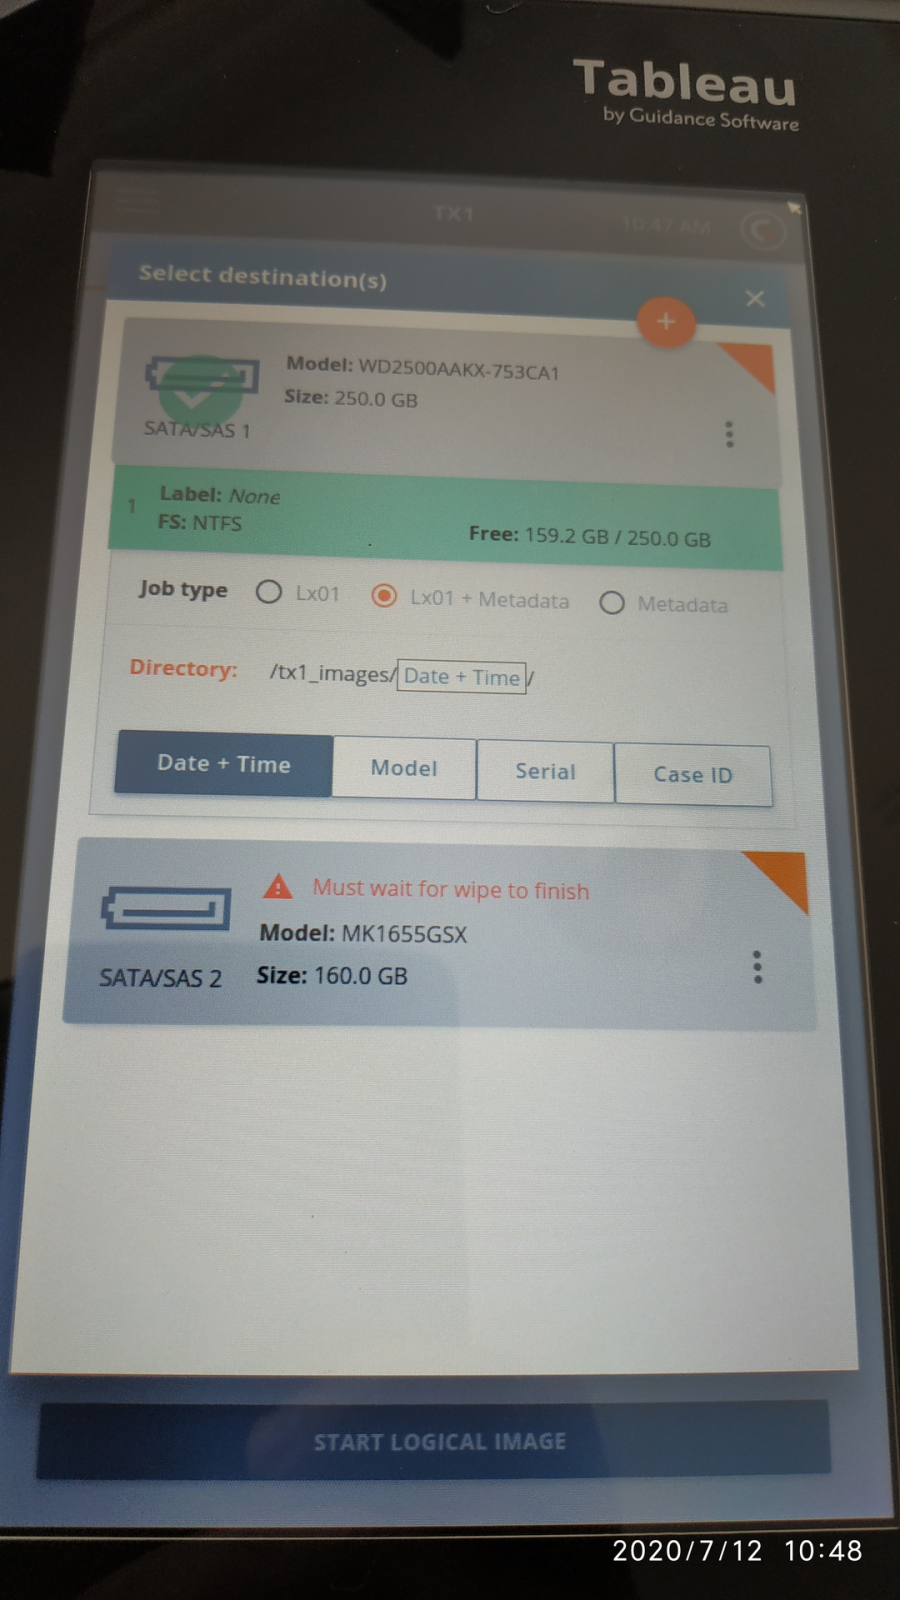
Queued Jobs - There are some functions that the TX1 can't or won't perform simultaneously, these appear here and ensures the TX1 does not get overloaded and prevents you from doing something silly.
One example of this is trying to write two different images (from different source/suspect drives) to the same destination disk.
As another example, shown in the screenshot below, we can see that the TX1 won't write to a disk, or image a disk that is currently being wiped - the user is informed they must wait until that wiping process is completed.
This is a nice sanity barrier and stops you from doing something regrettable when burning the midnight oil.
11. Using the TX1 - Encrypted Disks Detection:
The TX1 supports imaging encrypted disks which is a nice convenience feature, especially if you are on some E-Discovery project in a large enterprise that has rolled out Bitlocker across their end-points.
Hook up a Bitlocker encrypted drive and the TX1 detects it;
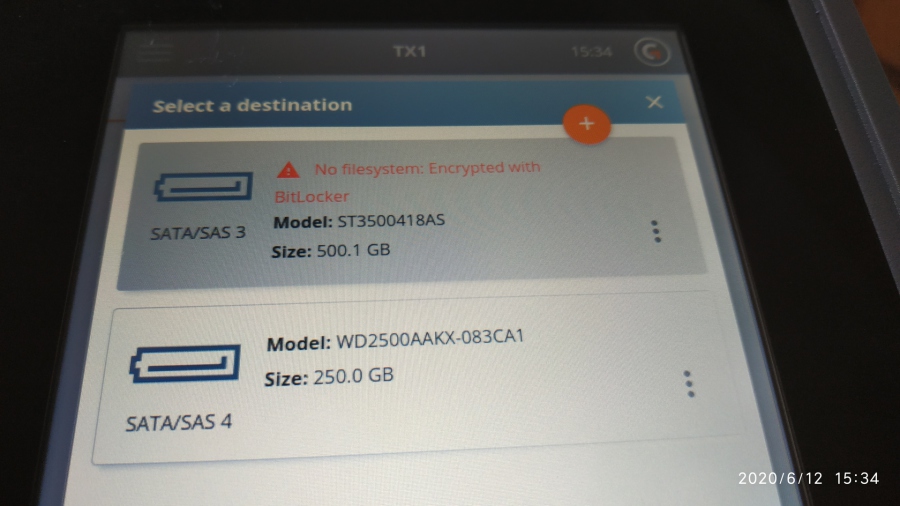
With the latest firmware (so make sure you update yours if you are an existing TX1 owner), you can also unlock Bitlocker drives by entering the correct credentials - which is very useful if you want to image drives and get decrypted disk image, or want to perform a logical acquisition of, for example Email and Efiles in an E-Discovery environment (where the entire disk does not need to be physcially imaged sector by sector).
I don't know about you, butI'm uncomfortable with imaging encrypted drives and then have the client's IT team provide me with the Bitlocker Recovery keys from Active Directory at a later date.
ProTip: Why am I uncomfortable with imaging onsite without the Bitlocker key to hand ? There is always a chance that the machine you are imaging is not in the clients Active Directory [and they are not aware], that the machine has not been enrolled into the domain properly, or this is a machine that the user has activated Bitlocker on themselves - all three usually result in an image that you can't access as the Bitlocker key is not available.
So for our beginner readers, it's good practice to have all of the Bitlocker keys at the time of imaging, so you can test you can unlock the image when you open the image file to test it immediately after it is created. Don't take any cr*p from the clients I.T team that they can't provide them to you in real time, its a two second job to look up a drives key.
Encryption Types Supported:
Digging a bit deeper into this feature, I can see that support is present for both the legacy Bitlocker file format (Windows 7 to early Windows 10) and the contemporary Bitlocker XTS AES (Late Windows 10) onwards.
I'm not sure if the TX1 is smart enough to work with drives where Bitlocker has been paused or suspended (there is an amazing article of Bitlocker forensics here on Arsenal softwares website) a good read for the seasoned and beginner alike.
ProTip: If you are a peasant like me and can't afford a TX1, its really easy to tell if a disk image contains an image of a drive that is encrypted with Bitlocker. Simply open up the image in either FTK Imager or Encase Imager (both of which are free) and examine the first few sectors of the disk. If you see FVE, this means the disk is Bitlockered and you will need a recovery key to access the data stored within any disk images of it you make. The other big clue that the disk is encrypted, is that you won't be able to browse the file system!
12. Using the TX1 - Disk Encryption Feature
The TX1 has the ability to format a destination disk so that it uses whole-disk encryption (it takes around 5-10 seconds) and will transform your bog standard destination disk into an inaccessible device without the password.
This is a nice feature and really works well if you are transporting disk images or sending them via an insecure method (such as the post office!).
Be aware though that this is not some implementation of Bitlocker, this is proprietary encryption specific to the TX1, without the password the disk is inaccessible, so make sure you have plenty of copies knocking about in case there is an issue.
13. Using the TX1 - Disk Wiping Feature:
The TX1 can wipe disks attached to its non-write protected interfaces, which is something I would use quite a lot as it is a nice way to completely sanitise a destination disk if you are going to reuse it to store new disk images.
Gotcha!: I noticed unintuitive behaviour when when wiping OpenText encrypted disks (previous section 12.), as the wipe feature does not wipe the physical disk from sector 0 forward as you would expect.
Instead the TX1 detects you are attempting to wipe a TX1 encrypted disk and only wipes the contents of the encrypted partition with zeroes. (So the boot sector and partition table are intact).
This is a strange logic choice and there is no indication to the user that the wipe function behaves differently when it is run on a drive that is formatted with the TX1's whole disk encryption function.
I would like to see this mentioned in the manual, or at least a prompt on screen warning the user that this wipe is not going to work as one would expect, to avoid a user who has not read the manual wiping a stack of disks for reuse, only to find out the hard way that only the encrypted partition was erased.
14. Using the TX1 - HPA & DCO Detection and Removal:
The TX1 has the ability to recognise drives that have a number of sectors that are invisible to the file system and usually any operating system - as a result of a Host Protected Area or other method being implemented (such as a Drive Control Overlay).
These sectors are usually reserved by vendors to hold diagnostic data or operating system files used to restore said if there is a failure. Most vendors these days take a simpler approach and keep their operating system restoration files on a hidden recovery partition, which is a lot easier to implement and maintain.
It is also possible for people (and malware) to manipulate these hidden areas of the drive for their own use, such as to store data that they don't want anyone to see. Whilst this is possible, its a ball ache to implement and I've never seen a user (or criminal) use this in all my years of investigating - and yes, I check every drive.
I'm sure that our secret agent readers, or those involved in counter terrorism who get out more than I do have seen this used to hide data out in the wild!
So remember to always check for one in your workflow.
Here we can see what happens when a drive with an HPA is attached;
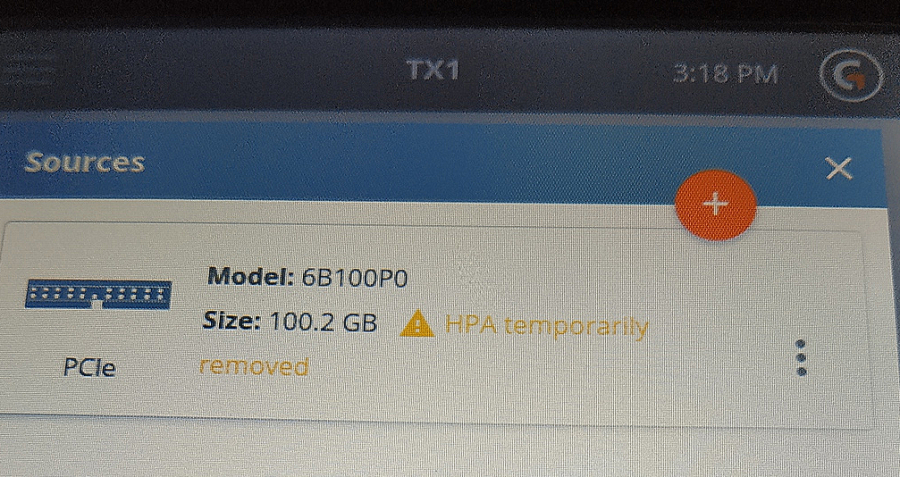 Erroneous HPA Detection Reports
RAID Detection:
Whilst we are on the subject of detection, the TX1 recognised a couple of low balls that I threw, disks that were part of a RAID set, I was impressed that it could analyse the disks and determine - correctly - that they were of RAID origin, I would imagine it is looking at certain sectors on the disk, the boot sector, partition table or combination of both to work this out.
See the bottom two disks in the screenshot below;
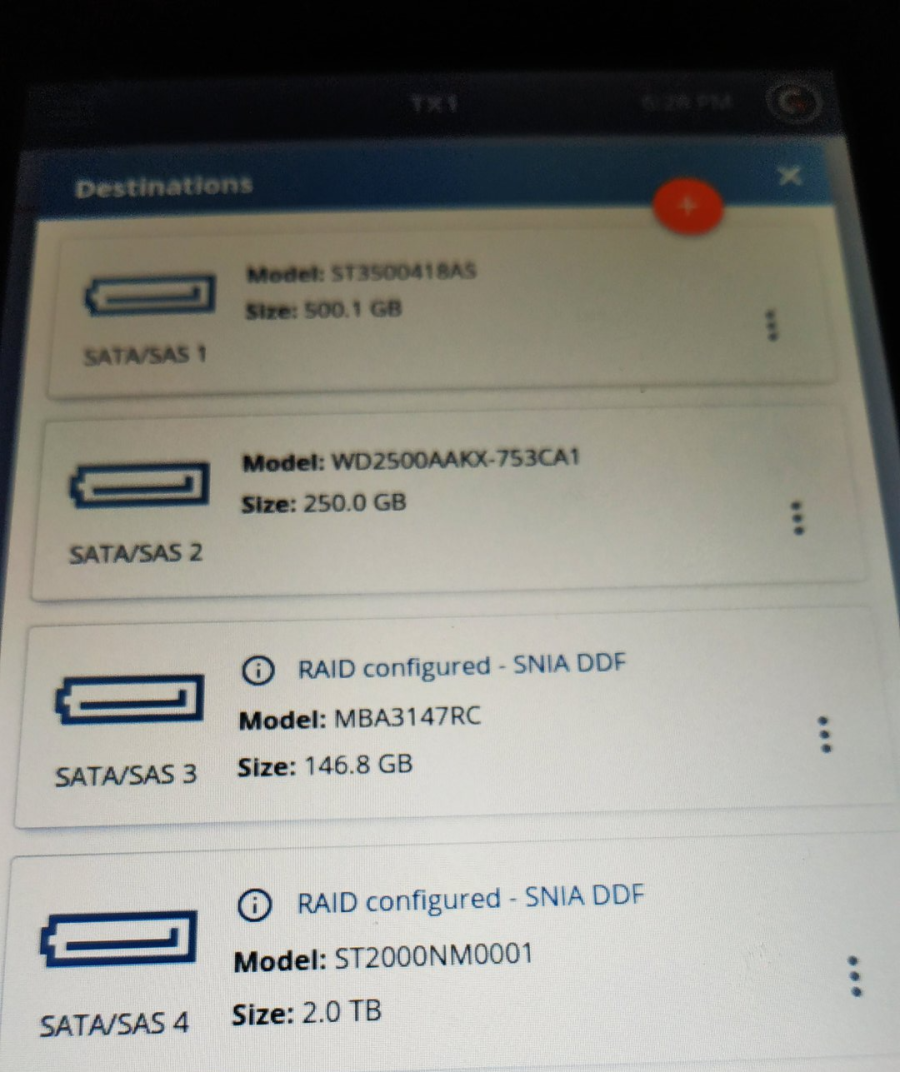 The TX1's RAID detection in action.
You can read all about the SNIA DDF format (shown in previous screenshot) here if you are interested - and this common format proves a point here - that one device can read the RAID disks created by another (to a degree). If you are learning the ropes, go here to read all about Redundant Array of Inexpensive Disks.
The TX1 does not have any capability to reconstruct a RAID image - I would not expect it to, so you can't hook up two disks from a striped set and expect to be able to browse the file system. That is the domain of software products such as Raid Reconstructer to name but one tool I use.
15. Using the TX1 - Apple Target Disk Mode Imaging:
Another interesting and very useful feature of the TX1 is that it is able to image Apple computers in TDM, which is quite a premium feature (and complex to implement) - I was surprised to see this here. There are some limitations which we will dig into, I'll come back to those.
The TX1 has a USB3 A port and a Firewire 800 port, so in theory as long as the Mac you have has target disk mode - you can image it.
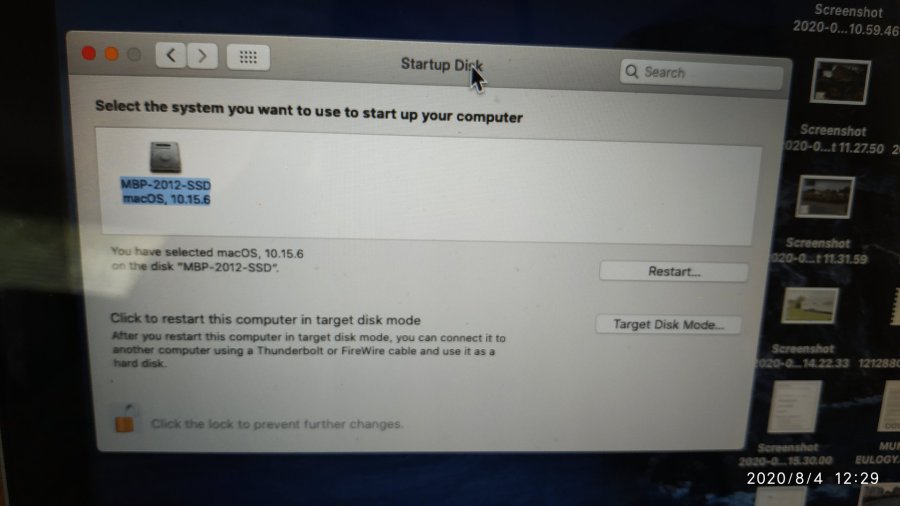
So as you can see below, we have my trusty 2012 Mac Book Pro, which is running OSX 10.15.x (she will be retired later this year when Big Sur (OS11) comes out as she is not on the compatability list).
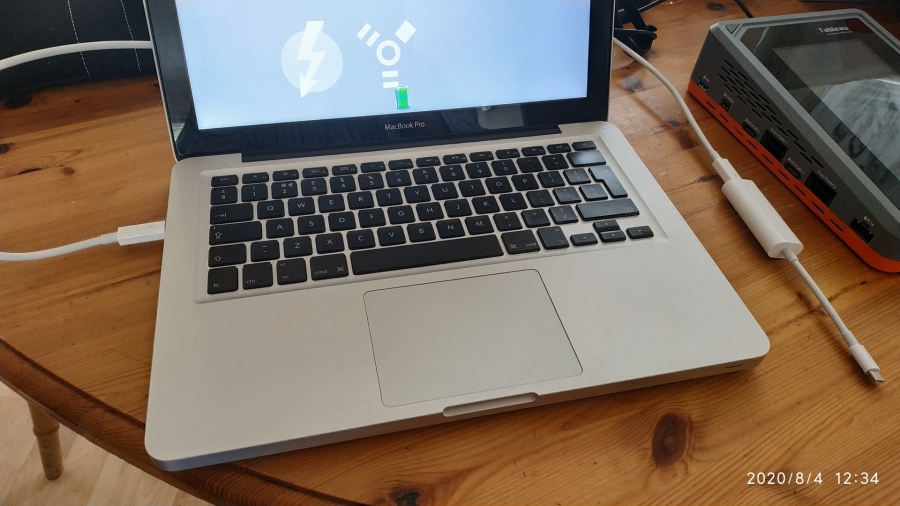 Thunderbolt AND Firewire TDM Icons!!
You don't have to be an Apple guru in order to image an Apple machine, but it is important that you understand what you are doing before you start, as there are a lot of pitfalls that can result in an image that you can't decrypt.
There are lots of guides online and if you take a look at my other reviews here (Mac forensics on a budget - its a good read) and here (Sumuri Recon Imager for Mac - all in one Mac image tool, recently replaced with Recon ITR - review coming soon) which involve Apple imaging, you can pick up some tips before you start.
ProTip: Apple imaging is a very fast changing game and one minute, limitation A applies and then a few months later, Apple make a change and A does not apply any more and you need to use some other method B.
So the Mac is ready to roll, with the Apple Thunderbolt to USBC (USB3) adapter hooked up.
ProTip: Apple imaging is a very fast changing game and one minute, limitation A applies and then a few months later, Apple make a change and A does not apply any more and you need to use some other method B.
So going back to that picture above, we have the Mac ready to roll, with the Apple Thunderbolt to USBC (USB3) adapter hooked up.
The cable (below) is your friend, don't buy a knock off on Ebay, get an original from Apple, it will last forever.
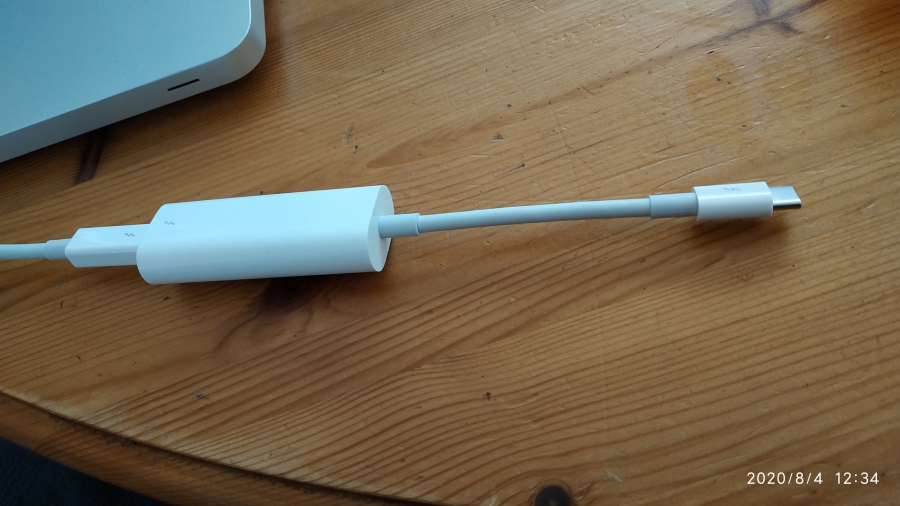
So if you are unsure of what cable you will need to connect up the Apple computer you wish to use TDM on, Apple have a nice list of what ports are on what machines here.
Page 187 of the TX1's manual (V20.3) describes what adapters you will need which shows care and attention from the manual writer.
As I pointed out earlier (is this the fourth time now ?), you really need to ensure you have ALL cables and adapters required at the time of purchase.
Getting your Apple Computer into Target Disk Mode
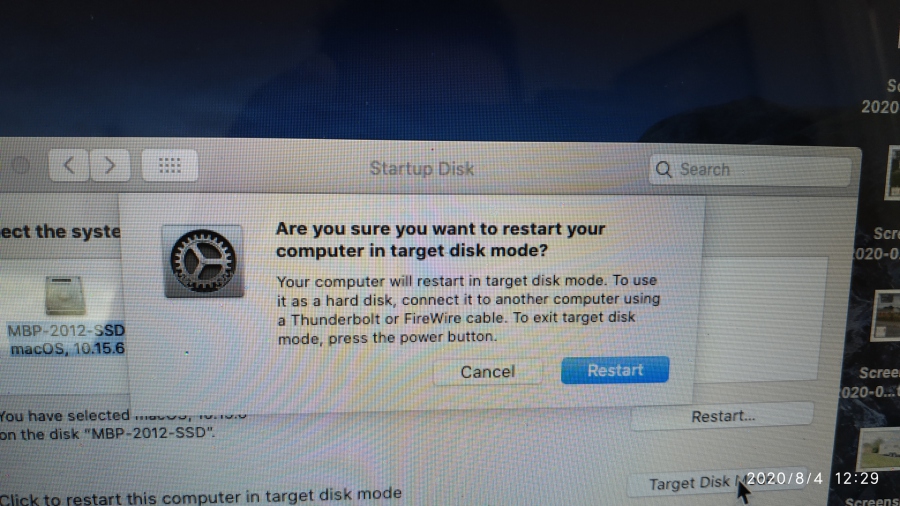
There are tonnes of articles on the web which will show you the various methods of putting an Apple computer into TDM, but for the "non forensic" test we are doing here, booting into the operating system, opening the startup disk utility and selecting target disk mode (see that button on the bottom right below) is the easiest way....
Apologies for the blurry screenshots, must learn how to operate the focus on my phone camera ;-)
The Apple OS will then prompt you restart the machine (below), before finally rebooting into TDM mode (second picture below), with the familliar Firewire/USB logos that Macs from this era displayed.
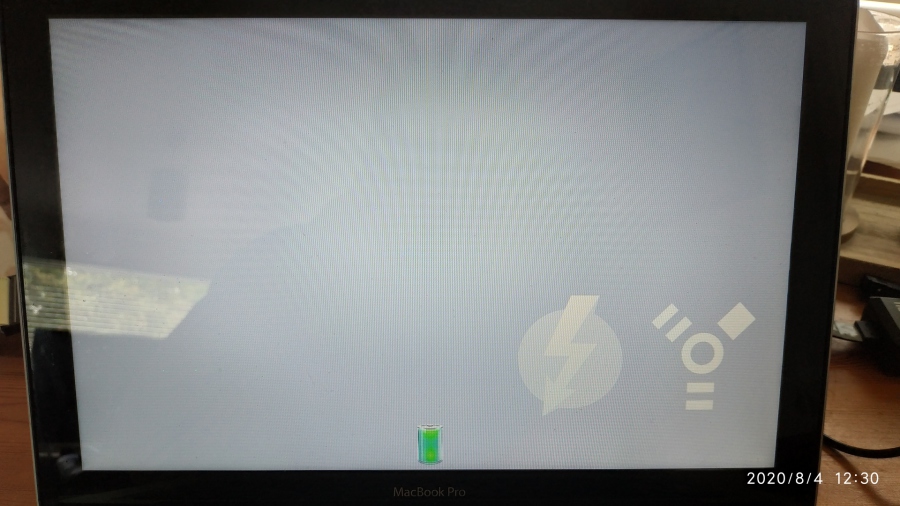 Yay, target disk mode enabled.
From this point forward, once everything is connected up, the Apple computers hard drive appears as a source in the TX1 gui and can be imaged (or explored and files encapsulated into a logical evidence file (LX01)) as if it were a standard hard drive connected to the units SATA ports.
An impressive feature here, which worked for me, on this particular machine, right out of the box.
Great job OpenText!
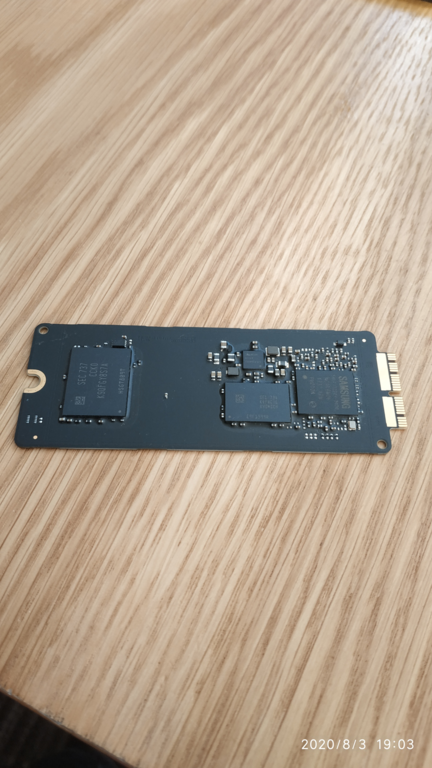
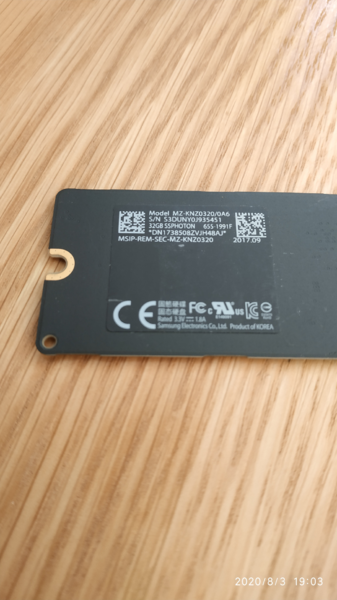
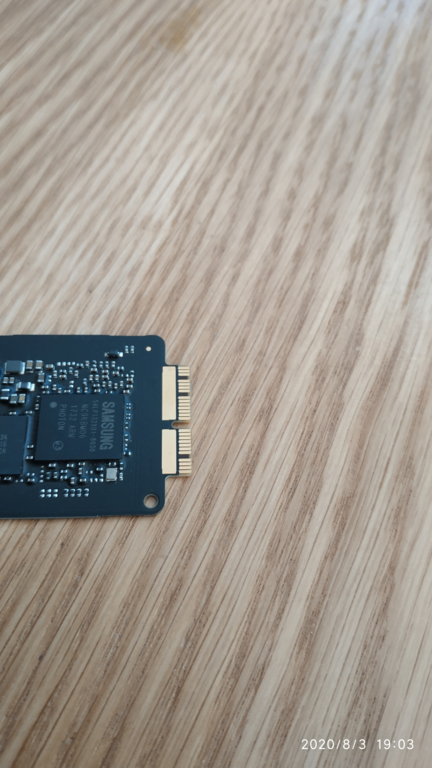
16. Using the TX1 - Imaging an Apple Proprietary SSD:
So lets keep things Apple and try something that is not exactly mainstream and stretch the TX1's legs a bit, lets play with a proprietary Apple SSD. Spoiler: Its not proprietary, its just Apple being Apple and using a different connector so they can make you pay through the nose for spare parts or upgrades.
So up for imaging we have a 32GB SSD from a 2013 Apple Mac Book Pro;

Wow, did they really make SSD's that small 8 years ago, can you imagine trying to run a Windows 10 machine with 32GB of storage on your operating system drive, thats nuts!
You will need to hook this up to the TX1 via the optional adapter (see the optional adapters section previously - waaay back at the start of the review) and also plug it in before you power on the TX1. As this connects to the TX1's PCIe port (by that bloody stiff cable) its not a hot-swappable device.
These SSD's were rather short lived and Apple quickly moved on to integrating the SSD to the logic (mother) board of the machine, so they were only around for a few years. You can also image these drives whilst they are still inside the Apple computer using Target Disk Mode (TDM) if you don't fancy opening up the machine and popping it out of its slot (see previous section).

Imaging of this drive did show an on-screen note that the drive was encrypted with Filevault2 encryption, which is good to see and nicely dovetails with the Bitlocker detection we saw earlier.
The latest firmware on the TX1 (20.3) at the time of writing this section prompts you for the password, so that you can browse the file system of encrypted partitions (as you will see in the image carousel below) and do a logical image of partitions and loose files if you wanted to, as opposed to a full physical image.
The image completed quickly at a rate that hovered around 500 Megabytes per second, which is odd because I was imaging to a mechanical hard drive that has a maximum write speed of around 100 Megabytes per second.
The only way this is possible is if the source drive (the SSD) was virtually empty (it wasn't) and/or had vast swathes of zeros in unallocated space (it didn't) meaning there was little to write to the mechanical destination drive (it wasnt) - or the maths used to calculate the average transfer rate is flawed.
17. Using the TX1 - Logical File Collection (LX01):
One of what I think is going to be one of the TX1's most used features is the ability to create logical evidence files (which are not sector-by-sector images - they contain only the files and folders you select from the suspect drive/network).
If you are in the E-Discovery world you will use this feature day in and day out to collect network shares (more on that later) or to avoid having to physically image an entire drive in a custodians machine - when you only really want live E-Files and E-Mail.
Collection at the time of writing this section is supported in LX01 format only, meaning the legacy .L01 file is not supported, so check that your tool has full support for this newer format before purchasing a TX1.
I can only assume the legacy.L01 format has been omitted to force you to enter the 21st centry and use the latest format (which does have some significant advantages - such as improved hashing and verification of individual files).
As you can see from below, there are quite a few options you can tweak - the same as if you were using EnCase to create the Logical Image file.
I set up a logical collection to take all files from a USB memory stick from the test set of media;
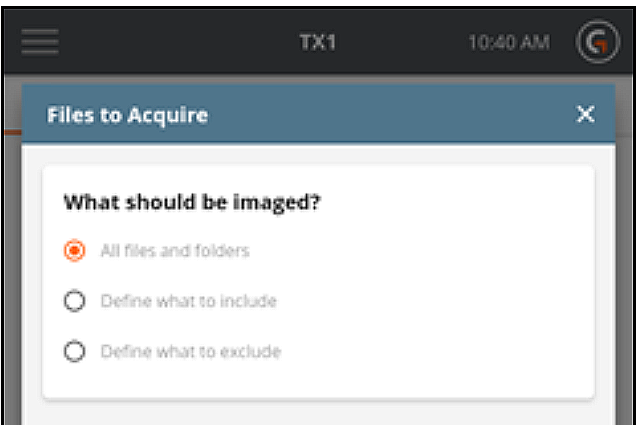
You can set up blunt or specific file/folder masks to choose which files are collected (or not), or you can just run with the default "all files", which is quite useful if you are collecting only specific types of EFILES and EMAIL in an E-Discovery collection process;
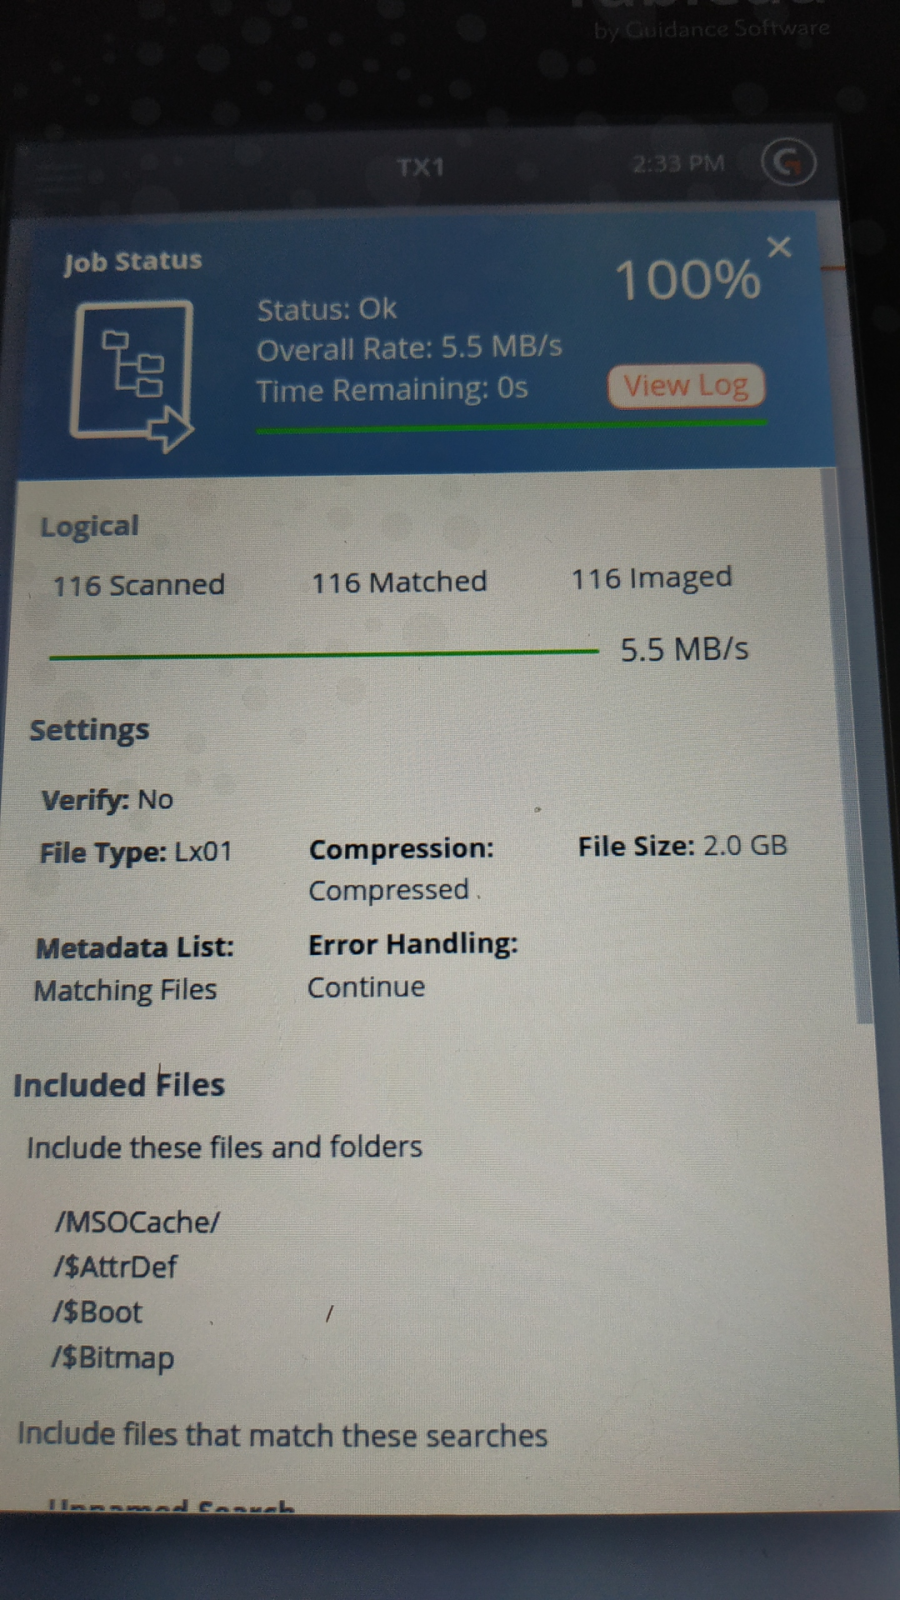
The TX1 completed this task, at a paltry 5.5MB per second which is mind numbingly slow, but before I throw my toys out of the pram, we must remember we are also imaging/writing to a pig slow USB 2 memory stick. So all in all, thats a pretty decent speed and also a good lesson in why you should not use USB2 memory sticks to image to.
ProTip: Writing to common-or-garden (cheap) USB memory sticks is not the same as writing to other types of flash memory (such as an SSD), memory sticks are super cheap for a reason - they use inferior memory controllers for the most part. Even brand name USB sticks that purport to operate at USB 3 speeds are often really really slow at writing (despite having a fast-ish read speed) so keep this in mind. My advice is to image to full fat USB3 SSD or mechanical hard drives for maximum speed.
Gotcha!: Its important to ensure that you set your error handling to "continue" (which is not the default) during Logical Imaging, as otherwise the TX1 will halt if a file cannot be accessed for any reason (locked files on a network, files that have been moved since the collection began are two reasons why errors may occur). This allows you to leave the TX1 unattended (overnight for example) and then examine the log files for any errors after the collection has finished. Instead of coming in and being told the image failed on file 3021 of 1,000,000 requiring you to restart the collection process.
I'm impressed with this feature, it is definitely a real time saver - if you put the effort in and set up the collection mask before you begin.
Metadata Collector:
Its also possible to use the TX1 to logically map the contents of a device, by collecting file system metadata for each file (instead of copying the actual file). This can be a great way to produce data maps for your client, or another way for you to identify what you want to collect and from where on the clients network.
Output is to a very tidy .CSV file which can be imported into your tool of choice for analysis. You know, the ones that make nice pie charts showing clients they have 13,000 spreadsheets and 49,203 word documents and 900,000 animated cat GIF's that you are going to charge them through the nose to ingest into Concordance.
18. Using the TX1 - Visual and Audio Feedback:
As you may have noticed in the various screenshots in this review, the TX1 has a really nice status led in the bottom right corner, this shows Green for when something completes, Blue for when a job is in progress (and other conditions) and Red if there is an error. There is also an audible "bong" sound that plays when a task completes. You can even change the volume of the sound or switch it off if you are doing covert imaging jobs.
This is an excellent feature, so when you are next playing Call of Duty, Spongs or Commander Keen on your laptop when the boss is not around, you can see from a distance what is going on and even hear when something needs your attention.
You can also log on and monitor the TX1 if you have it connected to your LAN and see from the web interface what is going on, but the led and buzzer are what most people are going to use.
19. Using the TX1 - Network File Capture:
One of the TX1's other killer features is the ability to capture data across a network, if I was buying a TX1, this is what I would be purchasing it for - say good by to FTK Imager, Robocopy and its command line switches - or anything else that requires you to interact with your collection laptop, the custodians workstation or the clients server console.
Simply plug the TX1 into the network at your custodians desk (if permitted) and you have the ability to capture home folder or network share data to the LX01 logical evidence file format.
The TX1 is equipped with an integrated 10 Gigabit (over copper) LAN adapter out of the box, meaning that you can hook the TX1 up much closer to the fire than a custodians desk (which will be 1 Gigabit at best) if you wanted to.
Taking the TX1 into the comms/server room of your client and hooking directly into a 10 Gig switch will allow you to collect data at speeds far in excess of what could be acheived at the end-point (the custodians desk).
ProTip: Note that the TX1 uses a standard RJ45 connector and as I said, runs over copper, so if the switch you are connecting to has fibre ports (SFP+) you are going to need a tranceiver like this if you want to hook the TX1 directly into it. I have not tested the transceiver with the TX1, so if this is going to be important to you - ask them first before you purchase!
In my experience you will see lots of this legacy SFP+ stuff, especially in smaller organisations who can't replace their infrastructure as often as the big boys do. If you buy a transceiver, don't cheap out and go via Ebay, buy from a well known vendor - which will reward you with stability and years of trouble free service.
How fast is 10 Gigabit Ethernet in real money?
Well, divide that 10 Gigabit figure by 8 (remember forensics class 101 - 8 bits makes a byte, so going from bits to bytes is divide by 8) and you arrive at raw Gigabytes per second which is 1.25GB or 1,250 Megabytes per second.
Doc Brown's pop would be mighty impressed that we can image at a rate beyond the infamous 1.21 Gigawatts. Sadly, you are not going to see a flying DeLorean or that transfer rate in the wild for a number of reasons!
Firstly, the network protocol overhead will eat into that transmission rate (up to 10%), secondly if the switch is on a busy network (and has some form of load balancing and/or management) its not going to give some random nerdy forensics guy the entire 10 Gigabits of bandwidth to yourself.
 Don't be a bandwidth hog.
Thirdly the data source (a Server for example) may not have a RAID array that can deliver anywhere near that level of throughput and fourth, you will see steep drop offs in transfer speeds when collecting productivity documents such as word, excel and other relatively small files.
Nobody at OpenText has made any silly speed claims (other vendors do - Logicube I am looking at you) so kudos for them for not trying to sell you the fastest network imager in the world (or some other marketing nonsense).
Where you will see speeds in the same ball park as the theoretical maximum is if you are imaging fast NVME SSD's over the TX1's PCIe connector and are imaging out to a multi drive NAS or Server over that 10Gb LAN port.
This was a smart move by OpenText and is a feature that I would make sure you take advantage of, especially with very large data collections across a network.
Writing Evidence files to the Network:
To round off this stellar feature, the TX1 can also write out image files to a local network share, removing the need to continually swap out destination drives. There are a number of different methods that the TX1 can use to present/capture devices to the network - including iSCSI and CIF.
ProTip: One thing to remember is that when you hook up a TX1 to your clients network, do some small tests first to assess the impact of your sucking data down the wire to the TX1. This is fine if your client has nothing time critical (or production processes/machinery) running, but if they have for example a multi-purpose server, which does file, print, database, email - caning it with the TX1 could lead to degredation of the end user experience - or in certain cases a database falling over due to delays in reads/writes. This could ultimately have a cost associated with it which is going to come your way if you didn't do any load testing first (especially if you are jacked in with the 10Gb network cable to an unmanaged switch).
So my tip is work with the clients IT team and ensure that the network infrastructure (switches etc) and the data sources (servers, storage arrays, etc..) can handle both your demands and that of the users at the same time! The simple answer to this issue is do imaging overnight when everyone has gone home.
20. Using the TX1 - Keyword Searching During LX01 Creation
The TX1 has a rather interesting search function that can be used when capturing files into a LX01 logical evidence file.
Its possible to set up some rather advanced search criteria and keywords and let the TX1 carry out these searches during acquisition.
The list of files that the TX1 can search is extensive, with all the common bases covered such as Microsoft (and a myriad of other) productivity document formats (word, excel, etc).
The TX1 can also search compound files, such as E-mail containers (.PST) and other structured files.
I think its important to point out that this search functionality is what I would describe as advanced for a hardware imaging device, but rudimentary when compared to an indexing/searching engine of a E-Discovery platform.
After some consideration, I think that this feature is squarely aimed at Law Enforcement users, who may only have a very short period of time to obtain a lead or some initial evidence in order to detain a
suspect.
I'm sure there are some limitations as to how well the TX1's search function works and I really would have liked to of explored it from a curiosity stand point, but my advice is don't let it be a replacement for indexing your data in something like FTK or Axiom if you are a small shop like me (the indexing engine in Encase is terrible, so stay away from that) or the bigger E-discovery platforms that the big-boys use.
I've commented on this feature as I feel it is a very useful one, but alas this was one of the features that I could not shoe horn into the time I had alotted for the TX1 review.
21. Using the TX1 - Logfiles:
Ah there is nothing better than fixing your own problems, particularly when you have a detailed log file to hand. Note to certain vendors: Stop encrypting your bl**dy log files, we are not all eastern-bloc hackers trying to reverse engineer and copy your software.
The TX1 does not disappoint in the logging department (and I'm hard to please), it has a very tidy and neat part of the interface reserved exclusively for logging information as you can see below;
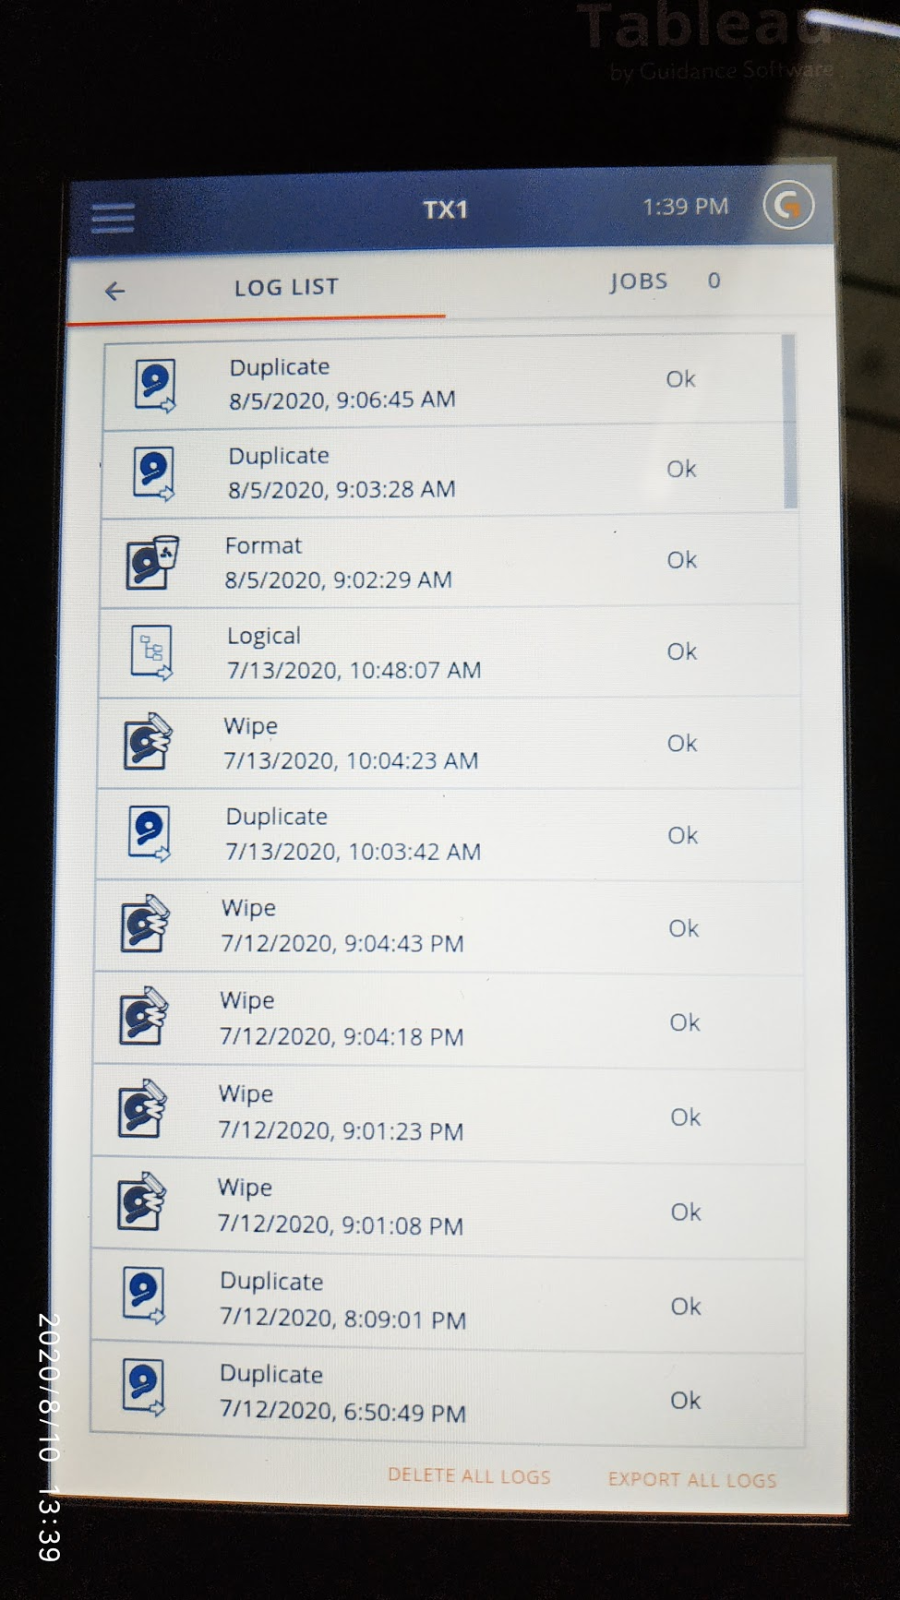 Job logs screen
This is an absolute god-send, because as nice as the queued jobs (discussed elsewhere) are on the TX1, I can imagine that if you have a few TX1's running in full-auto mode on a big E-Discovery collection operation - you could get into a muddle rather quickly!
ProTip: I always check log files once an image and verification of something has completed, you will often see useful information (such as bad/unreadable sectors or files that could not be copied during logical image file creations) which will save you a lot of problems if you return to the lab without checking them at the time of imaging.
This is not always possible if you are collecting a lot of data from a lot of sources, so what I used to do back in the day was use a macro in excel to examine all of the log files just before the end of the day and only show me failures. You can then set up re-collections for failed files (usually down to exclusive file locks or some kind of permissions issue) and recollect without having to manually trawl and filter potentially hundreds of log files one at a time.
Digging Deeper - Log Files:
To me, verbose log files are extremley important, be that just for my own peace of mind - or for when the TX1 is handed to a junior employee, they are going to be able to view the logfile themselves and learn to work out what went wrong.
Check out the following images of a nice looking HTML log file that the TX1 stores;
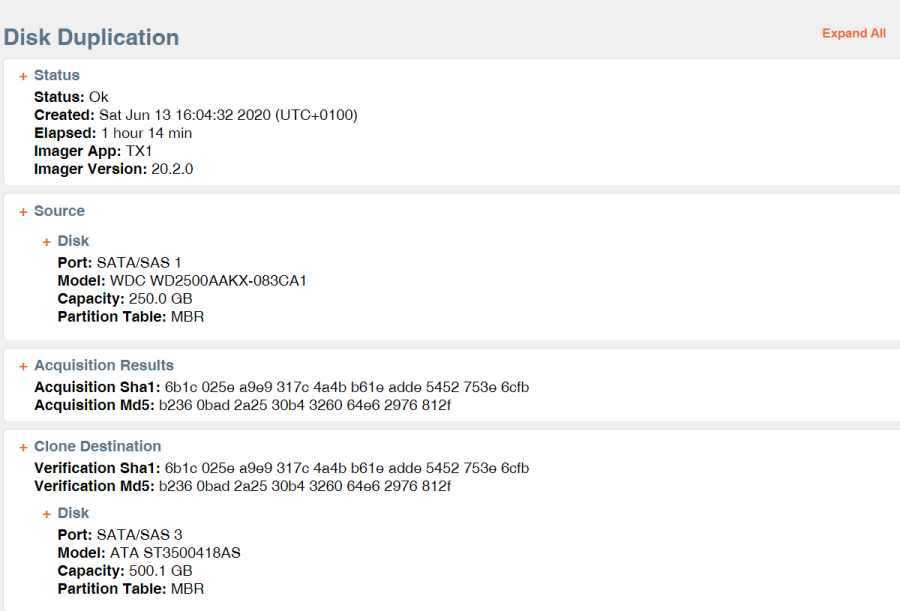
I've dug up some random plain text log files so you can take a look; [click to enlarge]


The first thing we notice is that there is a nice structure here, something that the script fans amongst us could easily carve out and use to populate spreadsheets and automate log checking tasks as I touched upon earlier.
I'm not too sure about the error codes, for example "0x6ea277c570490416" for when an operation fails due to a full destination disk. Can't we have something like Error 15 ?, but there is a text base failure reason code for each error "Destination is full" in this instance.
We also have some really nice additional information, such as the size of allocated files in each individual partition on the disk (or in other words how much space is used on the disk).
Its interesting to see that the default error granularity is 32 Kilobytes, which means if the TX1 sees a bad sector, it is going to mark that sector as unreadable (and pad the image file with zeroes) and the remaining sectors in that 32k block. Thats quite a large default value, but you can change that to a much smaller value (around 1kb if my memory serves) if you think this warrants the potential longer imaging times as the suspect drive is repeatedly re-read in an attempt to get the sectors surrounding the bad one(s).
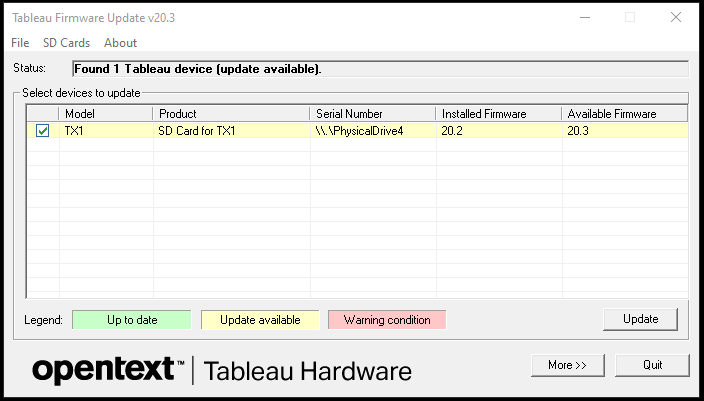
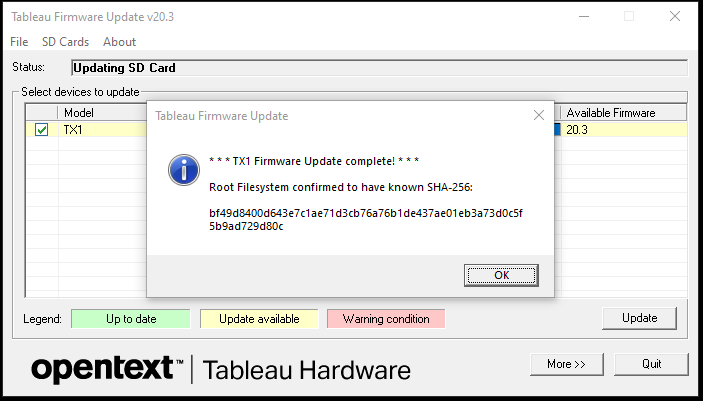
22. Firmware & Updates:
Firmware updates are something that you either religously pursue like Panini football stickers when you were a kid at school, or that you never bother with.
I wish that vendors would realise that there are a *lot* of customers out there that don't update their firmware because;
a. They don't know how to update the firmware.
b. They are scared to update it, they updated something in the past and it bricked it.
c. They don't want any new features and are happy to use it in stock form.
d. They are not allowed to update the firmware, thats the boss or IT departments job.
e. Something else.
The TX1 is not an internet connected device, so OpenText can't forcefully "push" updates out to it (although you can update it over a LAN), as say Google does to the Apps on your Android phone or Apple does to your iPhone.
Old Dog Learning New Tricks - On Borrowed Time ?
The TX1 is an old dog learning new tricks all the time, so it is a testimony to OpenText that they are continuing to support this model, I will certainly give them praise for that!
What you should know is that the TX1 is built on very dated hardware - compared to even a contemporary £99/$99 budget smartphone - its a very old design.
I've asked OpenText if they are planning to retire the TX1 in the next 12 months and replace it with a next gen unit. The official answer was that "at this time they have no plans to retire the TX1 and replace it with something else".
At least that reassures those that are a little hesistant to invest serious coin into a device this far into its life cycle.
Updating the Firmware:
Heading over to the Guidance Software firmware page, we can see the TX1 has plenty of revisions, apparently the mind-numbingly stupid number scheme (we go from Firmware V7.31 to V20.1) is because someone high up at OpenText likes everything to be uniform and match with other products in their range (for example, Encase went from V8.x to V20.x overnight).
Yes, it is corporate madness - but it keeps someone in marketing in a job.
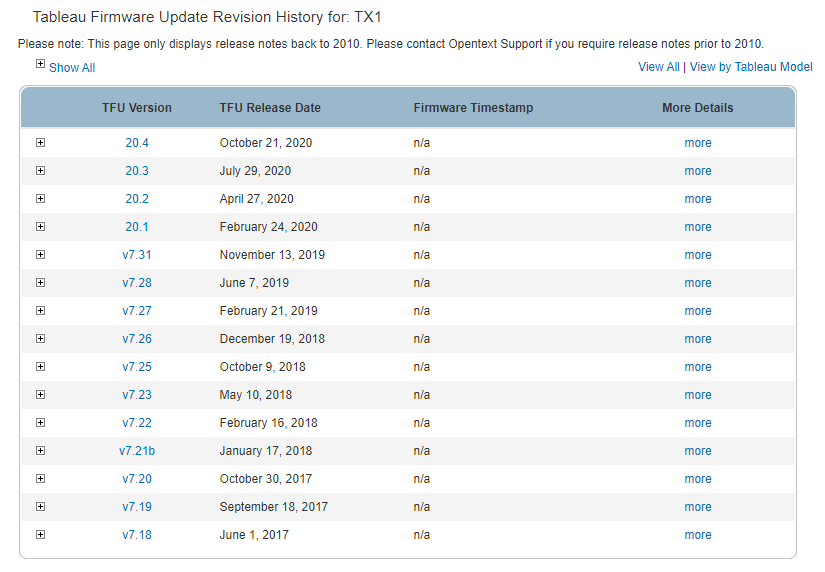
You can look at this number of firmware updates as a positive, that they are constantly updating the unit with new features, or you can look at this how I do - that they are fixing things that should never have made it past internal quality assurance testing (more on such issues later in the review). It all depends if you are a glass half-empty or half-full sort of person - me I'm a realist.
I've read these change logs and there are some real douzies in there, so the TX1's development team are now well and truly on my radar.
Updating the TX1 can be done in a number of ways, the easiest is to plug in a USB drive into the unit which has the firmware file on it.
As an alternative, you can take the SD card (which contains the firmware) out from the back of the TX1 and put it into a SD card reader attached to your PC.
 Firmware SD Card
Its then off to the OpenText support website to download the PC based Tableau firmware update software. This tool is Windows based, there is no version for Apple machines - so keep that in mind. Who uses Macs anyway *giggle*.
Firing up the firmware update software quickly detects the SD card and begins the update process - this takes a few minutes and once done, the SD card goes back into the TX1. Reminds me of how I used to update my TomTom SatNav in the early 2000's :)