Macquisition (BlackBag) 2019R1.2 Review
By Jon Munsey - Last Updated 7/2/2020
UPDATE: 20-FEB-20
I have become aware that a new version of Macquisition has been released, check it out here.

DISCLAIMER: This review is my own personal opinion and does not reflect the
views of my employer or any other third party.
Any images or trademark logos used are the copyright of their relevant owner and are used here as permitted by international law under "fair use" for journalistic and reporting
purposes.
The results posted here are as a result of limited informal testing, your experience of this products functionality may differ.
1. About This Review:
 BB Website circa 2003 - Click to enlarge
What is going on with that drive in the Hardware photo above!
Just to remind you how long ago this was, their tools at this time supported MacOS (as it was known) V8.1 to V9...... now that is going back.
Oh god... he is off on a tangent....just indulge him, it will pass.
MacOS - The Early Days
Check out how those archaic operating systems used to look, talk about a blast from the past (well the late 90's anyway!).
 MacOS 8 - Circa 1998
 MacOS 9 - Circa 1999
A Potted History of OSX:
The big leap for Apple was the transition from MacOS 9 to what we now know as the OSX (Operating System Ten) in the year 2000. Interestingly, right up until 2006 and the release of OSX 10.4.4 "Tiger" Apple computers used IBM's PowerPc chips, the switch to Intel processors was swift and offered more bang for the buck.
OSX (now no longer known as MacOS) is currently in its fifteenth incarnation at 10.15.3 Catalina at the time of writing. Long before Microsofts "Windows 10" as a service plan, Apple had the idea of having one product and simply refining and updating it. I'm sure they stole that idea from someone else, like most things they implement :)
Whats more, OSX has always been free to download and use, no licence keys, no activation - free. I guess that is fair seeings as they are robbing you blind for the hardware and the fanboy/fashion status of owning an Apple product *grin*.
Today it is possible to buy old versions of OSX from places such as the Apple Developer store, Amazon and Ebay - they even used to distribute them on USB memory sticks. No licence keys, no activation, reminds me of Windows 3.1 - in a nice warm fuzzy way.
BB's Other Software:
Getting back to BB, I did a trial about a year ago on 2018's Blacklight (BL), which was BB's flagship Forensic's Suite at the time and still is. I sadly got very busy with case work and this never got published - they have made many many changes to it since my trial, so the review lies dormant - obsolete.
I would like to do a full long term review of the latest version of BL, but I don't think that will happen anytime soon.
BB Acquired !
Yes, its true, if you didn't know already, BB has been bought out by Cellbrite. It will be interesting to see where this takes the product, hopefully they will roll all of BB's products into a one price suite.
 MQ product summary
Whilst we are on the subject of marketing, has anyone else been getting marketing E-Mails from BB which list a number of reasons (most of which don't make sense) why you should switch to BlackLight (their forensic suite) ? I've heard of comparing apples to oranges, but this is just bizzare.
I don't know if BB have the expired SMS charges disease like other vendors so I can't comment on that.
6. Soft Block Write Blocker Overview:
So, if you are in a law enforcement or certain corporate environments, then is likely that some form of write blocking protection when imaging computers via Target Disk Mode (TDM) is essential, as we touched upon in the pricing section previously.
SB essentially controls disk arbitration on your imaging Mac (the one you are running MQ on), so that the suspect Mac's hard drive being presented via TDM is not mounted in a writeable fashion (which is the default if you don't use SB).
So don't get caught out by that!
Why do I need this ?
To avoid confusion, you don't need SB if you are booting the suspect Mac directly from the MQ dongle (as MQ takes care of write protection when you do that).
If however the suspect machine won't boot from the MQ dongle, then you need to use SB on your lab/portable machine, which you will be conneting to the suspect machine over TDM.
Another use for SB is when you want to simply preview a machine (as opposed to image it), so you can safely attach a suspect machine that won't boot into the MQ dongle - by TDM and rummage around in finder or other tools without risk of changing data.
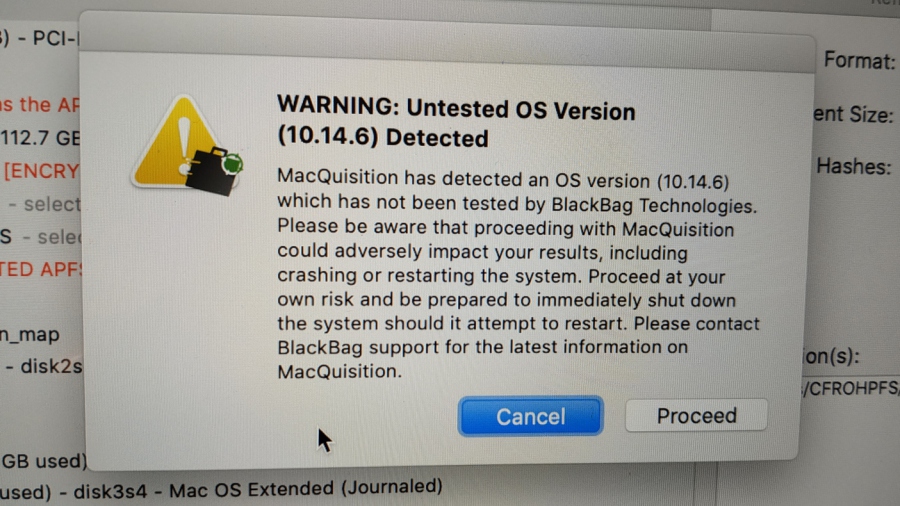
As we can see from BB's website blurb, the current version runs on OSX 10.9.5 (Mavericks) to 10.14.6 (Mojave)...
This screen shot was taken from the product page of their website;
 Softblock Features
There is no mention here of Catalina compatibility, so I am assuming that this documentation (on their website sales page) is either out of date, or SB is not Catalina compatible. Sumuri (BB's arch rival) have just released Recon ITR which has write blocking built into the imaging part of the program - and that does run on Catalina (as I was playing with it last night!).
Wait...come back...don't go there yet, I've only just go started!!!
You really need to clarify this with BB at the time of purchase, as if your lab machine has Catalina, and you intend to use it to do TDM images of suspect machines (where you are logged into your Lab machine's OS and running MQ from there) - you are up the Kyber without a paddle if SB is not Catalina compatible.
A downgrade to Mojave or earlier may be the order of the day here for your lab machine.
Gotcha! Some Apple computers have restrictions on which "older" version of OSX they can run. The newest machines may not let you run a version of OSX that is older than the version that came with the machine, so check this out with both Apple and BB to avoid purchasing a paperweight.
Tom O at BB I am sure would be more than happy to make sure your purchase goes smoothly.
ProTip: Downgrade like a boss, by using the MachineProfile program from the Apple App store, this will tell you the oldest version of OSX your machine can run - and its free!
Sadly I can't tell you any more about SB as I don't have a licence to play with and test *sad face*.
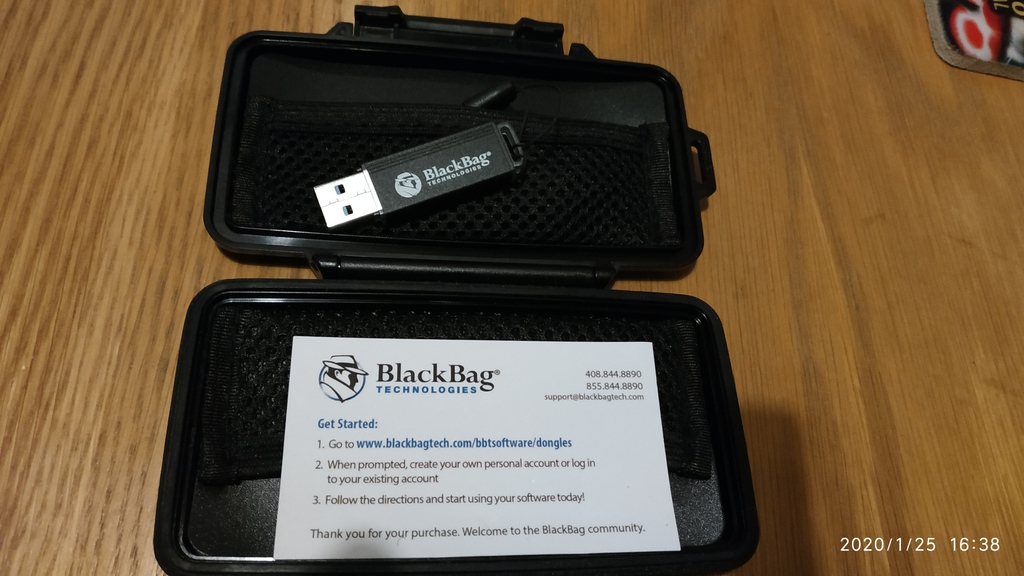
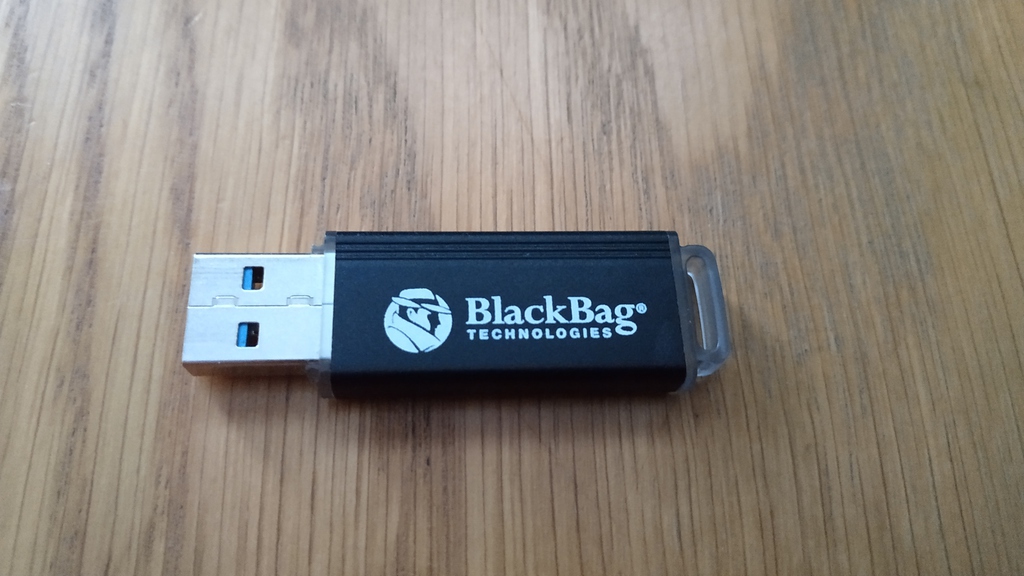
It comes in a nice zombie-apocalypse proof peli style case, so you won't lose this in a hurry!
I've put a few photos together in the gallery below, as it does look a very professionally presented piece of kit. This is how it is done Sumuri :)

9. Further Resources & Reading:
10. What You Need To Know About Imaging Apple Computers:
So here we are in 2020 and as hinted at in the introduction, I'm going to tell you that imaging contemporary Apple computers is no longer as simple as removing the SATA mechanical hard drive, connecting it to a write blocker and making an image.
Nor is it the same as getting a flashy SSD adapter and plugging that into a write blocker and making an image - you know, those teeny SSD's that plug into the sockets on the logic board (which is proprietary on most machines - so get an adapter lol!).
Its not getting any simpler is it ?.....
Nor is it as simple as plugging in the MQ dongle into the suspect machine and booting to it, to image out to an attached USB drive on contemporary machines.
Those days have all but gone....
If you want me to describe it, imaging Apple Mac computers is only straight-forward if you have very detailed knowledge of limitation X or cable Y and encryption setting Z, otherwise you are going to be in for some hair pulling and some frantic manual scouring.
Read The Manual Before Complaining:
As you may have noticed, I usually bang on about reading the manual cover to cover, well this is one of those products - so if you buy this, make sure you do :)
This is an opportunity for a vendor to shine, if something is difficult or complex, a step-by-step guide is what is required.
Look at iFixit's website, they found a niche in the market and developed that to the point where a blind monkey with one hand - which has only two working fingers on it - could take apart a Macbook pro and replace the DC in board for £10.
The manual should be a bible of accurate information to refer to at any time you feel lost or can't remember how to do something.
I often buy software on the basis of the documentation, some vendors for example, are so detailed, you can teach yourself without the need for a training course.
I am not encouraging our younger readers to embark on a career of teach-yourself-Encase/X-ways etc. Simply reading from the manual instead of getting a proper traning certificate under their belts is not a good idea! But in a pinch, good manuals can be the difference between success and failure when out in the field.
So Where Do I Start ?
There is no guide or chart in the manual to tell you what Mac boots from which version of MQ - there are 4.
This is where a quick reference chart (like the one Sumuri includes with Recon Imager (Now Recon ITR - review coming soon, subscribe to be notified)) that saves you a world of pain - becomes indespensible.
The MQ manual simply tells you to start with the most recent version of MQ and work you way through the older versions until you find one that boots your suspect machine.
What? Say that again......
I've seen some strange stuff in my time, but wow this is a bit casual - for a "forensic" product at this price point, this is not acceptable to me. This content may be elsewhere within the BB website or elsewhere, I don't know, but it should be here in the manual.
So I have thrown my toys out of my pram - lets pick them up and continue (I may need them again later).
I will help you all here, see this screenshot below, that shows you the base image (version of OSX) that the different MQ flavours run on (the 2015 version of MQ is missing). You can then look up what the suspect Mac can run (found elsewhere in this review, search for MachineProfile), from this you may well be able to work out for yourself instead of guessing which version of MQ to boot from!

Ooops I Booted The Suspect Machine:
There are two reasons why BB need a quick reference chart to tell you exactly what version of MQ is needed for each Mac;
a) If you are unlucky and choose the wrong version, you are going to boot the suspect system to the desktop (I'll go into more detail on that later on - with a section dedicated to it).
Explain that to the opposition counsel at court, its not a very forensic process is it if your vendors instructions are "try x, then y followed by z until it works". I've been in the courtroom one time in my life - many years ago, explaining why I booted a suspect machine - and don't wish to repeat that painful process.
b) Your RAM image is likely to fail or crash the machine if you are not using the correct version of MQ. So a reboot is in order and further RAM may overwritten.
Both of those reasons are not something I have made up or read somewhere, these are things that happened to your humble narrator - during the large amount of time I have spent with MQ for this review.
So please, BB, use some of your resources, buy a few used Mac's and get a junior employee to record the results in a spreadsheet, put them in a table and then add them into the manual. Its not difficult, time consuming or expensive - you don't need to test every single mac on the planet - just architecture branches for each generation.
Trial and error is simply not acceptable at this level of the game.
Physical, Synthesised or Loose File Logical Images - You choose !
The next question for me, is do you want to go for a traditional Physical Image (sector by sector), Synthesised Physical images (at the APFS volume level) or do you want to collect "loose" files from the suspect machine into a logical evidence file. Under certain scenarios, MQ can do all three. Nice!
Physical imaging used to be a piece of cake on older Apples (pre 2018) before the T2 security chip came along and caused us issues with APFS and encryption of unallocated space.
Remember, the definition of unallocated space and how it works has changed with APFS - no longer are there contiguous blocks of free space for each volume - its all lumped together now - all the APFS volumes share the free space "pool" available on the disk. Get a good understanding of how this works, before you decide if you need the physical imaging features on offer.
ProTip: Fail to Prepare, Prepare to Fail:
Next time you hear that there is an Apple computer in use by a custodian, ensure you get the following before you show up;
1. EXACT model number (A1466 AND the revision code MD628LL/A as an example)
2. Operating System (High Sierra, Mojave, Catalina AND revision number 10.14.6 etc..)
Both of these can be shown onscreen by clicking top left Apple icon and choosing "About this Mac" or in the "System Report" found in System Preferences. Turning up and finding a Mac with an unsupported OS could mean MQ won't work as you expect.
You also really want to know
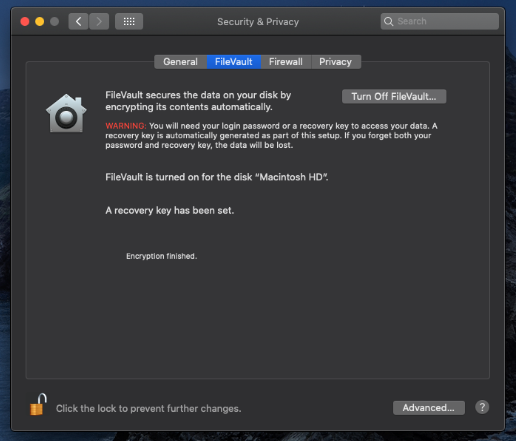
3. Is Filevault turned on (System Preferences -> Security -> Privacy Tab)
4. The admin password (or a user account with admin privileges) and the firmware password to the machine (if it has one).
With these four pieces of information, you can determine;
a) Which version of MQ will be needed to boot the device (if possible)
b) You will know if you need to use Target Disk mode and a second Apple Mac for the imaging (and which type of second Mac is required - as any Mac won't do, there are restrictions). For example, you can't connect a Mac with Firewire 800 ports to one with only USBC ports.
c) Whether you need a Thunderbolt 2 to 3 adapter.
d) Whether unallocated space will be encrypted and not carveable (meaning it is pointless to image it). If Filevault is on and its a T2 Mac - unallocated cannot be decrypted to the best of my knowledge.
They Won't Tell me all That up Front:
If you simply can't get this information from a custodian, then you need to make sure that they know you will do your best, but that 2 hour window you have to image their machine before their next meeting with the VP of Megolomania may not be enough to get the job done.
So with that in mind, lets move on!
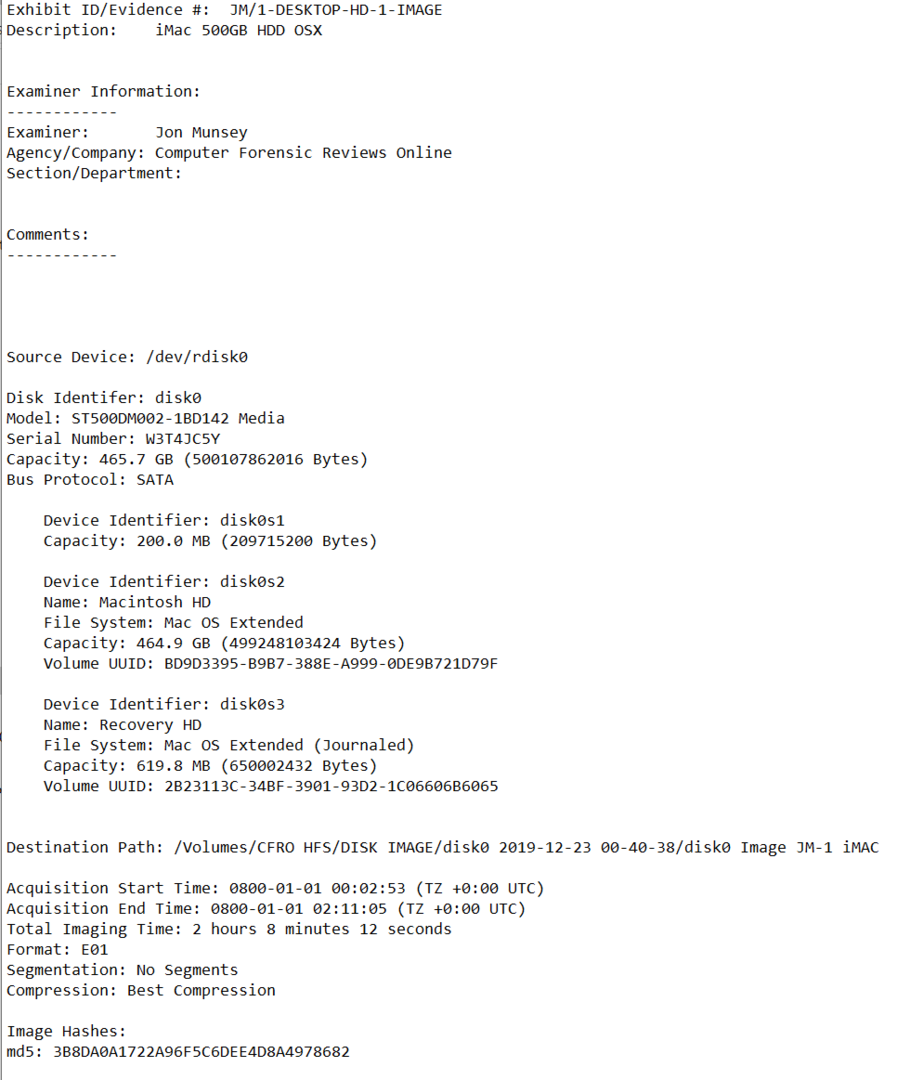
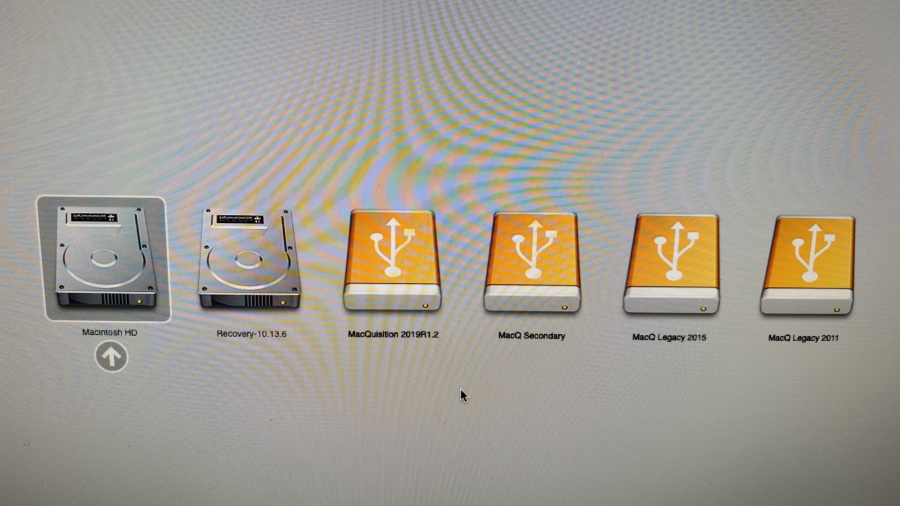 2009 iMac - MQ Boot Options (Click to enlarge)
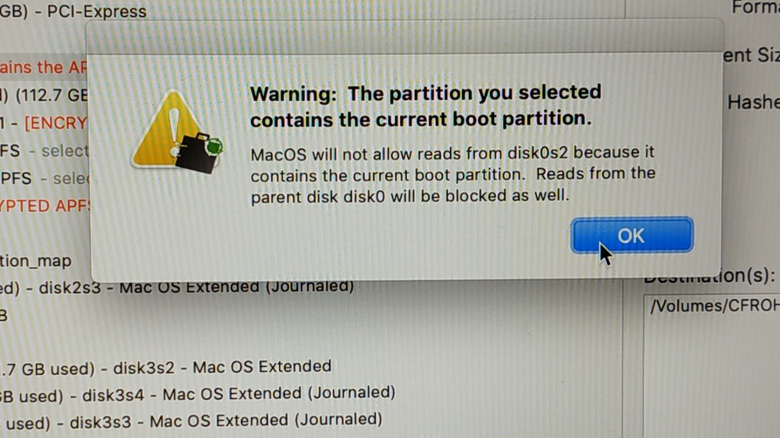
You will note the two silver drives, Macintosh HD is the partition (volume is the same thing so I use those interchangably) on the machine's internal disk which contains the suspect Mac's operating system.
This old bus has High Sierra 10.13, its the latest this machine can officially run due to Apple restrictions and their insistance on sending old machines to landfill. That OS is fairly recent, so it makes this machine perfectly usable for donkey work.
Note the second silver icon is the recovery partition "10.13.6" which you can boot into to re-install OSX, select a startup disk or use disk utility should you want to.
You don't want to click either of those - as that's going to change data on the system drive. Important if you are doing a criminal investigation, not the end of the world if you are doing a corporate (but document it if you do it!) so keep that in mind !
We can see 4 orange external volumes to boot from.
*Update* I got one of those little white wireless keyboards that came with one of the Mac's I purchased for this review - so I am now no longer a peasant with a PC keyboard! Update: I could not get the s*dding thing to pair properly, so I am back to peasant spec with my PC keyboard.
Gotcha! BB recommend that you always use a wired keyboard when booting MQ, as a wireless keyboard may not initialise fast enough under some conditions - and your frantic holding down of the Option key may not be recognised. I like attention to detail, so kudos to BB lets hope we see more of this.
If you see a padlock icon and no list of drives when you boot the target machine from the MQ dongle, then there is a firmware password that you will need to remove - hold Command R or ALT R (on a PC keyboard) to enter the firmware settings to disable this (requires the firmware password, which may not be the same as a users login password - well it might be, so try it!).
Gotcha! Also be aware that if a custodians password contains symbol characters and you are using a wired PC keyboard that you brought along (in place of a wireless one for example), you may not be able to type the correct characters into the password box - you also can't change the keyboard layout settings in MQ that I could see, so watch out for this one if you get incorrect password warnings. You may be forced to use a wireless keyboard in that situation.
I'm diving in with the 2019R1.2 version of MQ, the first game orange icon on the list.... Steven Falken would be proud...
 Failed Boot 2019R1.2
That failed, this "No Entry" or "Forbidden" sign (see above) shows that the Mac can't boot from the environment on that partition of the MQ dongle (its too new, the machine is not supported as it is too old).
This isn't MQ's fault, it is a limitation imposed by Apple. I would imagine that Apple's boot code is querying either the CPU id or the model number of the machine and not allowing it to boot (as Apple regularly culls older machines from running its newer operating systems). You can force an unsupported version of OSX to run on an older machine, but that is beyond the scope of this review and not recommended.
So lets try the next orange icon "Macq Secondary"... this feels a bit weird, I am not a big fan of randomly clicking things until it works.
 Successful boot - 2019R1.2
Ok, this looks better, I don't see an Apple logo so this is telling me to relax my sphincter and that the operating system we are running is the one from the MQ dongle. Its nice to know we are not on the way into OSX and changing zillions of time stamps and log entries on the suspect machines hard drive whilst speeding down the highway to a login prompt.
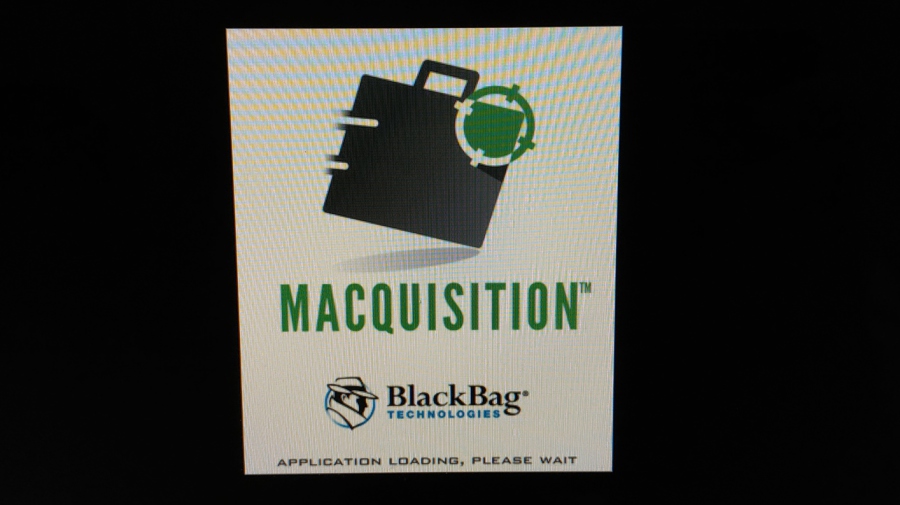
Next we see the MQ splash screen, so we know we are in business;
After a short pause, we are presented with the Case Information screen of MQ, we did it, we are in !!!
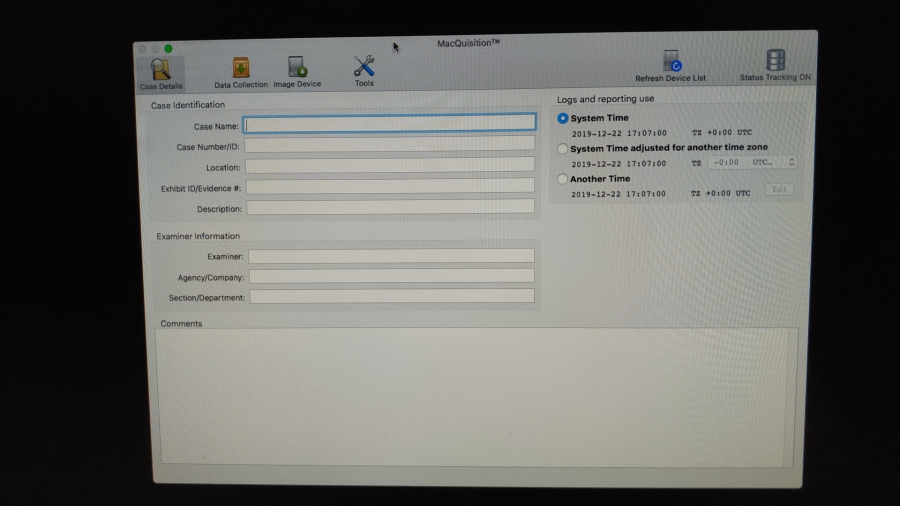 Case Information Screen (Click to enlarge)
All fairly standard stuff here, I won't populate this just yet, but what is all this "Logs and Reporting" time selection nonsense in the top right of the screen.
As with Recon ITR, I absolutely hate seeing anything that allows you to modify timestamps in any way. I want the report and anything else to be stamped with the time the computers clock read when you did it.
So that when I come back to this image in two weeks time (or someone in the processing team does), I/they don't look at the log file and see bogus dates and times. What happens here is these dates then make it into a report or workflow spreadsheet - because someone forgot to make a note that the time or date was altered. As my teacher once said to me at school, keep it simple stupid.
If you are in Afghanistan or Zimbabwe or anywhere else is does not matter, in my opinon, no one should be able to specify a time which the logs are stamped with - that differs from the computers clock. In my world this work is done at the report stage after analysis is completed and you are preparing the relevant evidence for the court or client.
I'm digging my heels in here and will show you how much of a liability this can be when we look at log files later. So all of you budding examiners, take note!
I did a test and set the time to the year 600AD, we will have a look at what that did to the log files later on when we get to them. I think the only Apples they had in the Middle Ages were the ones you could eat.
So time falsification rant over, lets move on and see what else we can see in MQ, I will do this in what I think is a logical order, not the order that the icons appear on the screen, but don't worry, we will cover them all.
So lets take a quick tour before going back to that "traditional" physical disk image.
Tools Screen:
 Tools Screen - Click to enlarge
As we can see, this offers us some interesting features;
Mount Device:
Here (above) we can see all of the disks attached to the system and the volumes/partitions they contain. You will only realistically mount your destination disk on this screen or unlock encrypted drives.
Take a look at the 4th disk down, that's my little USB drive from what feels like 1990, just 160GB - but in a USB 3 enclosure - which is funny as this suspect machine is only USB2. It is formatted as NTFS as I'm only planning on dumping container/image files on it, not loose files.
Erase Device:
This tab gives you the ability to have a really bad day, really quickly!
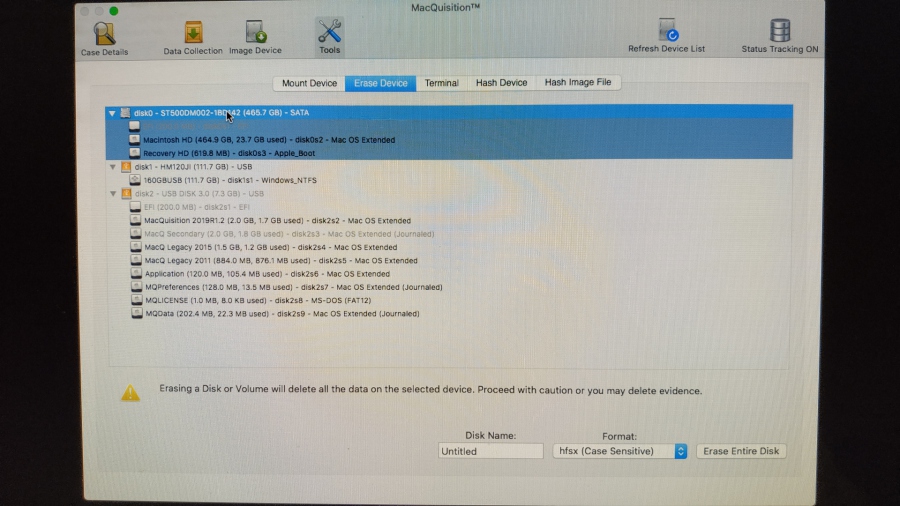
As with being able to manipulate dates and times on the Case Information tab, this is another accident waiting to happen.
I have trained a number of apprentice forensic examiners in my time and the rule that has served them well is NEVER EVER prepare your destination disks on the suspect machine.
It takes seconds to format a drive, label it and make some folders for the data you are collecting to live in - on.......another.........machine.
MQ even warns you (bottom of previous screenshot) to be "careful" when erasing/formatting disks as you may erase evidence. I like the fact someone has thought of this, but I'm not conding this feature at all.
I just wish these things would go away, its not best practice and certainly not something we should be teaching the upcoming child prodigies.
Terminal:
This a nice addition, I would use this to monitor free disk space on my destination drive (I like to watch image files grow and ensure the process is running as anticipated) but then I am way to much of an uber geek.
You could argue this is just as dangerous as the Erase Device screen, as with the correct commands you could again delete evidence. Unless you are a proper terminal warrior this is best left well alone.
 Terminal Screen (Click to enlarge)
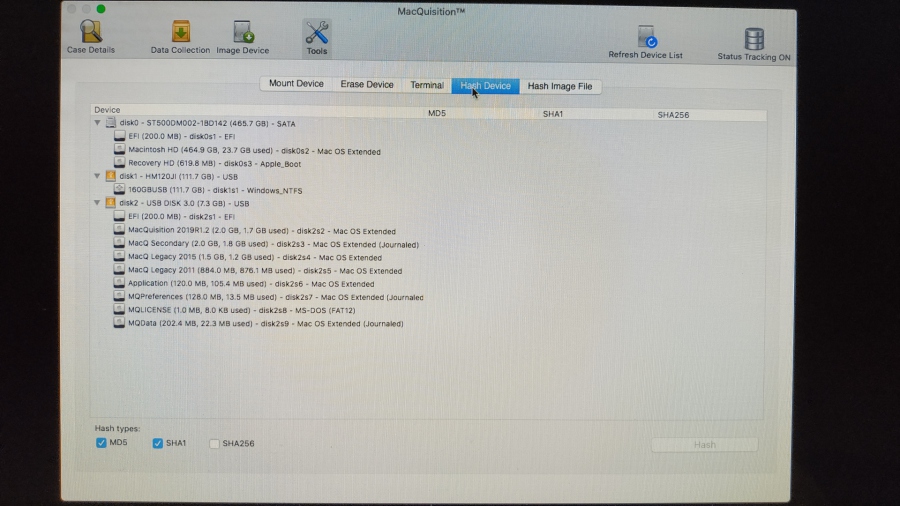
Hash Device:
If you like progress bars, you can use this to hash an entire partition or physical drive (encryption permitting).
 Hash Device Screen - Click to enlarge
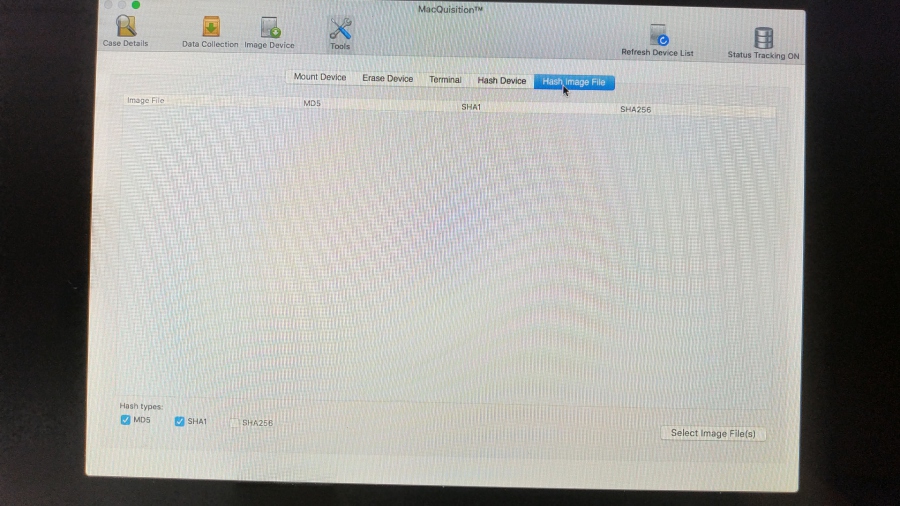
Hash Image File:
If you cancelled or declined the verification of your image you can use this tool to verify them at a later date. Very handy if used properly, but remember creating a zillion images with the "i'll verify them later" mindset can also be a recipe for a visit to the unemployment office.
ProTip: If you are unable to verify an image in full due to time constraints, then you have to do the next best thing (and you should be doing this even after verifying an image anyway!).
Open each image file and check you can see the file system, next head to the Windows folder (or some Mac system files) and find a readme.txt file (as you may not be permitted to read custodian documents) and see if that is viewable.
You have at least then confirmed the image is functional and can then start verifying it at the next convenient moment.
I don't recommend anyone starts doing this "verify later" as a workflow, this must be factored into the time allowed to create the image - but sometimes, whether you like to admit it or not, that is just not possible when the clients office is closing for the day and you will be thrown out into the car park at 5pm.
Check out the FTK Imager review on this site (not online at the time of writing this - subscribe to be notified when) to see when a controlled, "verify later" approach can help you get more done when time constraints prevent you from verifying immediately after acquisition.
In short, take another machine or two with you and let those verify in the background whilst you are using your acquisition machine to do just that - acquire!
 Hash Image File Screen (Click to enlarge)
Image Device Screen:
So, this is where the magic happens, RAM, Disks and partitions/volumes are imaged via this screen;
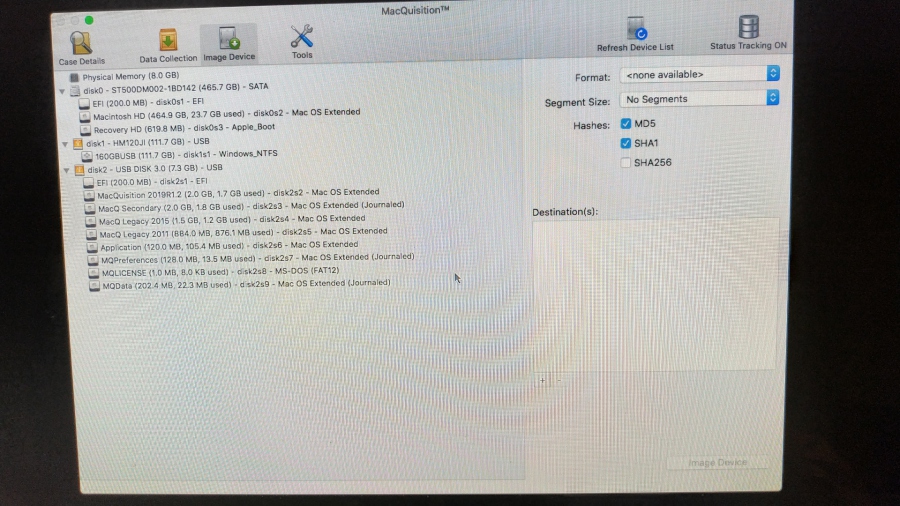 Image Device Screen - Click to enlarge
You will see that we have the machines 8GB of RAM listed as "Physical Memory" at the top of the list, then we have Disk0, the Mac's internal 500GB drive.
Anything else on this list is most likely going to be your destination disk and the paritions on the MQ dongle. You would also see Time Machine, Fusion drives and any other Mac you have connected via Target Disk Mode (TDM) on this list, if they are attached to the machine.
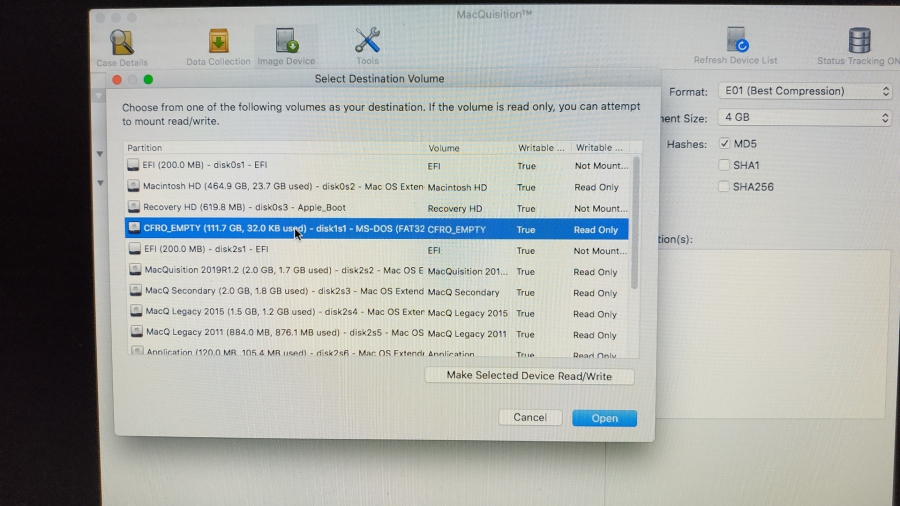
So now we must select our destination volume (remember that vintage 160GB NTFS USB drive I mentioned earlier), MQ shows it to me and offers me the choice to mount it read only;
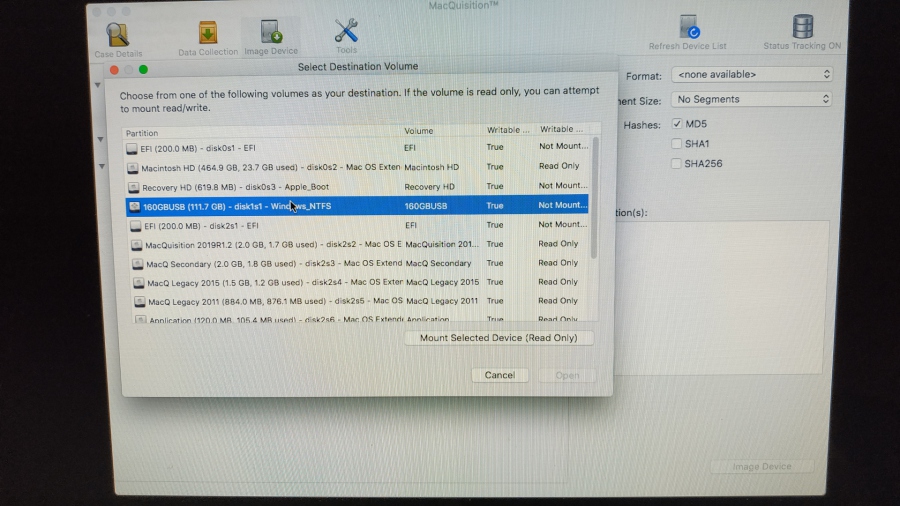 Select Destination Screen
Read only, thats no good, hang on, I read something somewhere about this;
 MQ Manual
Luckily MQ includes the manual on the dongle, page 41 reassures me that the destination disk can be NTFS (see above).
Gotcha: Don't read the manual from within MQ like I did - when you are about to image RAM, as that will overwrite the precious memory that you are trying to capture, have another machine with this manual on.
Well after fiddling around, I could not get it to change that little "Read only" button to "Read/Write" so I gave up. I did click it and see what happened, but nope, it was read only so no dice.
Update: I think that you can't write to NTFS volumes when you boot into MQ directly from the dongle, however when you run MQ "live" on a machine booted into an actual OS, an NTFS driver loads and it would work. If I do have the right end of the stick - the MQ manual needs to be updated to save hair loss.
So, lets use the built in "oops I formatted my evidence drive and lost all the Mac's I imaged today" Erase Disk function which we saw and I whined about earlier.
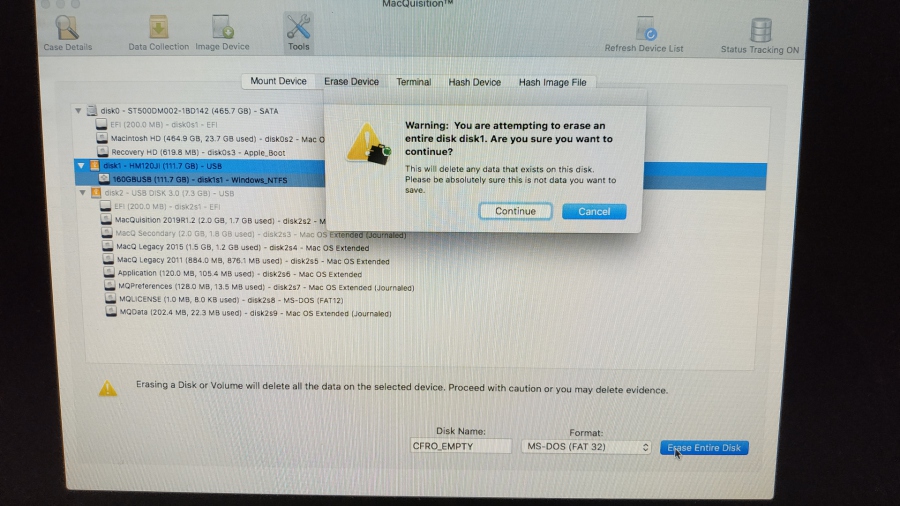 Highway to the danger zone!
So as you can see above, I am going for good old FAT32 (bottom right) as that will do the job for me to get the image of the disk and RAM from this machine.
Its nice to see that there is a warning before the disk is formatted, but you know my feelings on this whole feature - I feel dirty even doing this, if my young padawan's could see what their mentor has been reduced to.....
In the real world, outside of my test environment, I would usually be analysing these images using Windows tools, so having NTFS FAT32, a
Windows compatible file system makes my life easier (than faffing about with HFS+/APFS drivers for Windows 10).
On a side note, Paragon APFS for Windows is very good, so I advise checking them out if you want to mount APFS or HFS+ file systems in your tool of choice on your Windows box. I bought it when APFS first came out and it worked ok for me.
I digress..... back to this..
MQ finished formatting (ok Erasing) the disk;
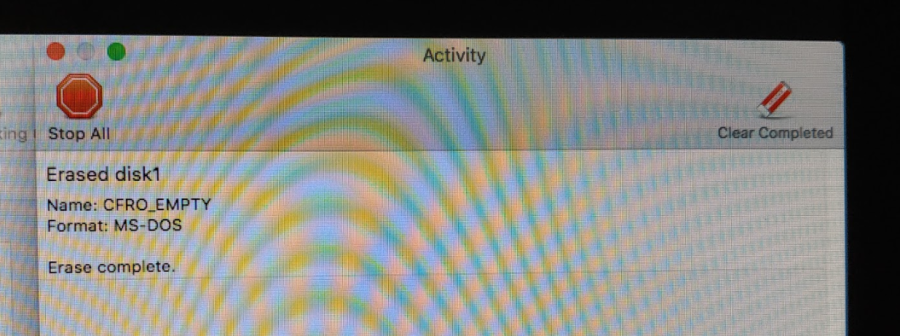 Activity Monitor
Activity Monitor:
So this brings us to the "Activity Monitor" (above) that MQ has, a rather nice window that lists all tasks and their statuses. I actually really like this - feedback after a long operation is always nice - without having to dig into log files to see if something completed successfully or not (I'll come back to the log files later).
So now we have that 160GB drive reformatted as NTFS FAT32 and in the Select Destination screen we can mount it read/write as shown below;
 Select Destination Screen
MQ gives us a nice clear warning that we are mounting a volume in a read/write state, which is nice - it may just save your bacon one day when its 1AM and you are imaging the last few machines in a marathon onsite session - to meet a date on a court order.
MQ also gives us confirmation that the mount operation succeeded and the destination volume is now read/write. Feedback in forensic tools is a lovely thing, so MQ picks up a few brownie/boy scout points here.
Note in the background on the screenshot above (top right corner), I have chosen an Encase (.E01) image format with best compression, plus the segment size of the image is set to 4GB, which we all know is the file size limit on the FAT32 filesystem.
ProTip: Knowing your onions about imaging formats and settings can save you a heap of time, if you want to see a diagram of how fast you can go when imaging a Mac, then look at this here from Evimetry a company that claims to make the fastest disk imaging software on the planet. As with all marketing nonsense, Evimetry hits you with the best possible figures - by showing you imaging a very fast PCIe SSD to a RAID drive connected to the suspect computer - so don't go binning your Encase imager (yuck), Guymager and FTK Imager just yet!
They achieve these speeds using AFF4 - the nasty new image format that nothing really reliably supports yet. AFF is very different to your typical .E01 as it is capable of storing a non-linear bitstream image, what does this mean?
Well, it means that you can have for example, THREE hard drives connected to your imaging machine, and you can image to all 3 simultaneously and thus the AFF image is spread across those 3 disks (think of it as a bit like RAID0 (striping) for your image file). So as long as your suspect drive is a quick SSD, this is how you can get crazy imaging speeds as you are writing out the image 3 times faster than normal. It also means non-linear as with the APFS unallocated space pool - but more on that later.
In slow time you then copy all of the image segments from all 3 disks back to your repository (server perhaps) and bang, you are in business. You can see this in action in a video here on the Evimetry website.
It's witch craft I tell ya, witch craft......
Anyway, this is a massive topic and there are pro's and con's which I can't cover here (including an indepth look at APFS) - perhaps an article on disk imaging is one for my list!
Right, tangent over readers, back to MQ and that traditional physical disk image....
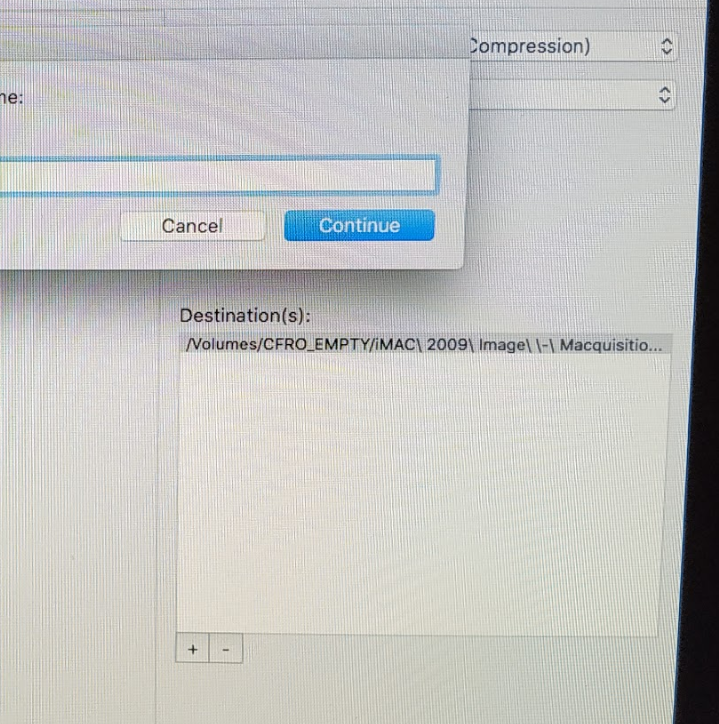
Next up we need to add a destination folder as to where to place the image file we are creating. To do this we use the + button at the bottom of the right hand "Destinations" window on the right (shown below);
I'm not sure what Apples development team were thinking when they thought it was ok to allow illegal characters in directory names on FAT32 volumes, but I'm sure this has been fully tested and works flawlessly *rolls eyes*. This is not BB's code as I tried this on a number of FAT32 volumes when booted into OSX using Finder and it let me do it!
So now we have the illegal destination folder all set up, lets continue and name the image file (shown below).
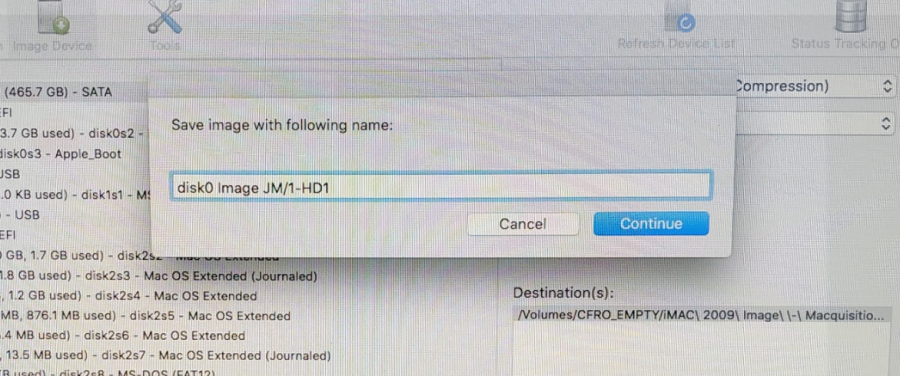
As we can see above, more illegal characters "/" are allowed in the filename!...oh I feel so naughty. Apple must of had another "bring your 5 year old to work day" and they wrote this code. Apple, if you are going to program support for a third parties file system, do it properly, or not at all. Sheeesh.
Gotcha!: Don't try to be a comedian like me and use illegal characters in the filename or paths, at worst when you plug this into your Windows machine, you won't be able to browse to the folders with illegal characters in the name (Explorer will give you an error along the lines of "this folder does not exist or is inaccessible") or best case scenario, Windows will interpret the file names and paths as best it can which may lead to things not being where you expect them to be on the disk. This is going to be especially bad if you have scripts that move images from collection disks as part of a workflow - so you have been warned!
There is a great wikipedia article on which characters can't be used here.
We get a nice warning (see below) where MQ is telling us that the destination disk is smaller than the suspect disk we are imaging and that it might not fit - even with compression. What sort of idiot trys to image a 500GB drive to a 160GB one ?
Thats a nice QOL warning, but knowing what is in unallocated clusters (free space) on the my suspect Mac's 500GB drive, I know this will compress nicely onto my teeny 160GB destination disk. I don't have superhero powers, I just wiped the drive before I started - so free space is full of zeros!
 Destination disk smaller than suspect disk warning.
So now its the turn of BB to write unintuitive code, as you can see from the next screenshot, we are warned that we can't use 4GB image segments because they exceed the 3.9GB limit of the FAT32 file system on our destination disk.
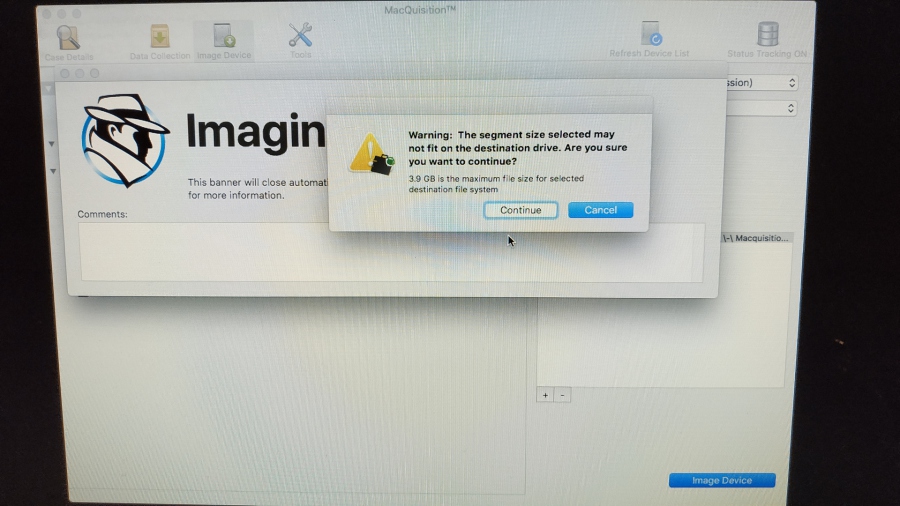 We put the 4Gb segment size in as a joke lads.
I'm not sure why there is a continue button here, but hey lets press it anyway and see what happens.
As expected, the image fails at a few megabytes short of 4GB. Nice GUI logic there.
BB actually go as far as pointing out (see below) that 3.9GB is the segment size limit in the manual (see below) and the quick start guide, so why the heck isn't the segment size of 3.9GB on the list of segment sizes?

If I see 4GB, I'm going to assume that the programmer has done the maths for me and the file is going to fit onto FAT32 (why else would I want 4GB segments?).
You can manually specify a 3.9GB segment size under the "custom" option, I think they put this in to catch out the little weasels that did not read the manual before they started... haha!
So choosing a 2GB segment size in defiance, I get things underway as you can see in the screenshot below;
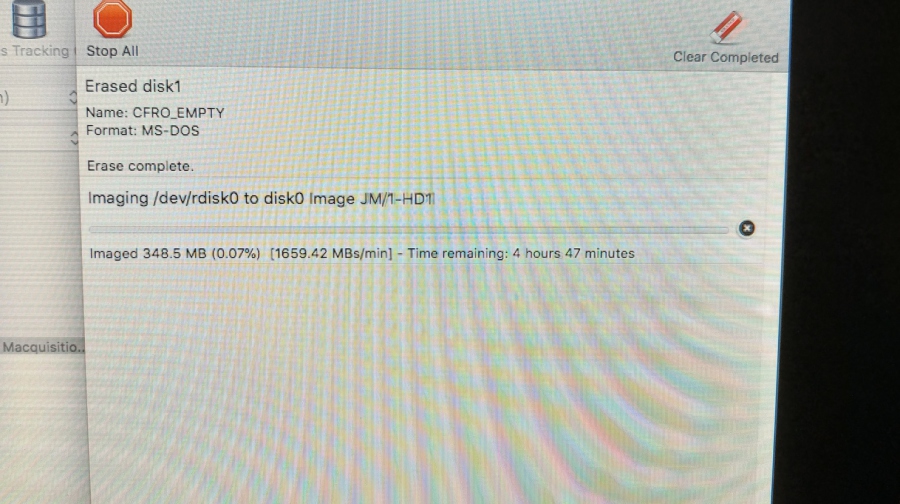 Disk imaging in progress
Whilst the image was in progress, I had a look around at the options and other menus of MQ;
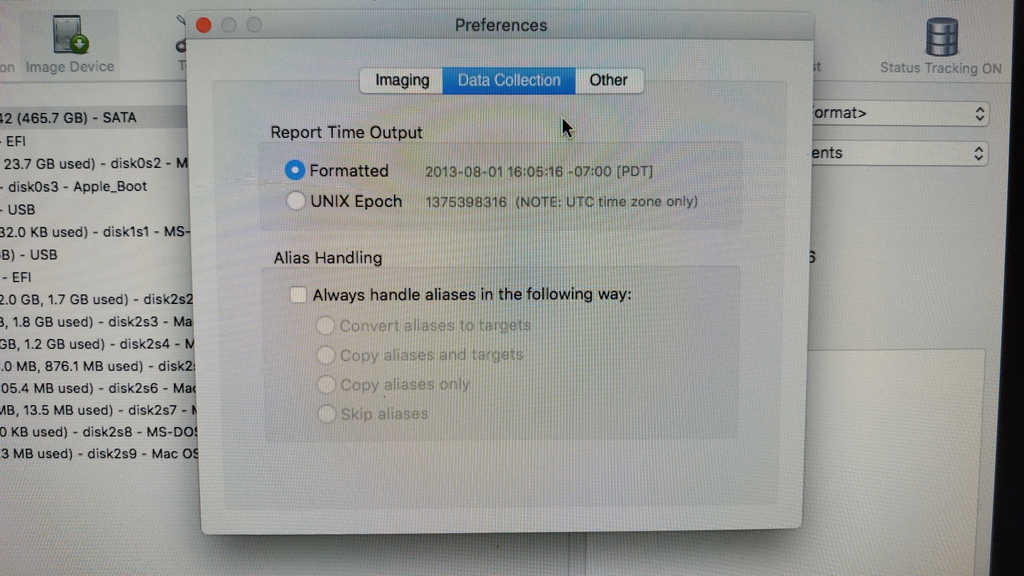
Preferences:
I had a quick look in the "Preferences" menu option (its not an icon) and found a few interesting things, see the gallery below;
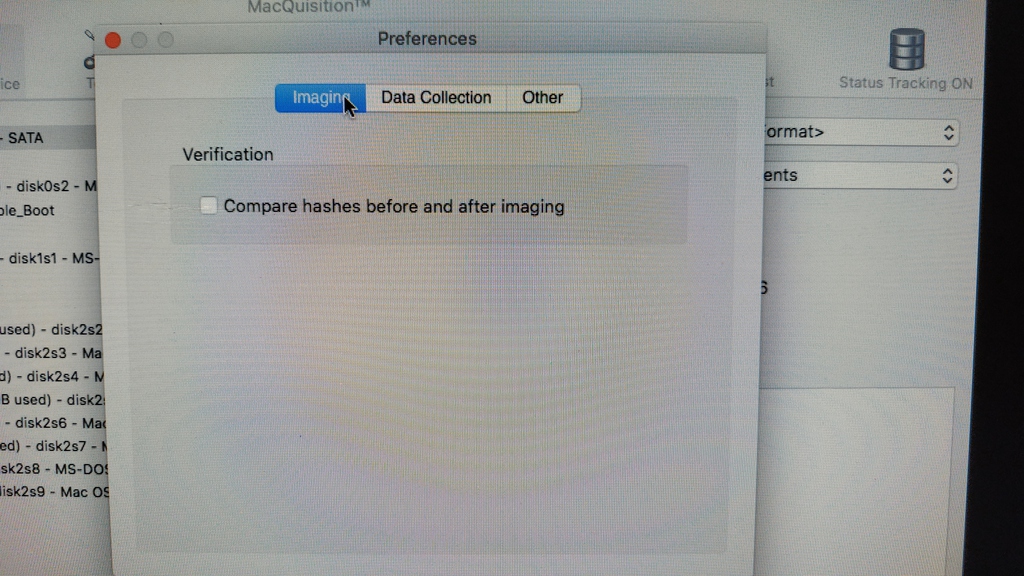
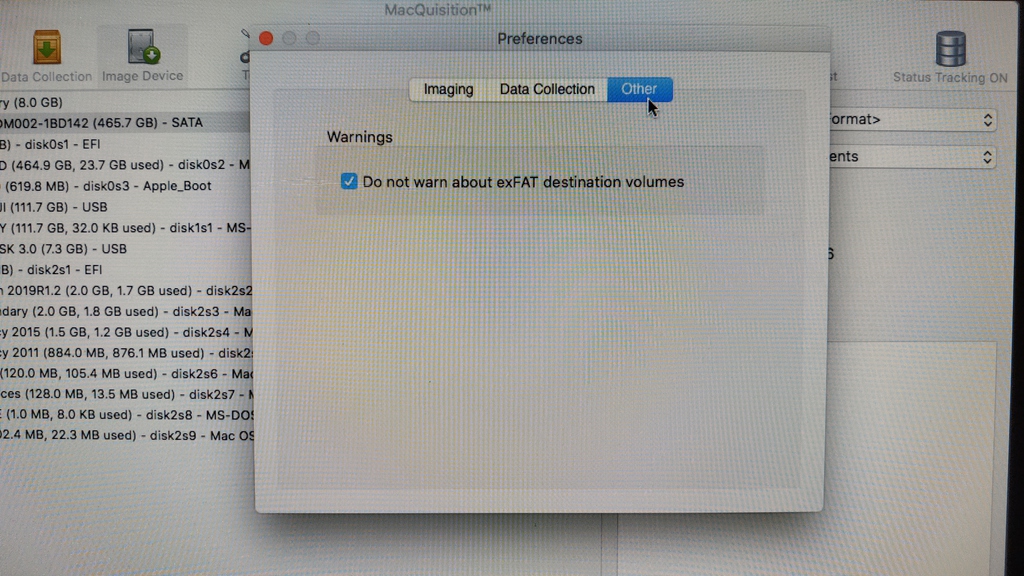
Under "Other" tab there is a warning about not using ExFAT volumes, the manual goes on to say that this filing system can sometimes throw a wobbly and result in corruption - so BB advise against using it. Nice! - anything in here to make things run smoothly earns favour with me!
I imagine that this ExFAT issue is shoddy API code written by Apple not BB's developers. ExFAT can be thought of as an extension of FAT32, but without the
file size limitation of 4GB 3.9GB or however you want to count the bits and do your math.
ExFAT is common in cameras, CCTV systems and anything else that has need of huge file sizes, yet has insifficient spare CPU time or memory to run a journalled file system such as NTFS or HFS - both of which have high overheads.
QuickQuiz: What is the file size limit for ExFAT volumes? remember, only weaklings Google stuff...... this months prize is an all expenses paid trip for a family of four to Walt Disney World in England (UK). The only condition is you must take the trip by 2022 at the latest and enter the competition no later than the closing date at the end of the review, terms and conditions available on request.
The imaging has finished, so here we see the delightful Activity window telling us all is well and the image completed;
 Imaging completed
I would like to see a time stamp on screen here, so that I can write in my notes when the image completed and verified - every other tool on the planet has this or a "console" tab, so this is a glaring omission. I can dig around in log files to find it, but in the next version please put this information on-screen!
Nothing else to report here as it is a bog standard Encase .E01 image - it worked as intended and I was able to load this up into Encase, Recon Lab and FTK Imager without any problems.
Log Files (Disk Imaging):
Log files, ah, love of my life...
So here we see your standard fayre for an imaging log file Acquisition.log, you will note that apparently this image started at 00:02 hours on the 1st January 800 A.D in the Middle Ages - anyway, I threw all my toys out of my pram about this earlier so enough said.
 Full acquisition log - complete with mickey mouse timestamps!
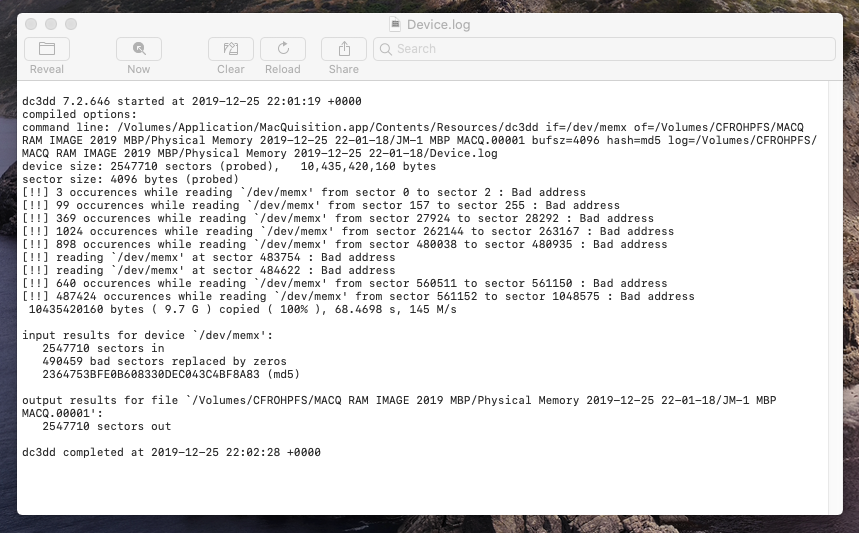
If you want to see a little more information, you need to open a second log file "Device.log" (below) which is some sort of terminal/console log, which gives you details such as the imaging average speed and whether there were any bad sectors encounted. Notably here you can see the real time that the image was made as opposed to the fairytales shown in the first log we looked at.
What is it with Apple forensic tools and their penchant for a zillion log files, consolidate them into one file please. I'm also looking at you Sumuri. This is fine for a handful of images, but does not scale - large E-discovery cases can involve thousands of disk images.
Bad sector information does not appear to be presented in the main "Acquisition.log" (above), so make sure you check this "Device.log" file for any errors, we have a million things to remember in our workflows, so can we have this information in the main log file in the next release please ?
The manual does tell you that you need to check both files, but again, this complicates workflow and does not scale well.
If it is there already and does not show up until bad sectors are found, I apologise in advance!
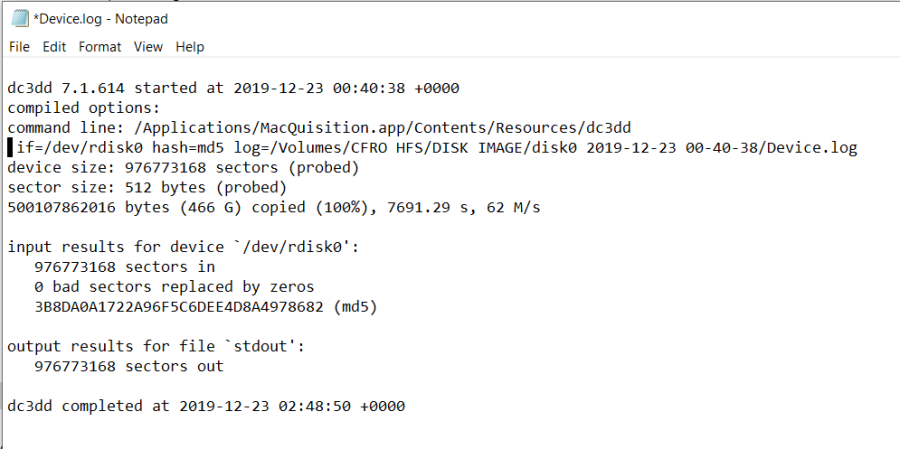 Device log
Interestingly we can see that the average speed recorded was 62 Megabytes per second, thats interesting as we are only running on USB2 ports and that is not physically possible..... or is it ?
Ok, off on a tangent.....here we go..Skip to the next Green heading if you don't have all day to read waffle.
USB 2.0 has a *theoretical* raw maximum transfer speed of around 53MB (don't start me off on microframes and packet counts - we will be here all day - but if you are a geek, check out the link in the further reading section) and a real world transfer speed of between 30 to 40 Megabytes if you are lucky.
How is this speed calculated? Well, the wonders of compression have helped us on this occassion.
1) We didnt WRITE 500GB of image file to the USB2 destination disk. Nope, our compressed image file was 29.2Gb in size, so we save HOURS of writing time over that super slow USB 2 bus.
2) We were able to READ the 500GB mechanical SATA suspect disk in the Mac running MQ at around 100 Megabytes per second (as that was on the SATA bus inside the machine). So we could get the data in fairly quickly, compress it with our CPU and then output the compressed data to the target disk at around 30MB-40MB a second.
Combining these figures and waving a magic wand gives us that magical "average" 62MM imaging speed.
Remember I said that choosing the correct image format and settings for the occassion can speed up your imaging, subscribe to make sure you get notified when I do an article on this !
Best compression was unusually my friend on this particular image. But normally I am a zero block compression man.
Also we can see (from the command line in the log file above) that MQ is using the dc3dd binary, thats good to know as dc3dd is very mature and rocks!.
13. Using the Software - Test 1 - Part 2 - Logical Collection - iMac 2009:
So we have imaged the drive sucessfully into .E01 format in Part 1 of this test, so lets see what MQ's other main feature - a logical acquisition of files and artefacts looks like;
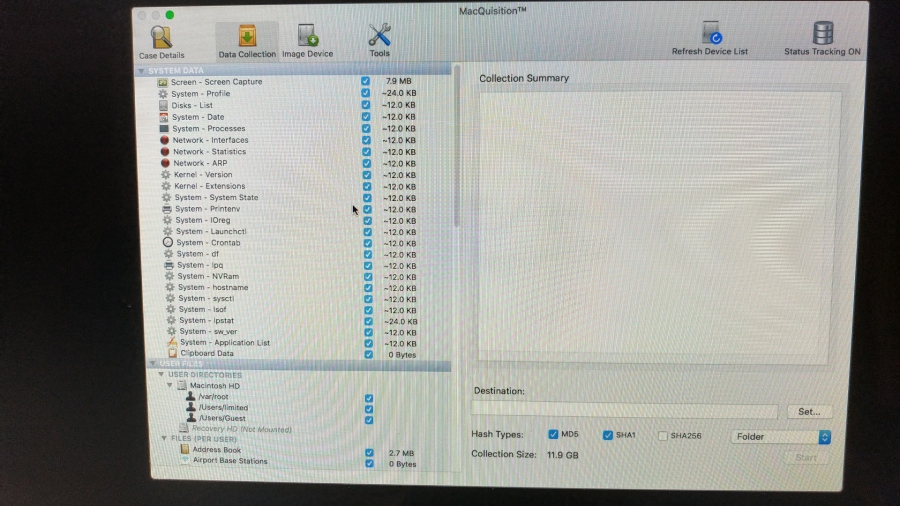
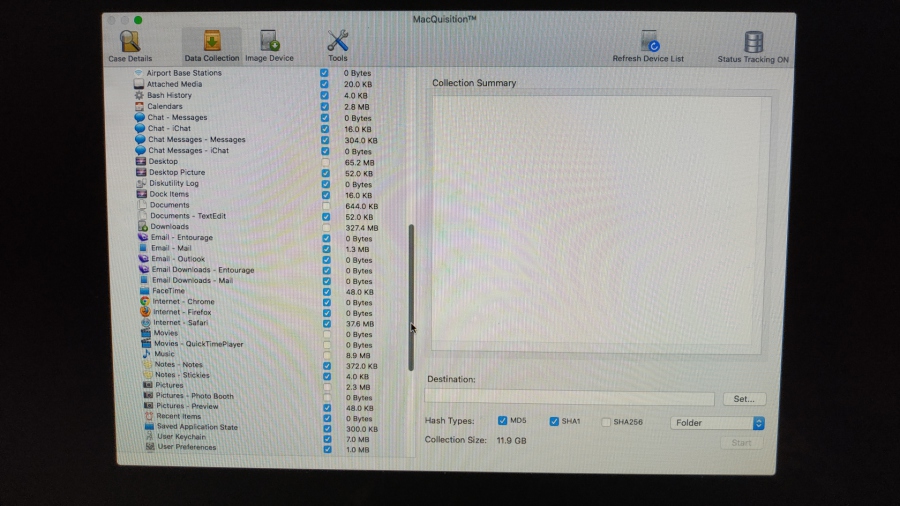
Data Collection Screen:
Before we move on, when I say logical collection, I mean just that - I'm not talking about a physical image of a logical partition (thats sector based), I'm talking about something similar to an Encase logical image file .L01 or FTK's .AD1.
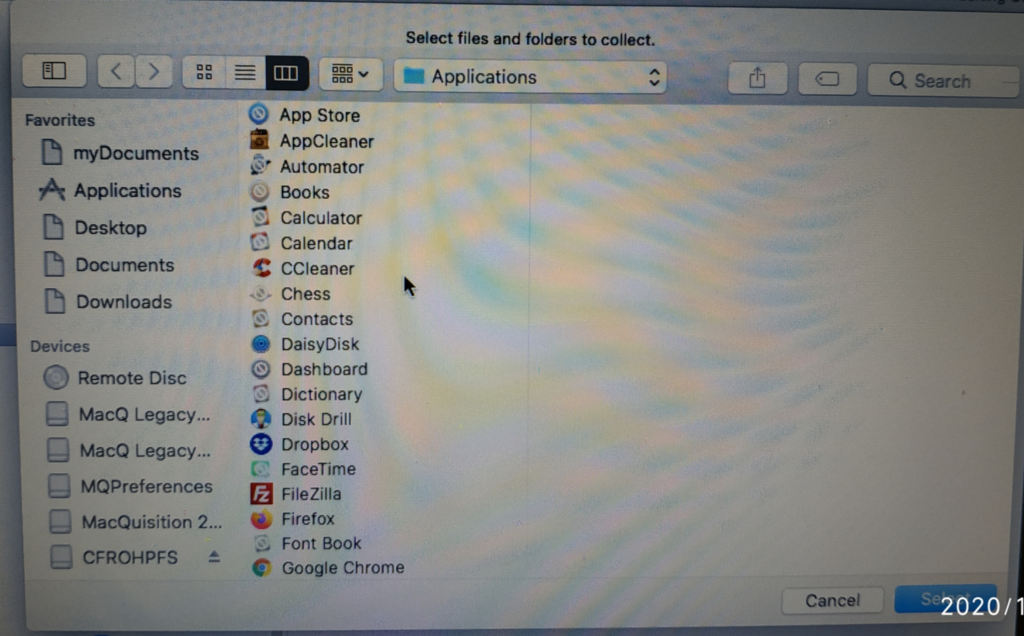
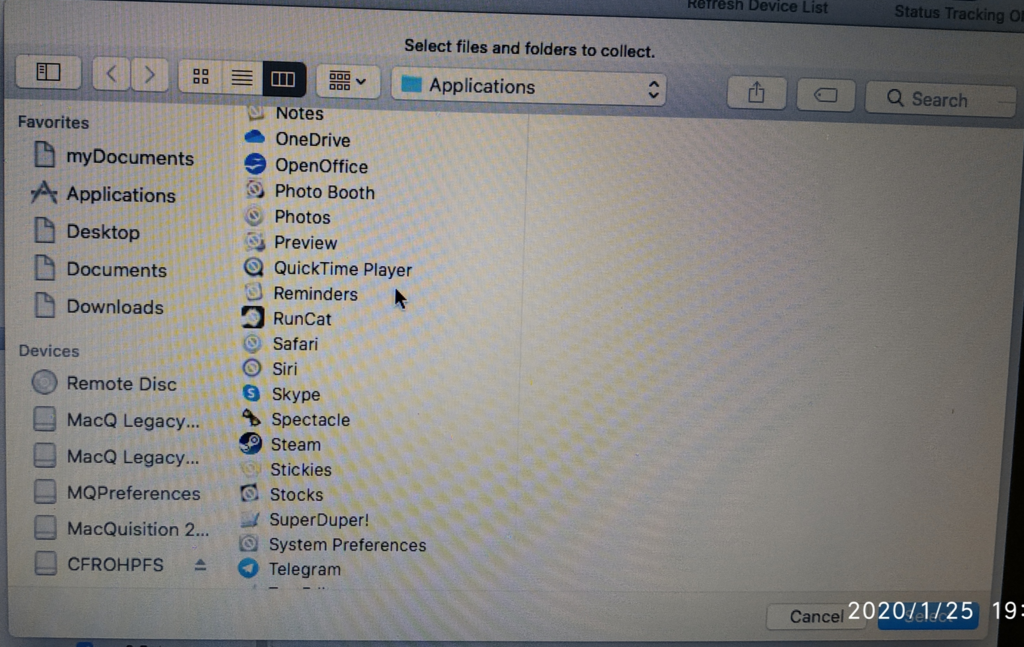
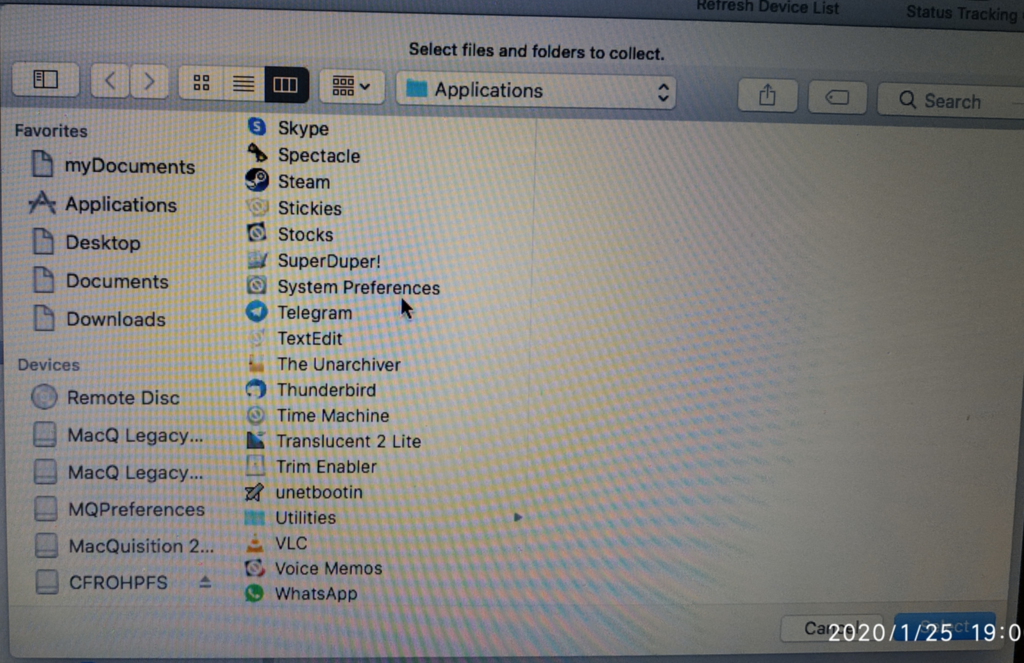
You will have to click the images below to read them, but basically if you choose a logical acquisition (files as opposed to sectors in a disk image) you get a very comprehensive (at first glance anyway) list of what to collect.
This looks very much like Recon Imager Pro's (now Recon ITR) data collection screen, so if you have used that, you will be at home with MQ.
This really strips all the evidence rich "artefact" stuff from the operating system and I really like this approach, reminds me of IEF from Magnet.
I must point out that this machine has not been used much, there are hardly any non-Apple applications installed - so this is not really a great test of MQ's abilities - but don't panic, we will look at a real world usage machine later.
 Logical collection targets 1
Cool things such as the size of the data being collected are displayed, good for working out how roughly how long it will take to collect the data. Also nice is that it recognises iOS backups from iTunes, so its really easy to determine if you may have iPhone/Pad/Pod devices tucked away on the suspect machine!
Gotcha!: If the machine has iOS backups from a iPhone or iPad, even though these are usually only a few gigs (but some iOS devices have 256GB or more storage, so be wary!), they can contain tens of thousands of small files.
Now imagine reading and writing those to a mechanical destination hard drive (its going to be super slow), then add in the overhead of the Status Tracking logs and you could add a very significant period of time to the collection process.
If speed is a concern, my advice is collect everything else first, then collect the iOS backups and system files in a separate collection at the end time permitting. I did wonder why there was the option to turn off status tracking, and this is one of those reasons.
Oh, by the way, iTunes no longer exists in Catalina (10.5) its Apple Music now, so thats another thing to be careful of - does MQ see those new data files if they are stored differently ?? I need to look at that and find out!
 Logical collection targets 2
As you can see in the bottom right (see above), you can collect to either a "folder" (it just dumps the files into a folder structure on your destination disk), or you can specify a "sparse image" which can be mounted on the Mac and treated like a container file. This is my preferred way of imaging as it preserves any time stamps from being altered when you look at the data collected afterwards.
 Logical collection targets 3
If this automated collection approach is not for you, you can collect other files from a volume - as there is an "OSX Volumes" section, shown in that last screenshot above.
Really useful if you want to look at something that the built in options won't cater for.
You are FAT and Invisible:
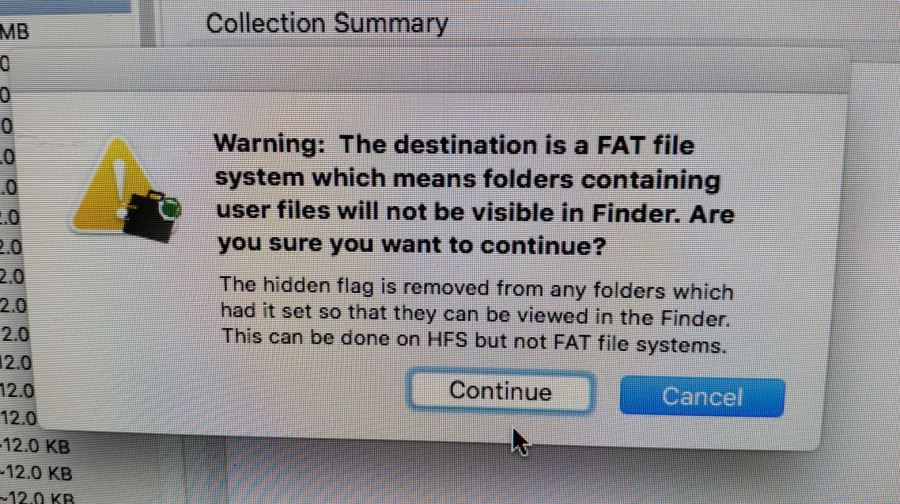 FAT file system warning.
This little beauty is only going to cause you problems if you are doing a logical collection of loose files, using the aforementioned "folder" option, to a FAT formatted destination disk.
Resisting the urge to go off on a huge tangent about the differences between Microsoft and Apple file systems, the short answers is that this happens because file attributes differ between the two systems - but don't panic, this warning is not as scary as it sounds.
This article is very high level, but gives you some insight and history of HFS+ and ExFAT filesystems.
If you are going to be looking at this raw "folder" MQ collected to, using a Mac and Finder, then you may think things have not been collected because certain files won't appear when you look into this folder.
ProTip: If you are collecting files from a Mac, never ever use the "Folder" option, its not a clean way to do things and exposes your files to potential modification of internal content (if you open them) and filesystem metadata (if you move/touch them). Always image to a sparse container as the destination to encapsulate the files - so you don't have to worry about that happening.
Aliases Warning:
So the next warning that pops up is when MQ detects an "Alias" file amongst the target files you have selected to be collected.
If you are a Windows user and not too familliar with Mac artefacts, this can be thought of as a "shortcut" file or a .LNK file as the nearest comparison.
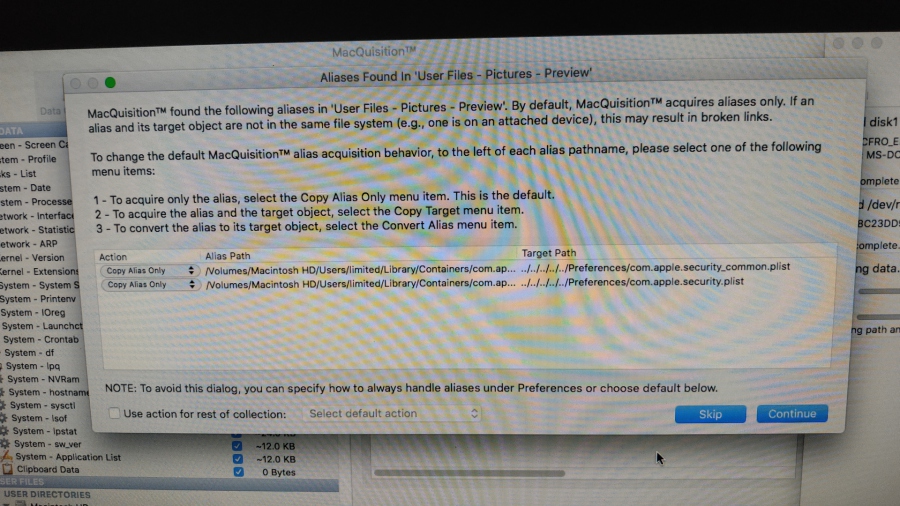
So, if your custodian has a file sitting in their "Documents" folder, within their user profile called "fred.docx" and they have right clicked on that file and selected "Create Alias", then moved the "Alias" file to the desktop, this is what MQ is detecting here.
So what do I choose 1, 2 or 3 ?
It is important to know what went on and how during analysis, so anything that changes the collected data in any way is a taboo to me, so collecting 1. Aliases Only (the default) is the way to go for me. Your milage may vary.
Choosing the "2. Aliases and Targets" mode is going to potentially put files into folders in your sparse image that were not there on the suspect machine. If you miss this at processing or analysis time, you could have a problem and make incorrect assertions about what was where.
Choosing the "3. Convert Aliases into Targets" mode is also going to be problematic as it will take away something that is on the suspect machine (the "Alias" file) and replace it with the actual file the "Alias" file points to. Again, this could lead to problems at analysis time if the presence of an alias file in a folder is evidential.
There are also some nuances where an "Alias" points to a file on an external file system (for example an attached USB disk), check the manual is my advice if you come across this scenario.
Its nice to see that you have some options here - as I am sure someone, somewhere will have a use for these options.
I have heard for people rushing for the MQ manual when this box pops up - thats the correct approach as it is impossible to remember everything !!!
Who needs targets anyway ?
Collection Complete:
Great stuff, so we let the process run and it collected what we asked it to, or did it?
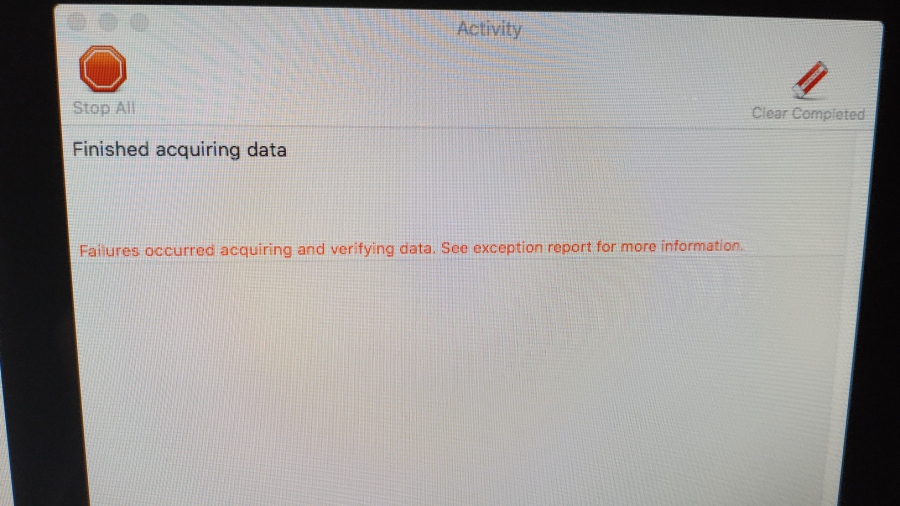 Failures & Verify Errors during logical acquisition of files.
Hmmmm, this is a bit ominous, but we will park this for now - we cover the contents of the error logs later in the review.
14. Using the Software - Test 1 - Part 3 of 3 - RAM Image - 2009 iMAC:
Ok, so we have done the disk image and had a look at the logical file collection function, no major problems so far, so lets look at RAM imaging....
Imaging on an Apple computer, as you may or may not know, is not like imaging RAM on a Windows machine (which is primarily done with the machine running "live", using tools such as FTK Imager, Magnet Acquire or some other third party tool) that you hope won't cause a BSOD.
Macs are a wee bit unstable when imaging RAM and the MQ manual is actually up front about this and states MQ may crash..... thats jolly decent!
According to BB best practice for imaging an Apple computers RAM is to restart it and boot immediately into the MQ software - directly from the dongle.
Apple machines don't - and never will - erase the RAM upon reboot, so if you are quick, the data is still there from the previous boot of the operating system before it decays from lack of power. This technique relies upon "Data Remanance" meaning that the RAM does not lose its contents when the computer is power cycled. Its an interesting topic, there is a wikipedia article here on it.
Actually booting into MQ overwrites a proportion of your suspect machines RAM, but this method is the cleanest method available via software and is usually a small price to pay. Being the geek that I am, I will explore this in a bit more detail, but not right now...later.
So lets kick off a RAM image then, you can see that running below (last entry on the Activity log).

Being the nosy parker I am, I clicked the Apple icon in the top left of the screen and opened "About this Mac" whilst the RAM image was in progress...... as I wanted to see the model number of this machine....bam...MQ crashed!
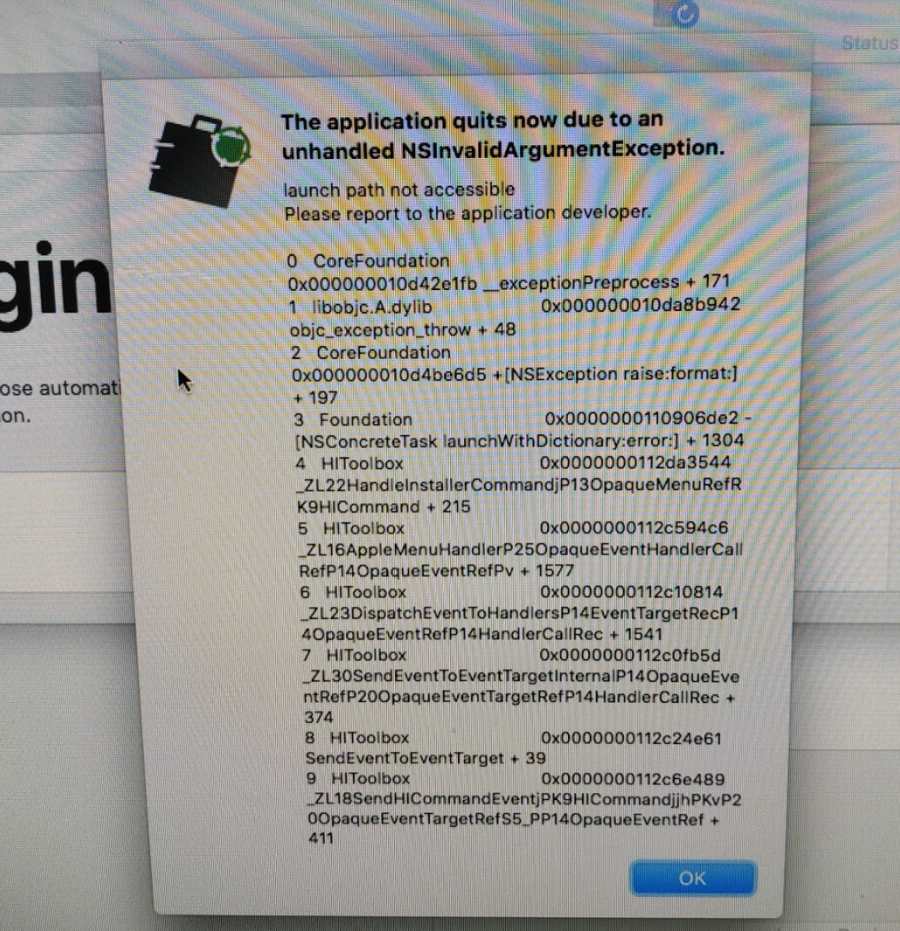 Crash
Crash
Keep in mind that opening anything whilst attempting to image a suspect machine's RAM is pretty stupid and is going to overwrite more of it.
So try to resist the temptation to click anything, move the mouse or squint at the screen pulling a funny face whilst the imaging process is underway. I'm in a test enviroment, so this does not make any difference to me - however if you are out there in the wild and do this, your second RAM image may not be as good as the first!
Needless to say I had to reboot the machine (potentially overwriting more of the precious RAM I am trying to capture) and start the image again.
Putting my programmer head on, I would imagine that BB have gutted the boot environment, the binaries and libraries required to launch the "About" dialogue don't exist anymore - hence the operating system experiences an unhandled exception when it makes calls to show the dialogue box and crashes as it doesn't know what else to do.
This to me, as Mr Strickland from BTTF would say, is a sign of a slacker, so whoever wrote MQ needs to be smacked cleanly across the forehead with the CFRO wooden ruler of shame for two reasons.
a) Its not cricket that you leave something in the product that if clicked on crashes the program. I don't think I have ever seen this in any commercial product, how on earth did this pass internal Q&A?
b) Its unforgiveable that you don't mention this in the manual to save inquisitive examiners from falling into this trap.
I would assume that this will be in the next version of the manual when BB update it after reading this review as they may not be able to code around this.
I'll park this for now and we will have more of a poke about with this in the Bugs & Stability section later (oooh my favourtie!) later in the review.
Upon rebooting, I was presented with this;
 Crash rescue screen
Wow, I'm impressed. A vendor who knows their program is going to crash, so they build in a routine to salvage the log database. If all vendors did this, I
would be a happy man.
Now if only we had this sort of thing in Encase and FTK - yes, I know that code is already there to a degree in those applications, but can we have code in those programs that actually works *grin*.
This is really good, I like it !
Restarting the RAM Image:
Ok, so we are booted back up and lets start that again, take a look at the montage below and you can see how it went.


There seems to be some inconsitency between the various versions of MQ on the dongle, for example, there is no 256 bit SHA hashing in versions prior to the 2015 Legacy mode, whilst this is no big deal for me, it may be to you.
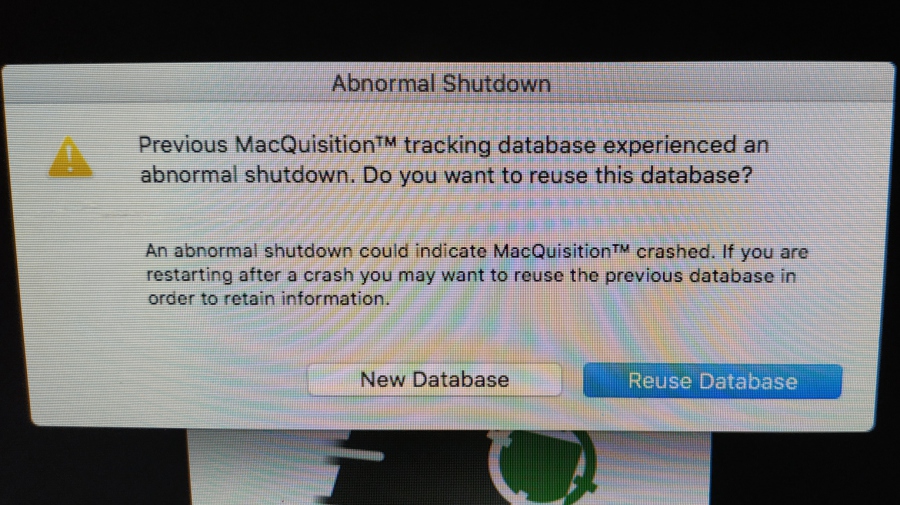
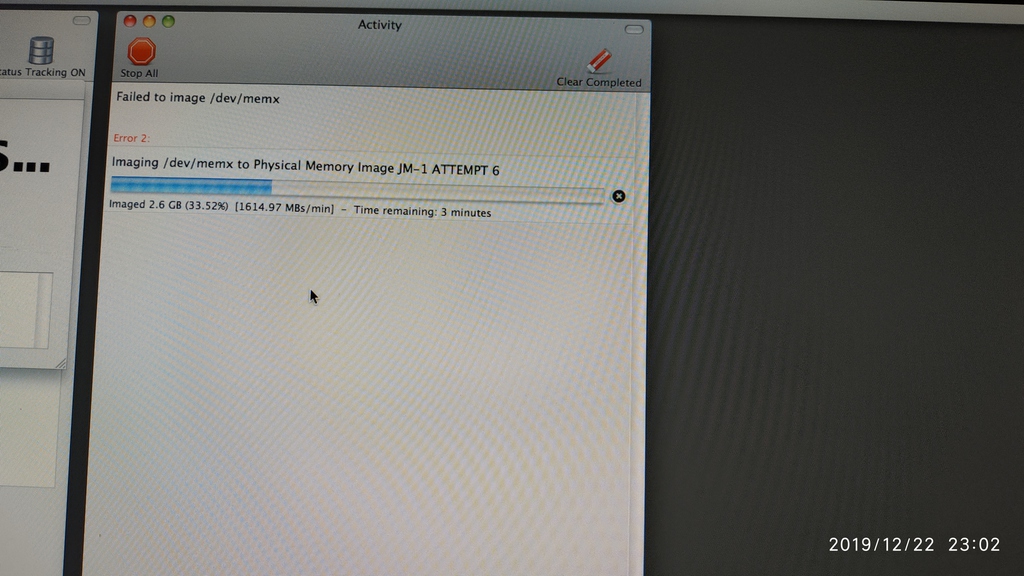
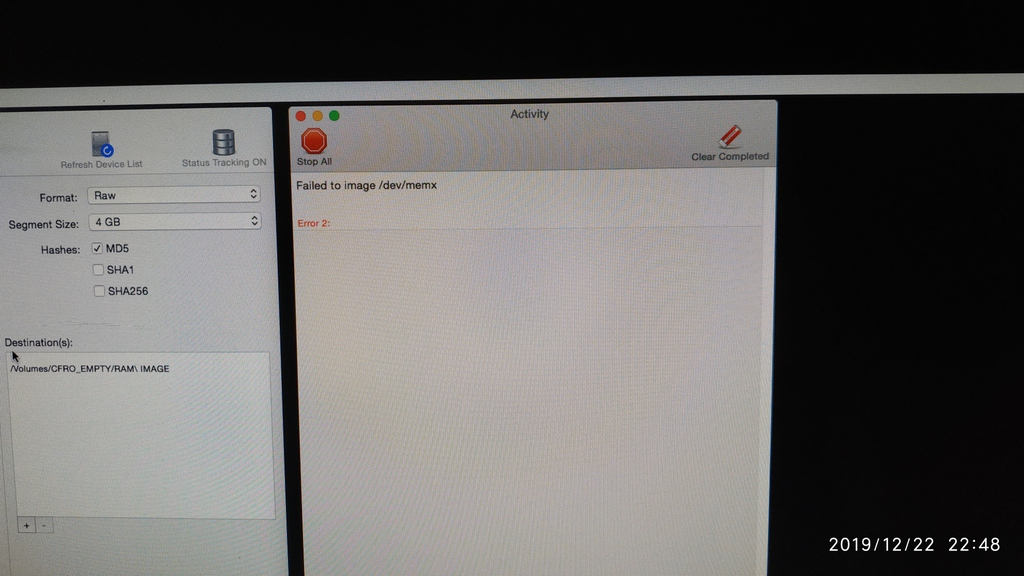
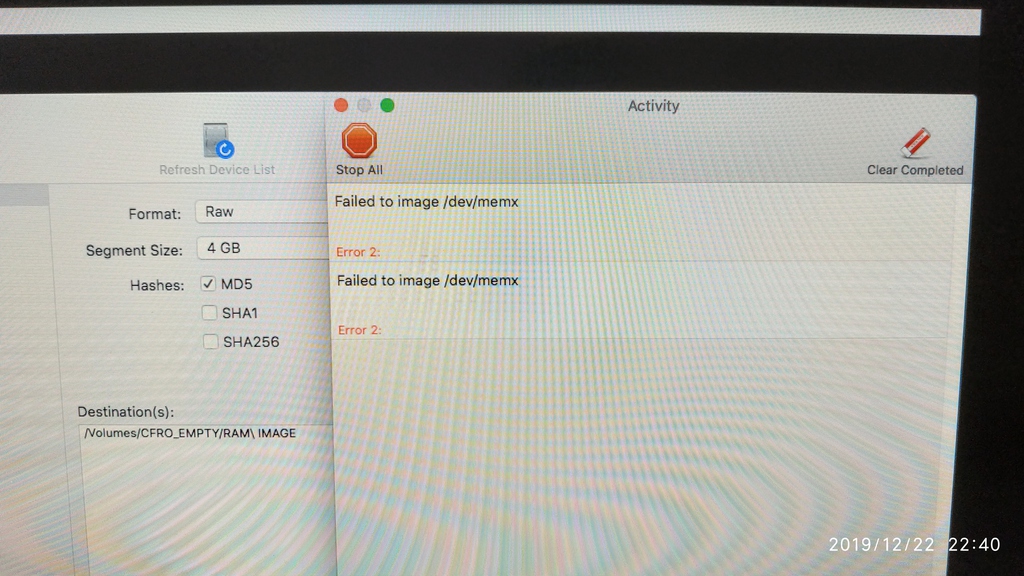
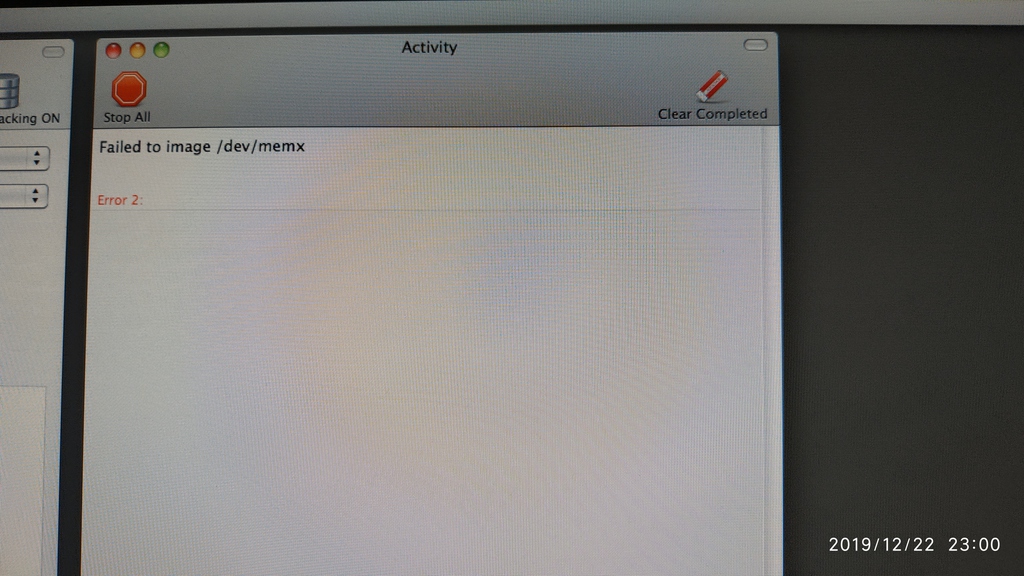
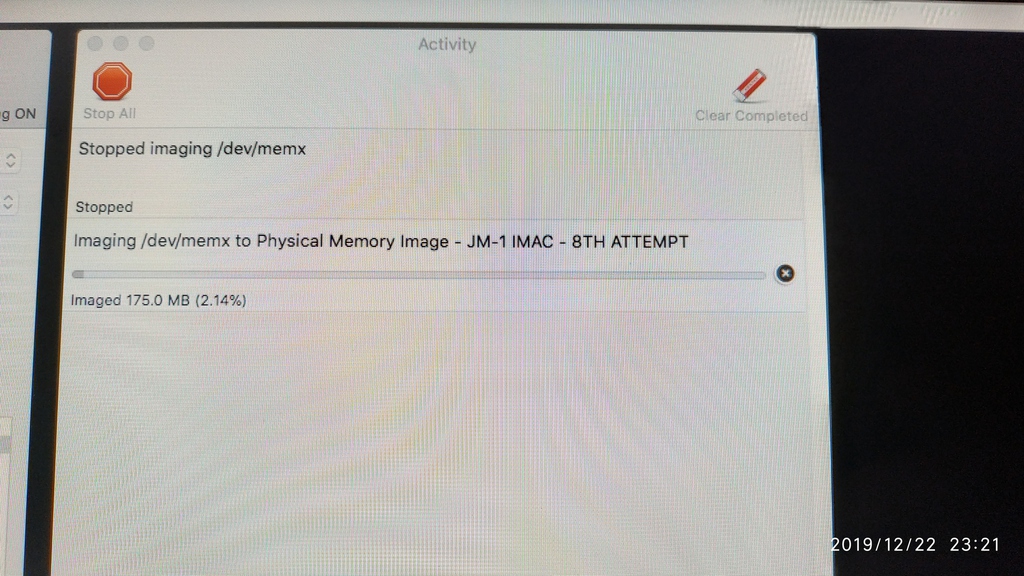
It took me a number of attempts to get the RAM image to work, I kept receiving the "Error 2" (see photos) which is not very helpful. There is no lookup table for errors in the manual, so this would be a call to the help desk, or you to do some detective work and explore the problem yourself.
Lord only knows how much RAM I overwrote with my 8 reboots of the machine trying different versions of MQ until I finally made a change that made it work.
Why was this happening? Lets go and look at the log files.
Check the Log Files First Stupid:
Well, it turns out that I was choosing the 4GB segment size (Oh no...not this again....please) - the older versions of MQ didn't tell me that in their universe FAT32 only supports 3.9GB max file sizes, so all of these "Error 2" messages were "file too big" errors.
Again, this is the classic sign that MQ's developers forget that their customers may not all be terminal/command line warriors and may be following a workflow - explanation of the most basic error messages is a must for those users.
Hopefully the memory controller on the MAC would load the MQ boot environment into the same lowest memory addresses of the stack first, each and every time I rebooted - minimising the overwritten RAM, I just don't know.
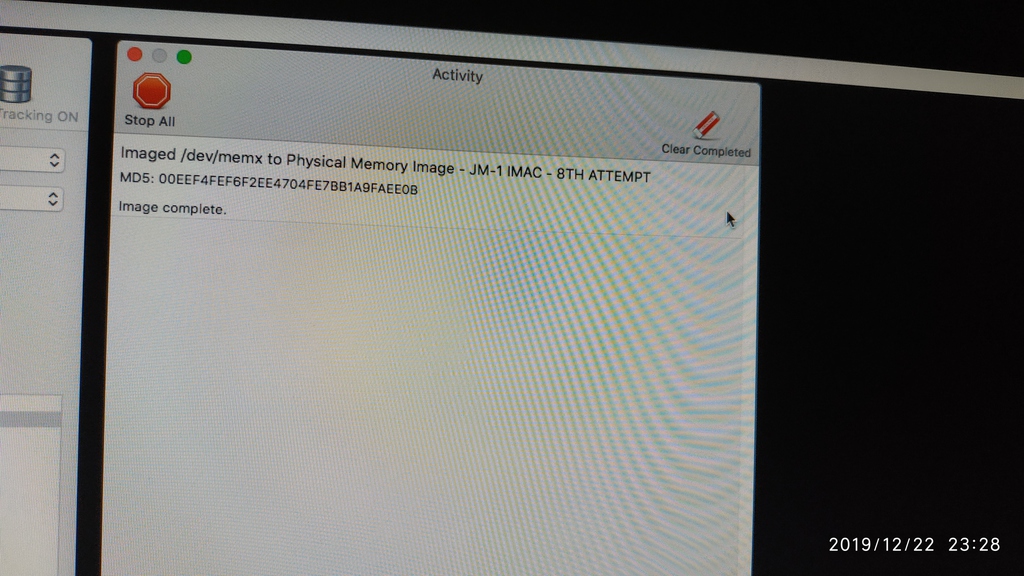
So being the distrusting person I am, I am not taking MQ's word for it that the RAM Image was "Completed" as shown in the lovely (but date and timeless) activity monitor.
Opening the Acquisition.log file tells me nothing bad, no errors reported here, so it was "Completed" ok, I have no worries right ?
Hmmmmmm.... looking at the Device.log file that sits alongside the RAM image file, I saw that I had an awful lot of "Bad sectors that have been replaced with zeros" and a lot of "Bad Address" reports when reads were attempted. The manual does tell you to look at both files.
Take a look at the log files yourself in the gallery below;


So looking at the log we have (with the math done for you) approximately 1.3 GB of RAM from the 9GB collected (remember Apple memory is compressed, so your image will almost always be bigger than the physical memory in the machine) that is zeros.
Thats interesting, why is that ? There is no mention of this in the MQ manual - which I think is an oversight- so unless you are a guru in Mac memory forensics, you will be scratching your head at these unexplained errors. Is my RAM really bad? Do I have bad addresses, do I need to image this again - what does it all mean ???
I suggest a short paragraph in the manual to explain why this happens to ensure that the process of RAM imaging is smooth for all users, regardless of their level of experience or training. When I was learning, if I saw huge amounts of bad sectors, I would usually reimage (which is the wrong thing to do).
My theory is that this 1.3GB is the kernal memory that MQ and the boot enviroment are using, and perhaps due to the memory architecture, these addresses are unreadable ?
It could also be that the video card or other adapters have mapped this area of RAM and hooked it for its own exclusive use - I will look into this, but for now, it is way beyond the scope of this review.
Examining the RAM Image:
So the RAM image is nicely compressed and opens fine in EnCase and proper RAM analysis tools, I could have just gone with a RAW data type at the start (which is what I recommend) so you can load it into any memory forensics tool without having to convert it from .E01.
You can always mount the .E01 as a physical disk with something like Arsenal Image Mounter (In Windows) if you wish - review is on the cards - subscribe to be notified - Arsenal, send me a licence!.
Well, thats the first "easy" test over with, a little bit of drama - but nothing that is the end of the world - it worked in the end after a bit of frustration on the RAM side of things.
So that's this machine done with, onto the next one.
15. Using the Software - Test 2 - Part 1 of 3 - Physical Image - 2012 iMac:
Ok, so lets try something a little more recent, as even that two-fingered monkey I mentioned earlier - armed with a forensic Linux distro (which is free) can boot that old 2009 iMac and image it. This time we will be imaging an iMac from 2012 which has some Filevault encryption going on.
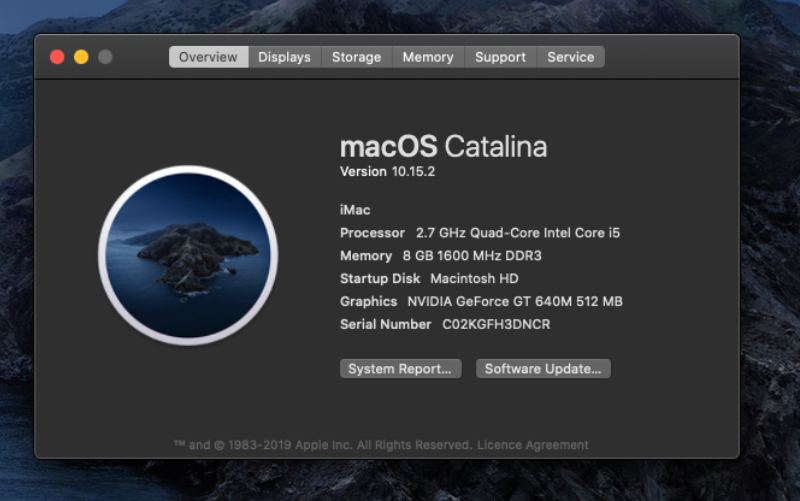
This machine has an i5 CPU, a 1TB mechanical disk drive and 8GB of RAM.
ts a full fat quad core chip which has 4 physical cores, running at 2.7Ghz which can turbo up to 3.2Ghz when required. I am such a salesman *grin*.
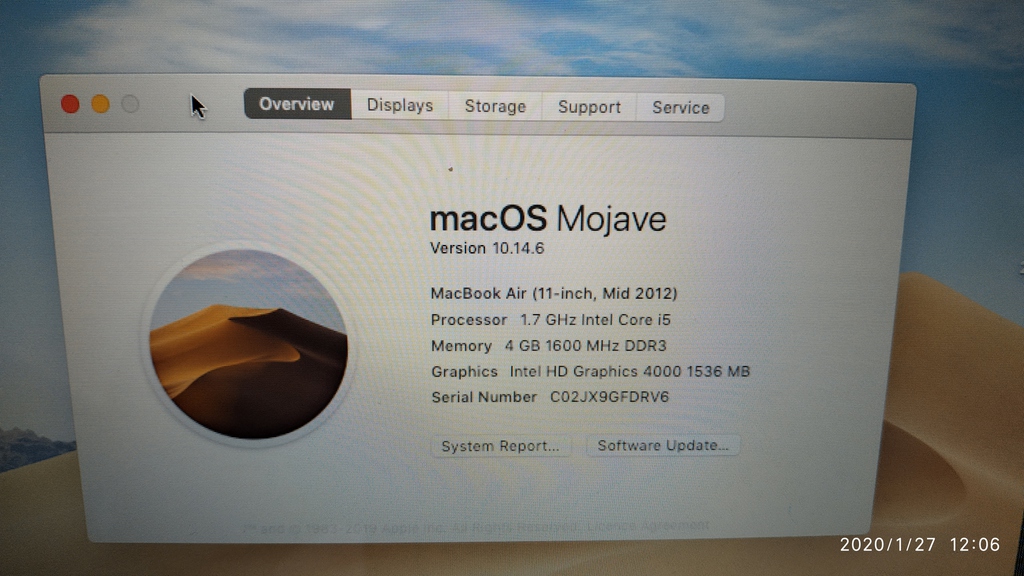
I did a clean install of Apples latest operating system 10.15.2 Catalina, applied all updates and we are ready to roll.
A quick glance at About This Mac gives us this;
 Test 2 - iMac 2012 Specification (Click to enlarge)
 Test 2 - FileVault Enabled (Click to enlarge)
As you know, this machine has a mechanical disk - but it is formatted with APFS, meaning we are going to realistically need to use the AFF4 image format. But as this machine is not blessed with a T2 chip - this is not going to be much of a challenge.
APFS sucks on mechanical disks, it was originally designed only for SSD's due to the way it does not not store data from volumes in close proximity (or linearly) to one another as traditional file systems do. It does not fragment files, but it does not store them within a certain boundary of sectors as traditional partitions on HFS or NTFS filesystems do.
You can collect APFS to an .E01 format, but its not recommended - MQ do touch on this in the manual, which is nice.
The imaging process was exactly the same as the 2009 iMac, however as this machine has FileVault enabled (whole disk encryption), I was asked to enter the Admin password for the machine in order to be able to unlock the APFS volume and mount it for imaging.
Don't confuse FileVault and APFS with T2 encryption, they are not one and the same - more on that later.
Remember, no Admin password, no image (not even over TDM).
So that was easy and drama free.
Next..
Catalina Increasing in Numbers:
You will see Catalina very soon on more and more Apple computers in the wild as users will undoubtably click "Yes" on the OS update prompt or their settings are set to "Automatically install OS updates".
From what I can see, auto upgrade is not the default option but users seem to be prompted each time they log in to update to the latest version.
So reading the MQ manual, we have to give MQ full disk access for Mojave or newer operating systems, which is done via System Preferences --> Security --> Security and Privacy --> Privacy.
You will need the password of an Administrative user to make changes here, but you should have that already, so no problem there.
You can see I have mine set up below....
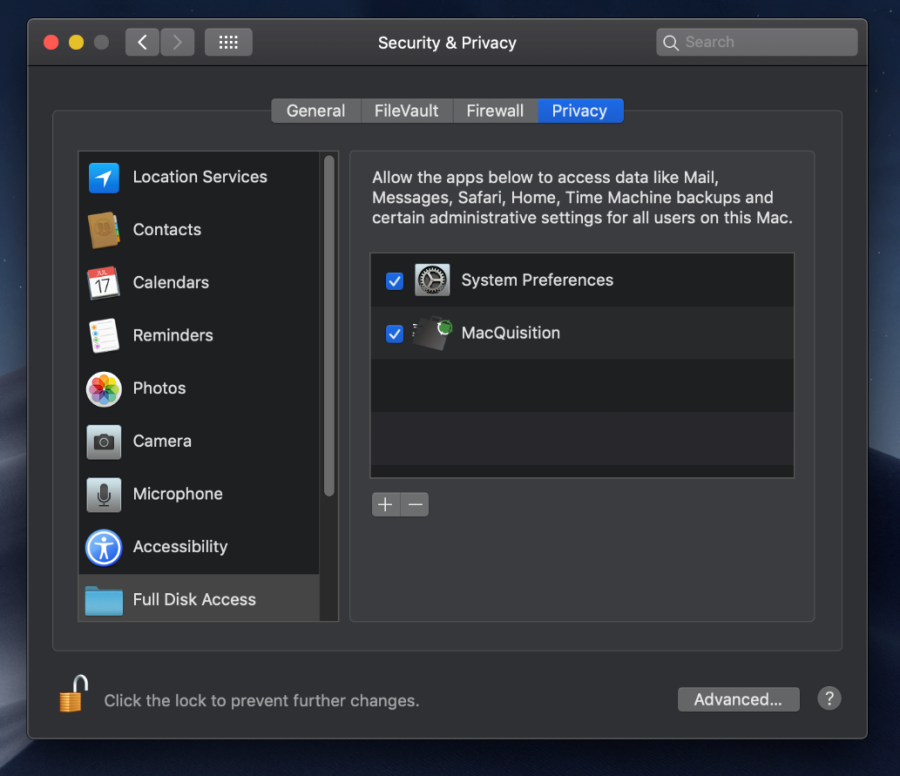 Test 2 - Enable Full Disk Access (Click to enlarge)
I'm pointing the full disk access dialogue to the MQ executable on the USB drive, I have not installed anything as we are booted into the suspect computer OS.
ProTip: You should always document what you are doing on a suspects machine that is live, dates and times are imperative - so record them!
So, now we are in business, lets launch MQ from the Application partition of the USB memory stick it comes on.....
What's this (see below), a helper tool, no worries, we have the Admin password, so we are all set....
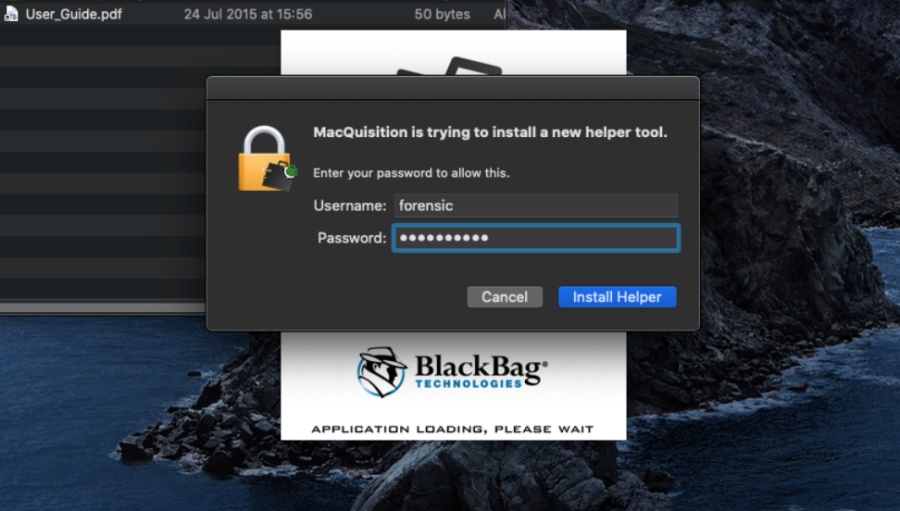 Running Live - Catalina - Installing Helper Tool
Well trying to enter the password gives you a second prompt to enter the same password, then the MQ app simply dissapears and leaves you hanging, no error messages, nothing. I also checked the manual and there is nothing in there to help you.
Did we do something wrong here......... the answer is no.
This doesn't work because, as we explored earlier Apple changed the way these helpers/extensions work in Catalina (they made changes in prior version too), but Catalina stops them dead.
MQ is not capable of running on Catalina in full fat mode, when launched from a booted operating system - as far as I can tell.
If you "Cancel" out of entering the Admin password on this prompt, you are offered the ability to run MQ in "Restricted" mode, in other words, you don't have root privileges, so to be fair, all is not lost;
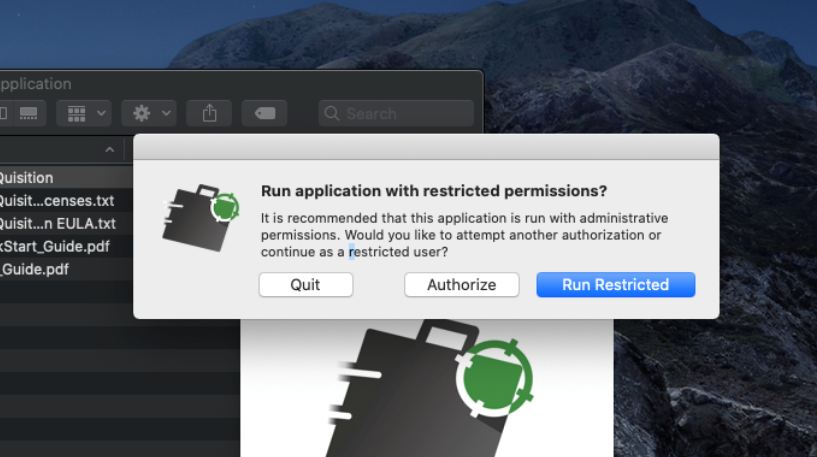 Restricted permissions - Logical Acquitision
Running in Restricted mode allowed the MQ program to launch and I did a live logical collection of files.
This is most likely going to be all you need, as we are running MQ using an Administrative account, we have semi-full access to the user created files on the disk.
Its not clear here in the manual or on-screen what is going on, so again, as this is a supposedly forensic piece of software, I want to know what it can't collect, so an update to the manual is required in my opinion.
17. Using The Software - Test 2 - Part 3 of 3 - RAM Image 2012 iMac:
So lets see if we have more luck this time around, imaging this machines RAM!
It went without a hitch, first time, that's restored a bit of confidence in RAM imaging for me, lets take a look at the log files in the gallery that follows;
Image 1 - Acquisition Log
Image 2 - Device Log (where the useful info is)
Image 3 - System Summary Log


 Wehiremac website - click to enlarge
19. Using the Software - Test 3 - Part 1 of 4 - 2019 Macbook Pro - Physical Image:
About The 2019 Macbook Pro:
Ok, I am excited, this is the T2 machine I shelled out for to get one of those fabled "Synthesised Physical Images". We are running the older Mojave 10.14 version of OSX, but thats ok, it is listed as a supported operating system on the MQ website!
Take a look at the system specs reported by System Preferences;
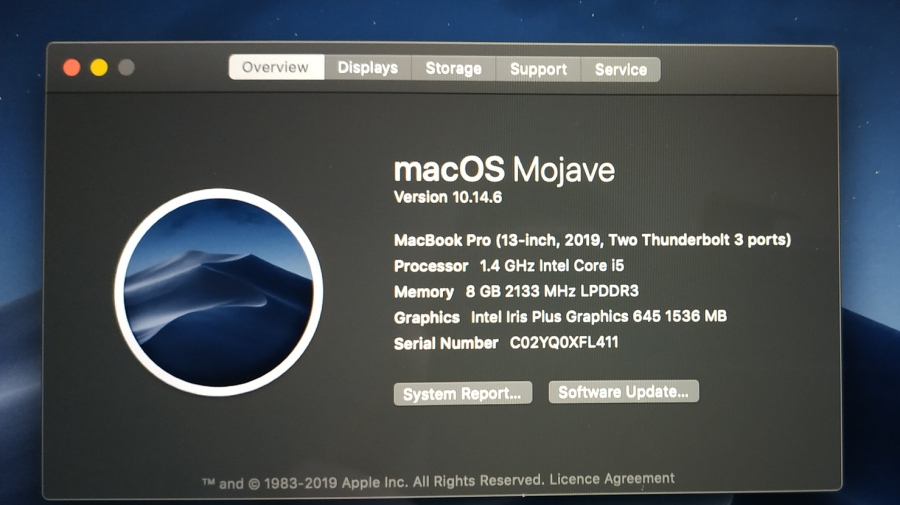 2019 Macbook Pro - About This Mac
 2019 MPB - Hardware Info
Like pig searching for truffles on a French hillside, I enthusiastically found the controller information......drum roll..... we see this !!! T2 in all its glory!
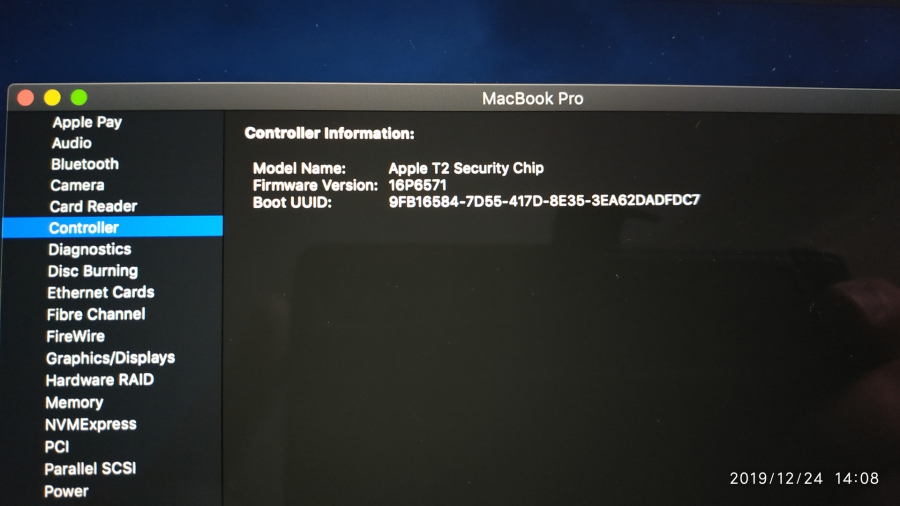 2019 MBP - Controller Info
Booting Up:
So lets boot this puppy from the MQ dongle and get imaging!
I couldn't get it to boot from the MQ dongle, no matter what version I tried, it would not boot up!
I disabled all of the restrictions on booting unsigned operating system code, but nope, it would not boot;
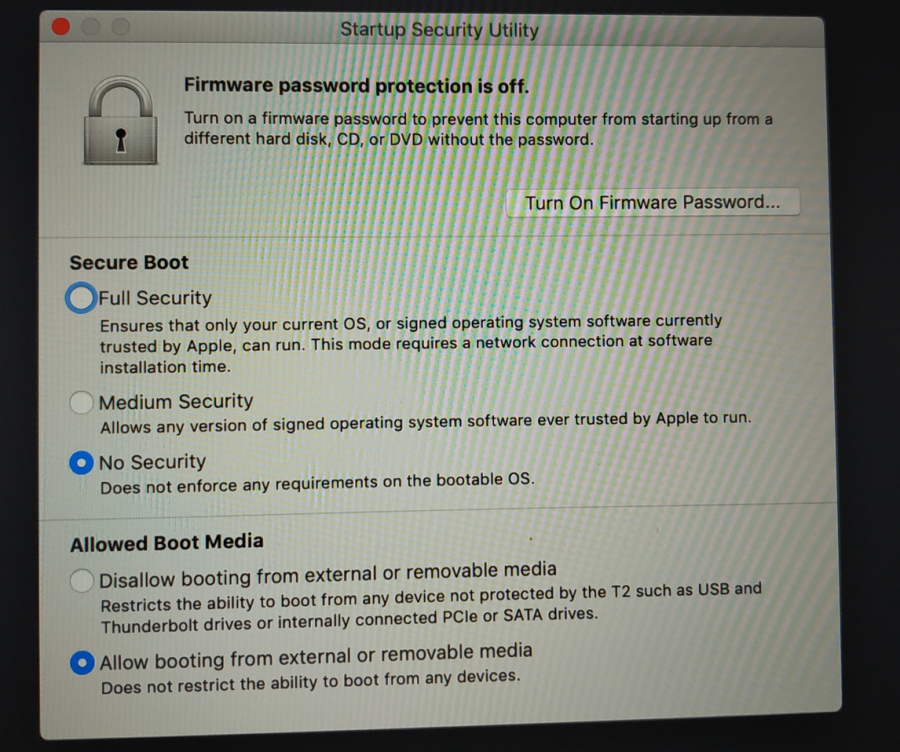 Startup Security Utility
Did I miss something here ?
No, it just does not work.
So I thought to myself, I know, I can do a live image (This is not Catalina after all), thats another option!
So I fired up the machine again, logged in as a user with Administrator privileges and launched MQ from the Application partition on the usb memory stick.
I got this;
 Mojave OS Not Supported
Eh? The manual and sales blurb states this is Mojave compatible, but obviously not THIS Mojave revision ?!.
This is a rather stark demonstration of what happens if you don't release interim updates to your product!
MQ informs me that the machine's storage is also encrypted with FileVault 2 encryption, thats good to know!
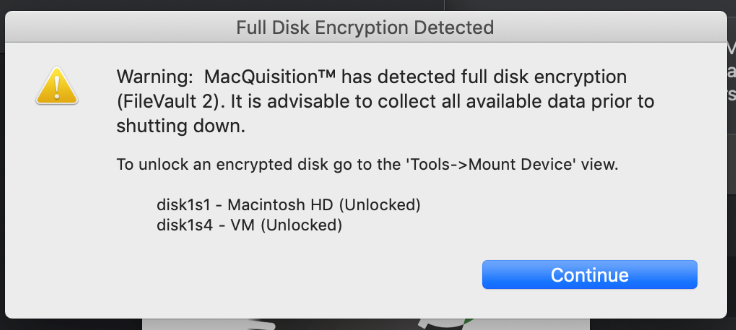 Incorrect detection of FileVault encryption (Click to enlarge)
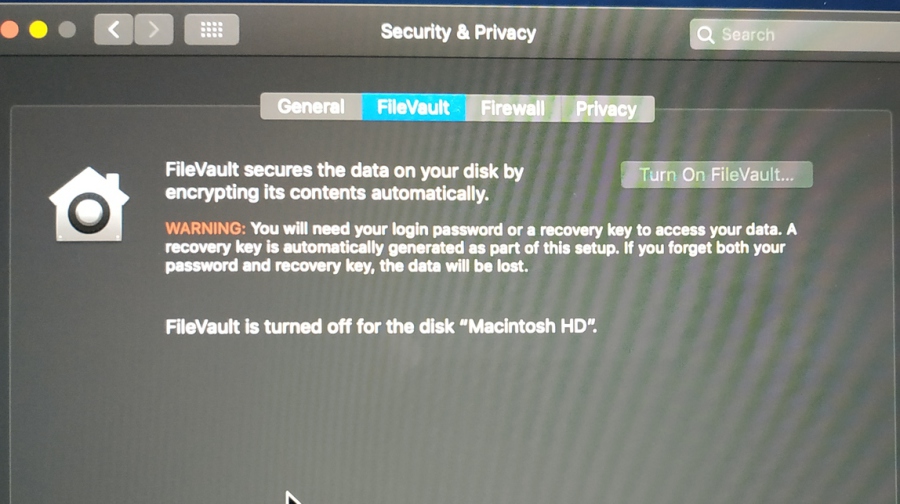
Apart from it isn't as this disk is not encrypted at all, this rental Mac has a fresh install of Mojave (10.14.6) and checking the Privacy tab shows FileVault is not active.
Is this a bug - no I don't think so, or is this one of the issues that MQ said I may encounter using an unsupported version of Mojave ? I would imagine this is the latter.
There are no "updated" versions of MQ available at the time of writing, so I guess I'm stuffed.
 File vault is actually disabled. - 2019 MBP
If you wondered how these new APFS volumes appear in Disk Utility, take a look below;
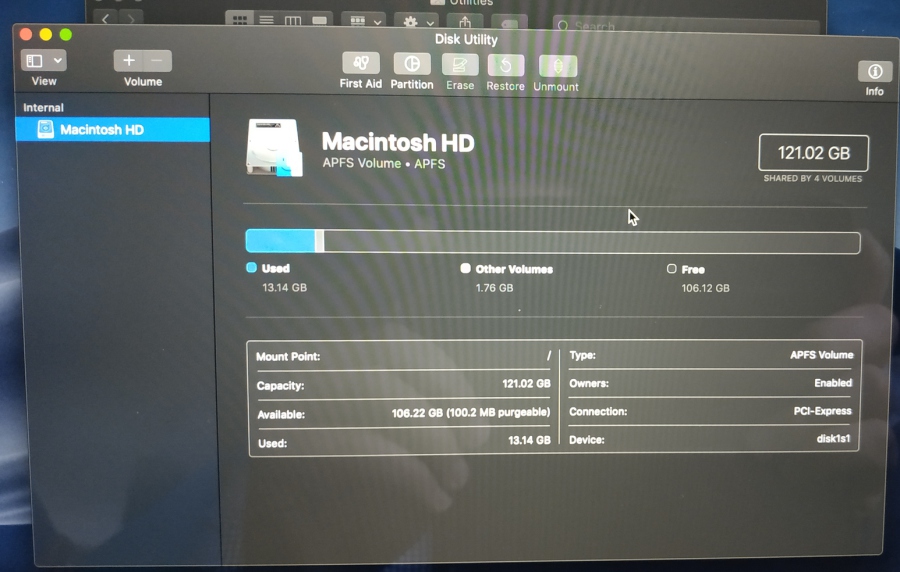 Disk Utility - 2019 Macbook Pro
20. Using the Software - Test 3 - Part 2 of 4 - 2019 Macbook Pro - Live Disk Image:
So lets see if we can do a "Live" image of the operating system APFS volume, we have not tried that yet.
Here we are booted into the suspect machines operating system and attempting a FTK Imager style "live image";
Hmmmmm that does not work either, but lets be clear here, this is an Apple restriction - BB can't code around this. Was this limitation detailed in the manual ?
21. Using the Software - Test 3 - Part 3 of 4 - 2019 Macbook Pro - Logical File Collection:
Well, I am hoping that this will work - as this machine is running Mojave - so maybe, just maybe, we can do a full-fat logical collection of files from this booted suspect machine.
We know this does not work on Catalina machine (restricted mode only there) so lets keep our fingers crossed.
So, it collected the files fine - no problems - well, other than the red "verification errors" that we saw when we did a live collection from the 2009 iMac way back at the start of the review.
Remember we parked looking at the logs, well lets have a look at those logs now
on this machine!
Heading over to the "Exceptions Log.csv" this is what we see;
 Logical collection - 2019 MBP - Exceptions (error) Log.csv
What we have here is a list of all the files that had issues during collection.
I will say this now, you will be viewing these files a lot if - like me - you have a workflow where you verify that a collection was successful and identify any files that were not copied or other errors. I would like to see a "view log" button in the next release (but if I missed it, I aplogise!).
In my collection I targeted files that were dynamically changing (such as logs, Plists and other things) those files are going to fail an MD5 hash (if you have that selected) as the file in your collection is going to differ to the one that sits on the disk (as if it is a log file, it will contain additional data added since MQ copied it).
We also see all sorts of other errors, relating to files that don't exist, so to save yourself a lot of pain, I would do two collections;
1) Custodian productivity files from the home folder - you should not get any errors or hash mismatches here - as these files are static and not open.
2) Log/system files only, this one you are not too concerned about the errors (as long as the files are collected).
If you don't do this, you will be spending a lot of time in Excel sifting through the files collected, seeing errors that for the most part can be ignored.
I think that at this point MQ's developers have forgotten again, that they are selling this product to forensic examiners not programmers, so I would like to see some sort of section in manual that deals with common errors and explains these to give examiners like you and I the information you need to determine if any errors are serious.
Just to clarify, this part of the test was done "Live", meaning I was booted into the 2019 Macbook and ran MQ from the applications partition on the MQ dongle. If you want to do this in a read only environment, on contemporary Mac's the only way to do this with MQ is TDM and Softblock.
This would give you a much tidier log file and massively reduce the amount of "errors" that would be logged.
Jon, I'm a bit lost, this is heavy going, run that all by me again please!
Boot the Macbook 2019 from the MQ dongle
Not happening - Apple Restrictions (Hardware level)
Boot the Macbook 2019 from its own OS and make a "Live" disk image via MQ
Not happening - Apple Restrictions (OS Level)
Boot the 2019 Macbook from its own drive and perform a "logical collection of files"
Mojave 10.14 - No Problems
Catalina 10.15 - Restricted Mode Only
Make sense ?
Wow, that wasted a lot of my time finding all that out, so how do we image this machine ?
The simple and only answer is TDM.
I was unable to image the 2019 Macbook via TDM as I only had the MQ dongle for a weekend and most of that time was spent imaging the "legacy" machines that actually booted into MQ from the dongle, this compounded with the fact that this was a rental machine and had to go back in 5 days - it was not going to happen.
Sorry people, I did the best I could in the time available over Christmas, - don't troll me.... :)
Update: I did manage to get the MQ dongle back for a few more days, but sadly the shiny 2019 Macbook had been returned long ago - so I will show you what it looks like to image one of the other lab rat APFS Mac's via TDM.
So, we will park this 2019 test here and I promise I will deep dive TDM later on.
How much later ? It feels like I have been reading forever :)
22. Using the Software - Test 3 - Part 4 of 4 - RAM Image - Macbook Pro 2019:
I was able to complete a RAM image of this machine, all seemed fine as before - MQ stated "Completed" and did not display any error messages in the Activity window. Another one in the bag!
Check the RAM Log File Part Trois:
So remember, we saw those "Bad Sector" messages in the older iMac and Macbook Pro RAM image logfiles, I see them here again in this 2019 MBP RAM image, take a look at the log file below;
 RAM Image device.log file - showing bad sectors.
Yes I know, this was done on Christmas Day...BB... how could you do this to me, no licence :( Maybe I changed the collection date and time in MQ to make you think it was Christmas day.... mwahahhahahaha! No I didnt.
Doing some quick maths, we can see that approxmately 20% of the RAM image contains zeros. 2GB.... what ? As the MAC uses memory compression, even though it has 8GB of physical memory, that decompresses to 9.7GB in the image file.
Well my moaning aside, it is the best you are going to get, so lets stop complaining!
In addition, the memory in most Macbooks is now integrated (surface mounted) onto the logic board these days, so the old-school route of removing the RAM and connecting it to something else to read it is consigned to history.
Thanks Apple!
23. Say Hello To My Lil' Friend - TDM:
So as you can see, the only way you are going to be imaging internal disks on contemporary T2 (post 2018/19) Apple computers is via TDM.
The next machine from the fleet is a 2012 Macbook Air, running Mojave, with just 4GB or RAM and a wee 64GB SSD. The disk was formatted with APFS and FileVault encryption, so other then the "unlock encrypted container" button clicks, the process is essentially the same as the other machines imaged previously.
The Write Protection Crossroads:
So you are now at a fork in the road, are you going to READ ONLY town (if you are law enforcement) or are you going to WRITEABLE town (if you are a corporate) or are you somewhere in between?
If you are going to READ ONLY town, then you need to make sure that;
a) You boot YOUR imaging machine into its operating system (dont boot from the dongle).
- But not if its Catalina, as MQ does not work with that - older versions of Mojave are fine (not the current 10.14.6).
b) You ensure that you have BB's Softblock write blocking software running on your imaging machine.
c) You connect the suspect machine to your imaging machine and put the suspect machine into TDM mode, then mount the TDM disk in the suspect machine using Softblock - mounting it read only.
d) Plug in and mount your destination disk.
d) Use MQ to image the suspect disk to your destination disk.
In our test, we are off to WRITABLE town, so off we go;
The first thing you need to do is get the target machine into TDM (hold down option and hold "T") you will see a screen similar to this one.
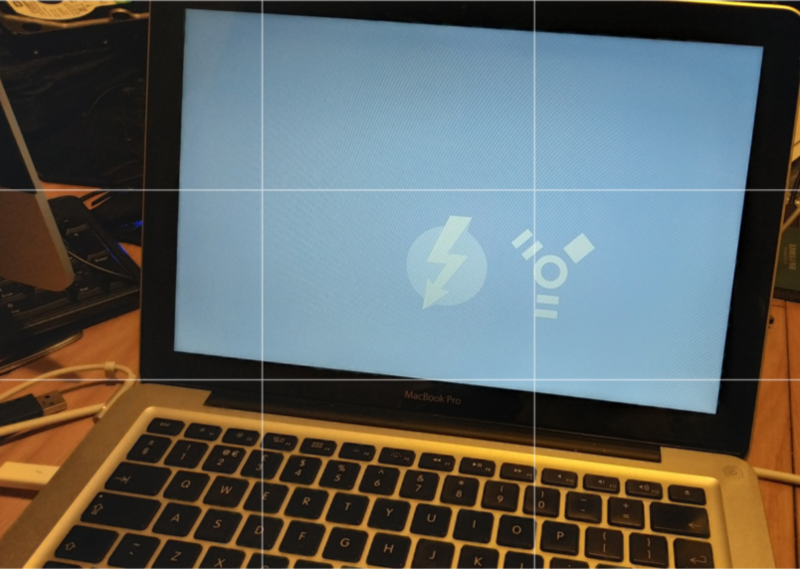


As this Mac is quite old, it has both Thunderbolt (TB) and Firewire symbols, newer machines will only have one symbol. There are some machines that show a USB TB icon, those which only have USB C ports, so watch out for those!
ProTip: USBC and Thunderbolt 3 may look the same (they are pin compatible) but Thunderbolt is a different protocol - so keep that in mind when choosing cables).
Lets step through the gallery above;
1st Picture - Your suspect machine needs to look like this, ready to accept a connection from your imaging machine.
2nd Picture - This is what your imaging machine should look like when you turn it on and use the option key to show the boot menu, whatever you do at this point, don't click the orange icon, that will boot the suspect machine in a writable state (it won't be read only).
Its worth noting that it is sometimes a pain to get the suspect machine to show up in the boot menu of your imaging machine. If it refuses to show up, power cycle everything and try again. Note there is no destination disk attached at this moment in time - we will do that later. This is nothing to do with MQ as at this point, you are in the Apple boot loader - MQ is not loaded.
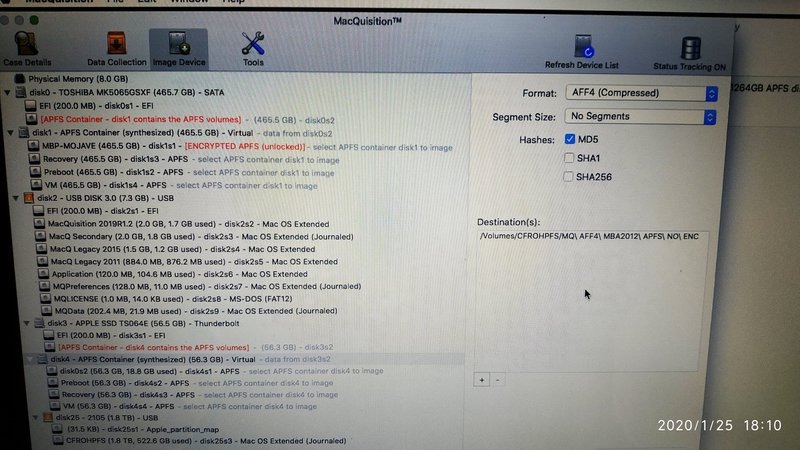
3rd Picture - We are booted into the MQ dongle here and as we can see we have a lot of disks here, understanding what you are looking at here is key to making sure you don't choose the wrong disk.
Lets break it down;
Physical Memory - we all know that one.
Disk 0 - Toshiba 500GB Hard Drive
This is the internal drive of my imaging machine, the give away here is that it is on the SATA bus. We can see this has two partitions, an EFI firmware partition and an APFS container.
Disk 1 - APFS Container (synthesised)
This disk does not exist, its not a physical disk (it should have a different icon in my opinon). This is a virtual disk (not to be confused with VHD's, VMDK's or anything like that) this is something that logically represents the APFS conainer that is on Disk 0.
To me this is very clear, I like it.
Disk 2 - USB Disk 3.0 7.3GB - Thats the MQ dongle.
Disk 3 - Apple SSD 56.5GB Thunderbolt
This is the disk in the suspect MAC, its nicely labelled Thunderbolt - a Orange icon here to match the Apple boot screen colours would have been a better way to identify this in my opinion.
So that's it, I selected the DISK 1, was prompted for the volume password and then the image started - and successfully completed with no problems.
Easy peasy, lemon squeezy - one Mac imaged over Thunderbolt - I just wish I had this information before I started.
So that's enough of disk and RAM imaging, lets go back and examine the Logical Data/File Collection function of MQ that I have not fully tested out yet.
24. Using The Software - Test 4 - Part 1 of 1 - Macbook Air - 2012 - Application Parsing
So this test is going to simulate what you can pull out of a well used Apple Mac computer, we are done with disk imaging and RAM imaging, I have nothing else to show you in those departments.
With a bit of forward planning and understanding of the Apple (not BB) limitations and you will be in for a smooth ride with MQ.
About This Machine:
I've actually got more Apple computers that I know what to do with now, but hey, I really wanted to give MQ a good test, so meet the latest addition to my fleet of Apple test machines a teeny tiny 2012 Macbook Air;
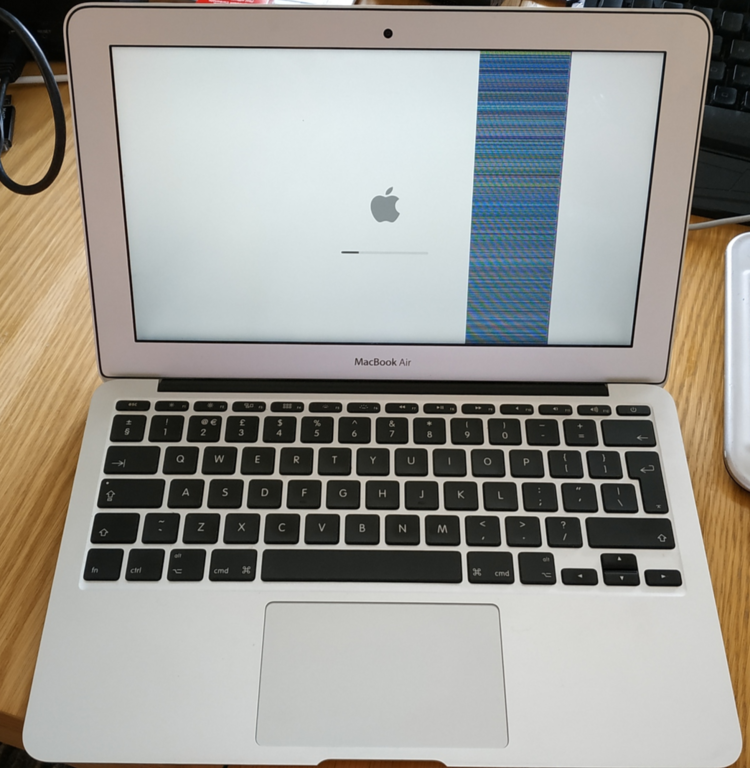

I can see why people like these things, it is soooooo light and thin - just like me!
This particular model is running a fresh install of Mojave, which I have heavily used to simulate regular user activity. We have mailboxes with gigs and gigs of messages, chat histories that go back years - rounded off with heavy usage of productivity applications - making good test data.
The sooner someone makes the Mac equivalent of IEF, where I can get all of my user activity into a few spreadsheets - I will be a happy man.
As we know, this little beastie only has 4GB RAM (not upgradeable) and a 64GB SSD (upgradeable with an Apple 17 pin to standard M2 SATA adapter), so its pretty modest and it was cheap too (around £130/$165/€150) from Ebay.
This machine is ideal for taking into the field and using to acquire other Apple computers, it has Thunderbolt 2 (x1) and USB 3 (x2) ports so can take care of all of your TDM acquisitions you would want to to (providing you have a TB 2 to 3 adapter for the newest Apple USBC only machines).
Through the efficiency of OSX and the sheer speed that tiny SSD pages RAM to disk, this machine is no slouch when using MQ.
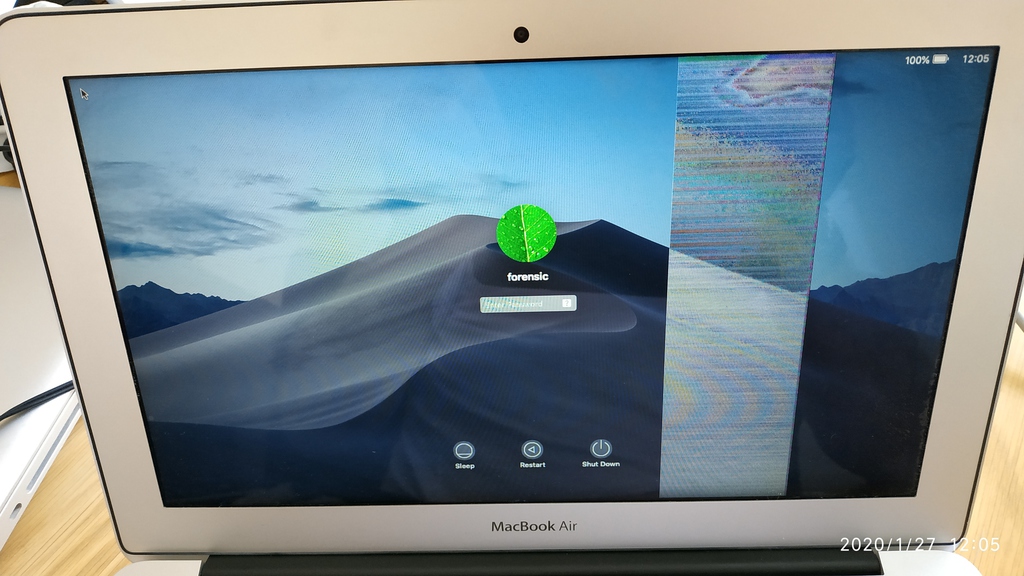
You may have noticed that the screen has a vertical band down it, no I'm not running an Atari 2600 emulator and playing Yars Revenge.... this machine has a faulty LCD cable (it works fine on an external display). I have one on order for £8/$10/€12) and its about a 30 minute job to replace). After passing a 24 hour burn in test, it joins my fleet of test machines!
Whats on this Machine - Finder View
Ok, so lets have a look at the mainstream programs I have installed on this machine, take a look at the gallery below to get a feel for the programs that we hope MQ will examine;

All the usual Apple programs are here such as Mail, Messages, Stickies, Facetime, I have set those all up and done a bit of usage to populate them. But those are not what I am interested in - I am testing non-Apple application support here.
Only tree huggers, environment campaigners and non-achievers use the built in Apple applications.
As you can see, we have a mix of some ubiquitous PC applications and some not so. which are heavily used in my experience by both corporate and home users of Apple products:
Microsoft Excel, Word, Powerpoint, OneNote - for our productivity applications.
Microsoft Outlook and Thunderbird - onboard to deal with Email.
Viber, WhatsApp and Telegram - to take care of Instant messaging.
Libre Office, Apache's Open Office and WPS Office to take care of the free office suites.
Firefox, Chrome, Chromium and Opera taking care of internet browsers.
Finally, we have some cloud storage, One Drive and Drop Box.
Thats quite a lot of programs , 18 in total if my maths is correct, no machine is ever going to realistically have all of these installed, but I would at least expect to see Microsoft Office at the bare minimum.
Take a look for yourself at the detected Apps in the gallery below;

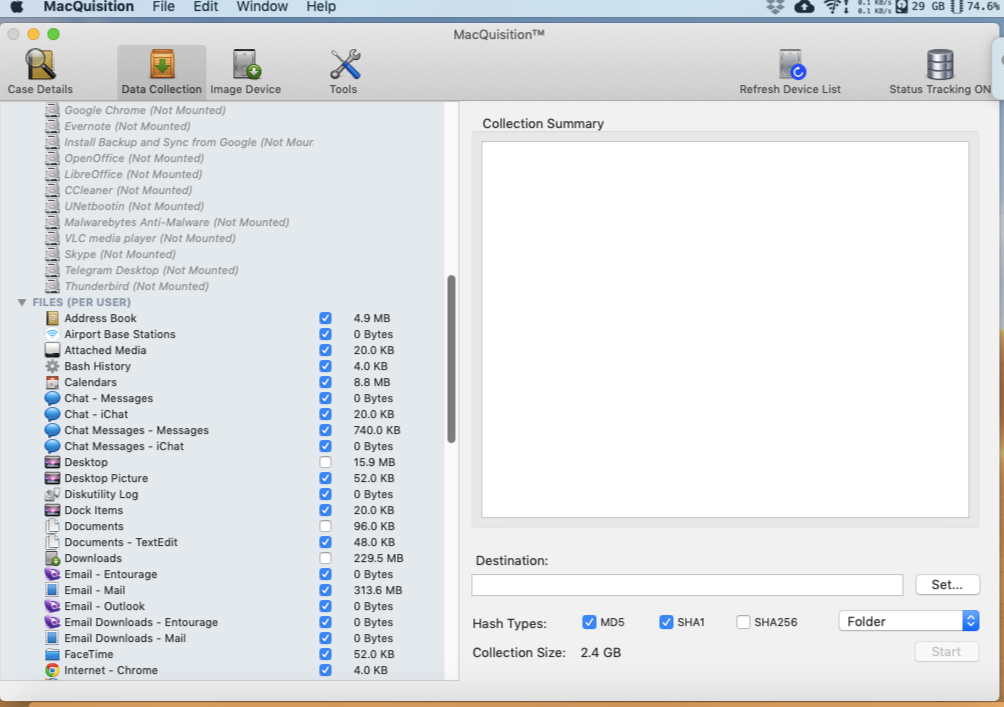

2 out of 18 detected.
The 2 MQ detected were Chrome and Firefox, don't forget MQ did warn me that it was not compatible with this version of Mojave - so perhaps that is why certain apps were not detected. If this Mojave incompatibility is the issue, customers have paid an awful lot of money for a program that can't collect data from a previous gen operating system.
Outlook is listed (and so is its ancient sibling Entourage) as being logically collectable, but it is not detected - so was not collected.
I had Recon Imager kicking around, so ran this over the same machine using its similar "loose/logical file collection mode" and I was festooned with the tens of thousands of E-Mails that resided in the data files associated with Outlook 365 on this machine. So the data is there, its just for some reason MQ can't extract it.
I would clarify this with BB at the time of purchase, again, you don't want to buy something that can't automatically collect the bread and butter of your E-Discovery collections.
You could memorise where all of these common-as-muck applications store their data files, and add them in manually to your collection workflow, but that would be a chore and would not scale well when you are doing large collections.
You could argue that MQ is an imaging tool and this feature is a secondary feature. I would argue that this is a premium product and I expect all features secondary or not, to be reasonably up to date.
So like a broken record, I go back to the fact that this product has not been updated in a long long time and such an amazing selling point (you don't need to image the whole machine to collect user created files) - has been neglected to the point of making it obsolete. That is such a shame.
To ram this point home, as an example, Office 365 (Mac edition) was released way back in late November 2018, so it is not exactly new.
25. Gotcha! Accidentally Booting the Suspect Machine:
So remember I had a rant earlier about the fact that MQ, under certain conditions, will allow the suspect machine to merrily boot into its OS, well I'm not done with that yet;
We all do it, we get frustrated when something does not work - its hard to keep a lid on things, especially when you may be under pressure from time constraints.
This warning applies to my favourite type of examiner, the law enforcement kind, the ones that are under resourced, over worked and don't get as many cool toys as the corporate boys as a rule.
They are also the ones that experience cases being thrown out of court on a technicality, it does not matter if you can explain something like this, sometimes counsel just does not want to take the risk and bang - a bad person could be walking the streets again.
That may sounds like a bit of an over dramatisation, but here in the UK, I have experienced that happen during my service in law-enforcement and its not pleasant feeling.
This little MQ icon is not your friend;
 Not your friend if you are LE
If you do get to a point where you are frustrated that your MQ dongle did not boot your machine when you chose the correct version from the 4 available - don't start to randomly try the other versions of MQ on the dongle, well at least not this one.
It will boot straight into the Apple operating system on the target computers hard drive, no nice "no entry sign" as the manual mentions - just boom, the Apple logo followed by the login prompt. This is mentioned in the MQ manual but only in passing.
Programmer hat on, there is most likely no way for MQ to prevent the machine from doing this, under these circumstances - they are at the mercy of Apple boot loader code, Cellbrite - please put that chart in the user manual and save a rookie examiner having to write a report as to why his actions changed 19 million time stamps and 3 million log files on this machine whilst it was in Police custody.
From my limited testing (on 5 different Intel Mac's) 2009 to 2019, this is the behaviour I saw. Obviously your mileage may vary, do your own testing and don't take this as gospel! This is a review website, not a tutorial on how to use MQ in a production environment.
By far the most "compatible" for me was the MQ Secondary option, this worked a charm on almost every machine I used.
I put how MQ behaved when I was using it in the table below, remember this table shows you what happens when you boot the incorrect version of MQ for the machine you are imaging;
| MQ Version | Common Behaviour | Other Behaviour |
| 2019R1.2 | Hangs, does not load | Shows no entry sign & halts |
| MQ Secondary | Loads as normal | Hangs |
| 2015 Legacy | Boots to Suspect Desktop | None |
| 2011 | Hangs does not load |
None |
Ok, so that wraps this section up - lets look at some other issues in the Bugs and Stability section.
26. Stability & Bugs
So in this section we deal with things that went wrong for me during testing, this section can be sometimes a bit nerdy and boring, so if that is not your thing, please skip ahead to the next section.
Don't Touch That Menu - Revisited
Remember I said MQ crashed when I stupidly clicked that Apple menu and then chose "About This Mac" whilst imaging ?
This happens even when you are not imaging anything (see screenshots below);
 Don't mess with this menu !!!
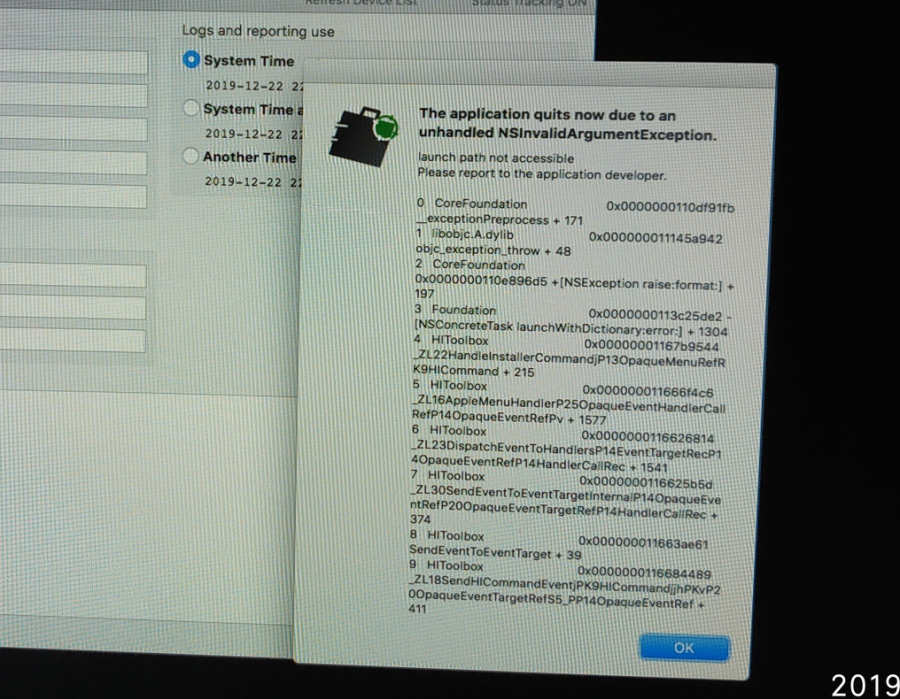 Oh dear!
So being the inquisitive type, I thought I would see if this bug exists in the other builds of MQ on the USB dongle.
2019R1.2 Version - This one does not boot for me so I cannot test.
MacQ Secondary Version - Yep
Legacy 2015 Version - This has a different issue, whilst it does not crash when you click "About this Mac", once you have done that, the menu options now no longer function.
I don't think BB can do much about this, as long as they put this in the manual, I will be a happy bunny.
Don't Change Your Mind!
It crashed again, check out the screenshot below;
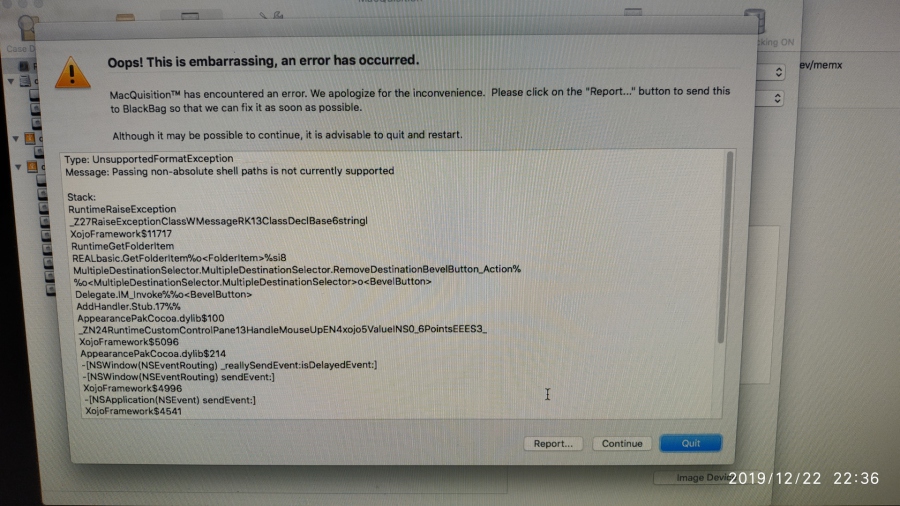 I broke it again!
So how did I break it this time?
Well, the code in the Tools section of the program, relating to the adding and removing of destination locations (where you want to write your image to) has a GUI logic bug.
Here are the exact steps I took so that BB can replicate this and fix this.
1) I start by clicking the "+" sign to add a new destination folder for my image.
2) I browsed to my destination volume (a USB disk in this example).
3) As I navigated around my USB destination disk, finding the folder I created for the image to sit in, I remember that I have not yet mounted this volume as writeable. Ooops, my bad.
4) I cancel out of the "Select Destination" dialogue box and am returned to the "Image Device" screen and nothing is listed as a destination (as expected).
5.) I then go and mount my destination disk as writable, I come back and use the "+" sign to add in the destination folder...that works as intended... all good so far.
When we are returned to the "Image Device" screen, we can see that we have a strange "blank" line as a destination (see below - bottom right);
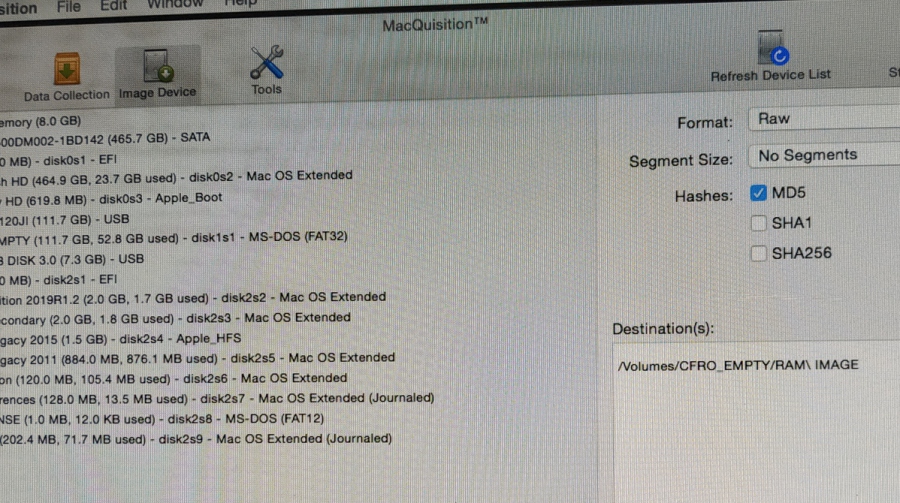 Blank destination line
When we try and delete the empty destination line (using the minus (-) button, BOOM!, MQ crashes) - see screenshot at beginning of this section.
I'm not really trying hard here to find bugs, I just document things that go wrong in my testing.